Setting Up A Raspberry Pi for Data Engineering and Virtualization Projects
Introduction
Building your own Raspberry Pi server is an excellent way to gain practical experience with Linux systems, networking, and server administration. This hands-on project will teach you valuable skills applicable to larger-scale environments while giving you a reliable platform for personal projects. Whether you’re a student, hobbyist, or IT professional looking to expand your knowledge, this guide will walk you through creating a robust, secure server environment from scratch.
This guide provides step-by-step instructions and explanations for configuring a Raspberry Pi 4 to learn about hardware, servers, containerization, and self-hosting principles. To be clear, this guide is not exhaustive, and I’m sure there were areas where I made mistakes or misunderstood topics. I’m encouraging you to let me know if you find any issues! You can submit feedback via GitHub on the guide on my website.
The primary purpose of this guide is to help me reference what I previously did and understand my thought process when I need to troubleshoot or recreate something. The secondary purpose is to provide a helpful resource for others in similar situations, as I struggled to find the comprehensive document I needed when starting this journey.
Eventually, I’d like to set up an actual server cluster and self-host some interesting, more resource-intensive applications. Before making that kind of commitment, I wanted to learn the basics and see if this was something I would enjoy—the good news is that I learned I do. The great news is that Raspberry Pi makes their hardware very affordable and easy to purchase. Here’s the official webpage for the exact computer I bought.
I purchased the 8GB Raspberry Pi 4 model. The price difference isn’t that significant compared to the lesser 2GB and 4GB models, but the performance improvement is substantial. Additionally, because I’m planning to host and experiment with CI/CD, I also bought a case and cooling fan to help with longevity. All in, the base price (including the power supply and HDMI cable) is $107.30 before taxes, shipping, and other fees.
Below you’ll find an outline that provides a general idea of what we’ll be covering and in what order. At the start of each section, I’ll include a key terms list that covers the fundamental concepts important for that topic.
Guide Outline
1. Introduction
- Purpose and scope of the guide
- What you’ll learn and build
- Prerequisites and assumptions
2. Initial Setup
- Hardware Requirements
- Raspberry Pi 4 specifications
- Storage devices (Thumbdrive, SSD, microSD cards)
- Accessories and peripherals (Keyboard, monitor, etc.)
- Image Requirements
- Selecting and downloading Ubuntu Server LTS
- Using Raspberry Pi Imager
- Initial configuration options
- Getting Started
- The physical setup of the Raspberry Pi
- What to expect during first boot
3. Linux Server Basics
- First Boot Process
- Connection and startup
- Understanding initialization
- Service Management with systemd
- Understanding systemd units and targets
- Basic service commands
- Understanding Your Home Directory
- Shell configuration files
- Hidden application directories
- The Root Filesystem
- Filesystem Hierarchy Standard (FHS)
- Key directories and their purposes
- User and Group Permissions
- Basic permission concepts
- chmod and chown usage
- Understanding advanced permissions
4. Networking Basics
- Computer Networking Concepts
- OSI and TCP/IP models
- Key networking protocols
- Network Connections
- Wired vs wireless configurations
- Understanding IP addressing
- Ubuntu Server Networking Tools
- Testing connectivity
- Viewing network statistics
- systemd-networkd
- Configuration file structure
- Wired and wireless setup
- Converting Netplan to networkd
- Why and how to transition
- Troubleshooting network issues
- Advanced Networking
- Subnets and routing
- Security considerations
5. SSH (Secure Shell)
- SSH Basics
- Client vs server setup
- Key-based authentication
- Key-Based Authentication
- Types of SSH key encryption
- Generating keys
- Installing the public key
- Server-Side SSH Configuration
- Host keys and security options
- Optimizing for security
- Client-Side Configuration
- Setting up SSH config
- Managing known hosts
- Additional Security Measures
- Firewall configuration with UFW
- Intrusion prevention with Fail2Ban
- Secure File Transfers
- Using SCP (Secure Copy Protocol)
- Using rsync for efficient transfers
6. Remote Development with VS Code
- Setting Up VS Code Remote SSH
- Managing Remote Projects
- Debugging and Terminal Integration
7. Partitions
- Partitioning Basics
- Understanding partition tables and types
- Filesystem options and considerations
- Partitioning Tools
- Using parted and other utilities
- Partitioning for Backups
- Setting up microSD cards
- Mount points and fstab configuration
- Partitioning your SSD
- Boot and root partitions
- Formatting and preparation
- Advanced Partitioning
- Monitoring usage
- Resizing partitions
8. Backups and Basic Automation
- Backup Basics
- Directory structure and permissions
- Configuration Files Backup
- Using rsync for system configurations
- Remote transfers of backups
- Restoring from Backup
- Creating restoration scripts
- Testing recovery procedures
- Automating Backups with Crontab
- Creating a schedule for scripts
- Verifying the schedule
9. Changing Your Boot Media Device
- Boot Configuration Transition
- Flashing OS to new media
- Proper shutdown procedures
- Physically changing boot devices
- Testing the new boot configuration
- Restoring configurations
10. Monitoring and Maintenance
- Monitoring Basics
smartmon,vcgencmd- Resolving SSD health issues
- Security Updates and Patching
- Preventive Measures
- System patching schedules
- Log Management
- Log basics
- Management tools and strategy
Initial Setup
Key Terms
Hardware Terminology:
- Raspberry Pi 4: A single-board computer developed by the Raspberry Pi Foundation, featuring a Broadcom BCM2711 processor, various RAM options, USB 3.0 ports, and GPIO pins.
- SoC (System on Chip): An integrated circuit that combines the components of a computer or electronic system into a single chip.
- GPIO (General Purpose Input/Output): Programmable pins on the Raspberry Pi that allow interaction with physical components and sensors.
- SSD (Solid State Drive): Storage device using flash memory that offers faster access times and better reliability than traditional hard drives.
- Boot Media: The storage device containing the operating system files from which the computer starts.
- USB 3.0: A USB standard offering data transfer speeds up to 5 Gbps, significantly faster than previous versions.
- microSD Card: A small form factor removable flash memory card used as storage media.
- eMMC (embedded MultiMediaCard): An integrated flash storage solution often found in compact devices.
Software and Imaging Terminology:
- Ubuntu Server LTS: A long-term support version of Ubuntu’s server operating system, maintaining security updates for 5 years.
- Raspberry Pi Imager: Official software tool for flashing operating system images to SD cards and other storage devices.
- Image: A file containing the complete contents and structure of a storage device or filesystem.
- Flashing: The process of writing an operating system image to a storage device.
- Headless Setup: Configuring a device to operate without a monitor, keyboard, or mouse.
- Public-key Authentication: An authentication method using cryptographic key pairs instead of passwords.
First Boot Terminology:
- Cloud-Init: A utility used by Ubuntu Server to handle early initialization when a server instance boots for the first time.
- First Boot Experience: The initial setup process that occurs the first time an operating system is booted.
- Initial RAM Disk (initrd): A temporary root filesystem loaded into memory during the boot process.
- Bootloader: Software that loads the operating system kernel into memory.
Hardware Requirements
This section provides basic setup instructions, so you’ll have the same tools I do and can follow along with this guide step-by-step.
- Raspberry Pi 4 8GB
- Micro HDMI to HDMI cord (for direct access)
- Protective case
- Cooling fan
- Appropriate Power Supply (use an officially suggested one)
- Keyboard (connected via USB for direct access)
- Monitor (for direct access)
- 1TB Samsung T7 SSD (connected via USB for boot media/core memory)
- 64GB Generic Flash Drive (used as the boot media when partitioning the SSD)
- Amazon Basics 128GB microSD card (or other microSD cards for backups media)
- SSH-capable devices for headless access
- I’m using a MacBook Air
- I prefer macOS and Terminal for personal development, because I use Windows at my day job
Image Requirements
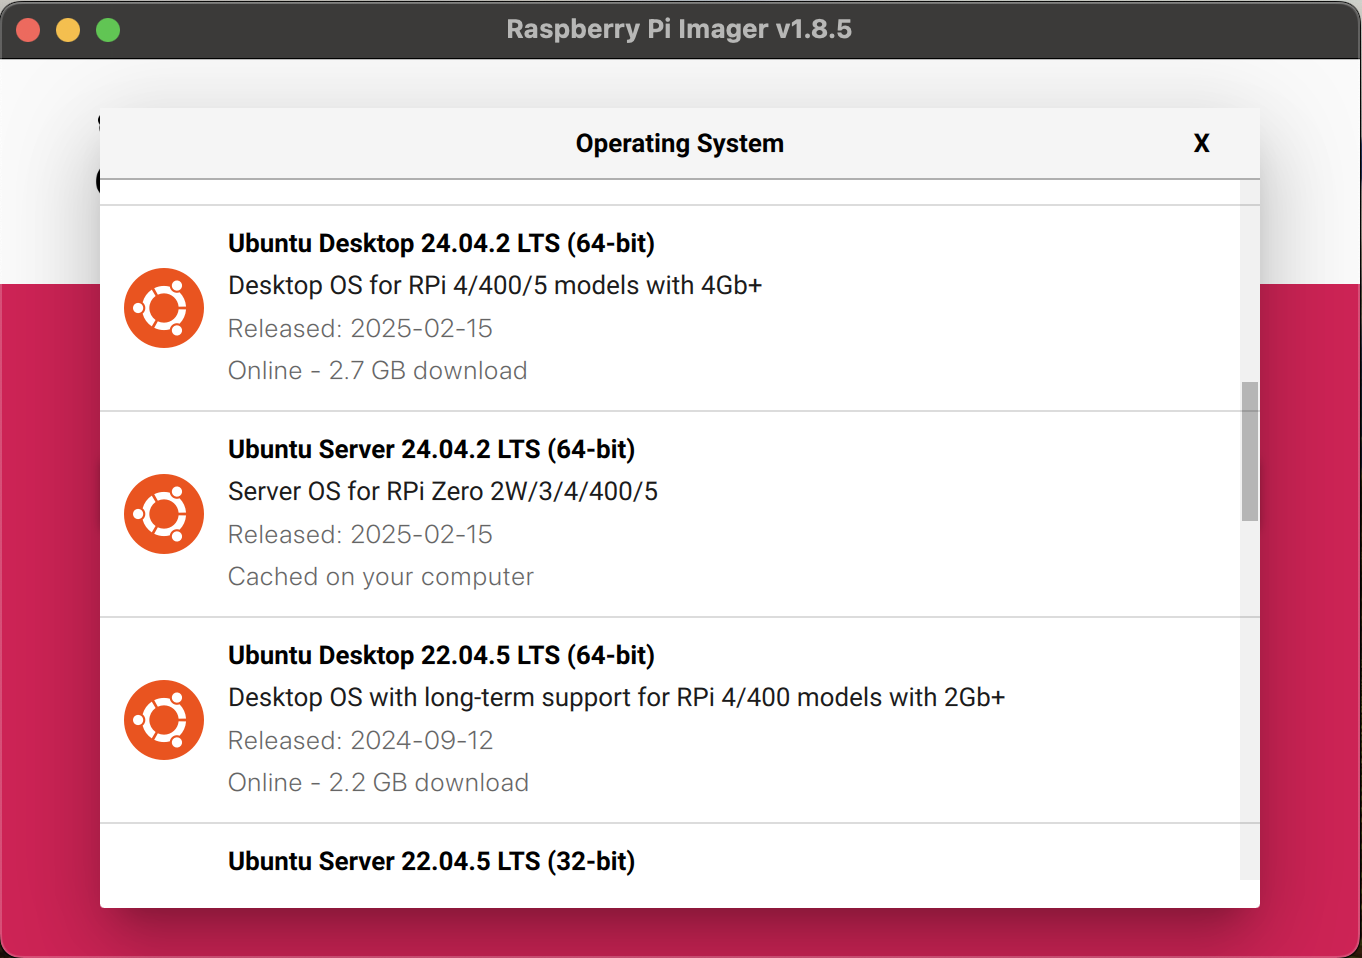
Once you have your hardware ready, you can begin setting up the software. I’m using Ubuntu Server LTS because it’s a stable version of Linux intended for headless, server environments. LTS means long-term support, so unlike the more frequently updated versions, these OS versions are supported for 5 years. Additionally, you’ll want to use public-key authentication for better security purposes, but more on that in the SSH Section.
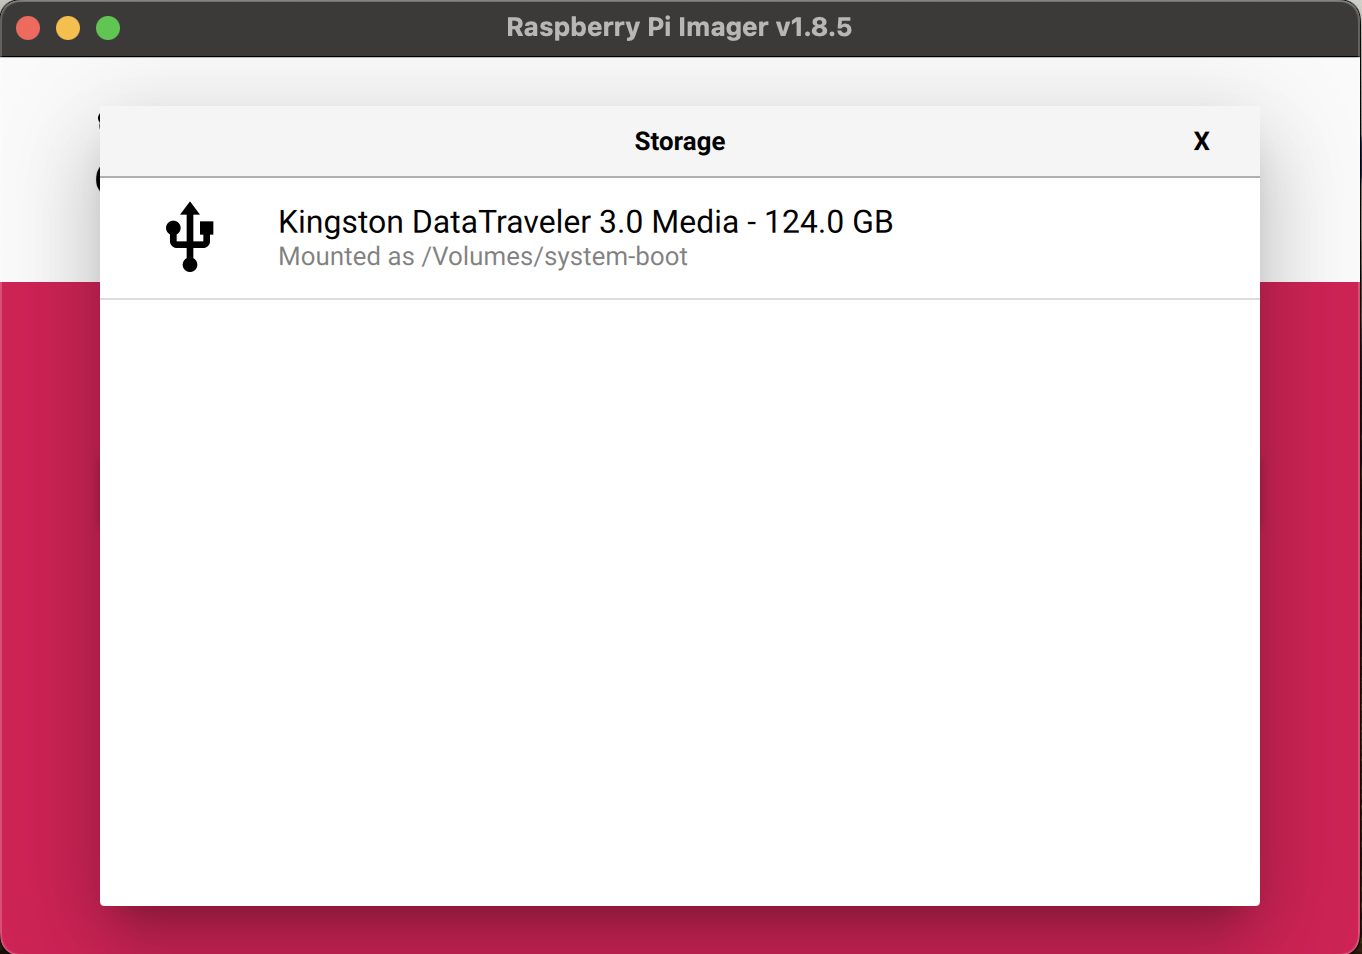
Have your Thumb Drive ready and able to connect to either a laptop or desktop (whichever you plan to use with SSH)
Download Raspberry Pi Imager from the official website
Run the Imager and configure your installation of the most recent Ubuntu Server LTS image
- Select your Raspberry Pi device
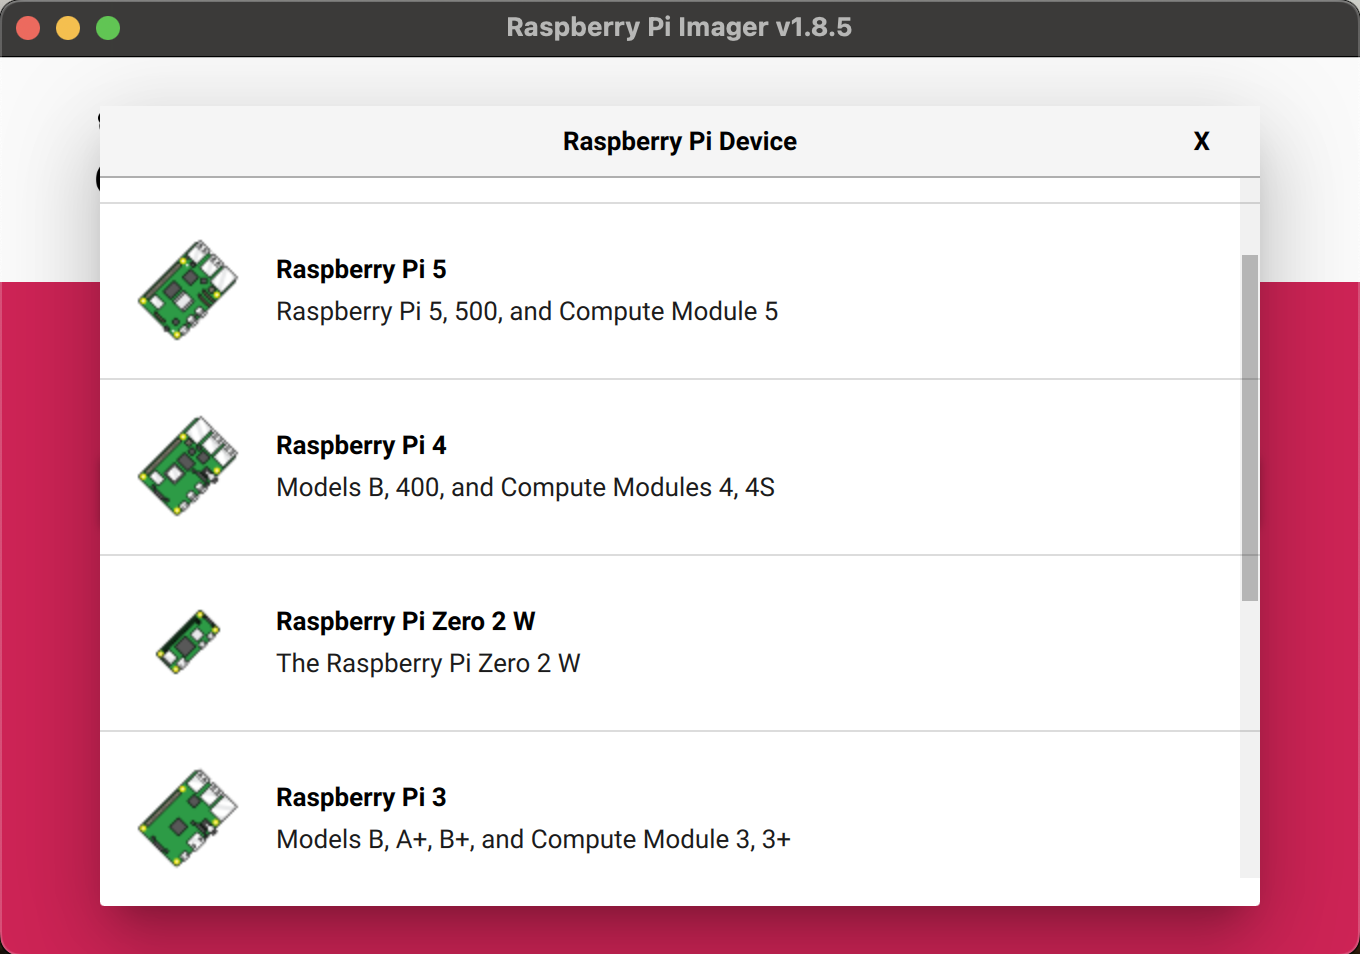
- Select the OS Image you want to flash
- Select the media storage device for the image
- Configure settings
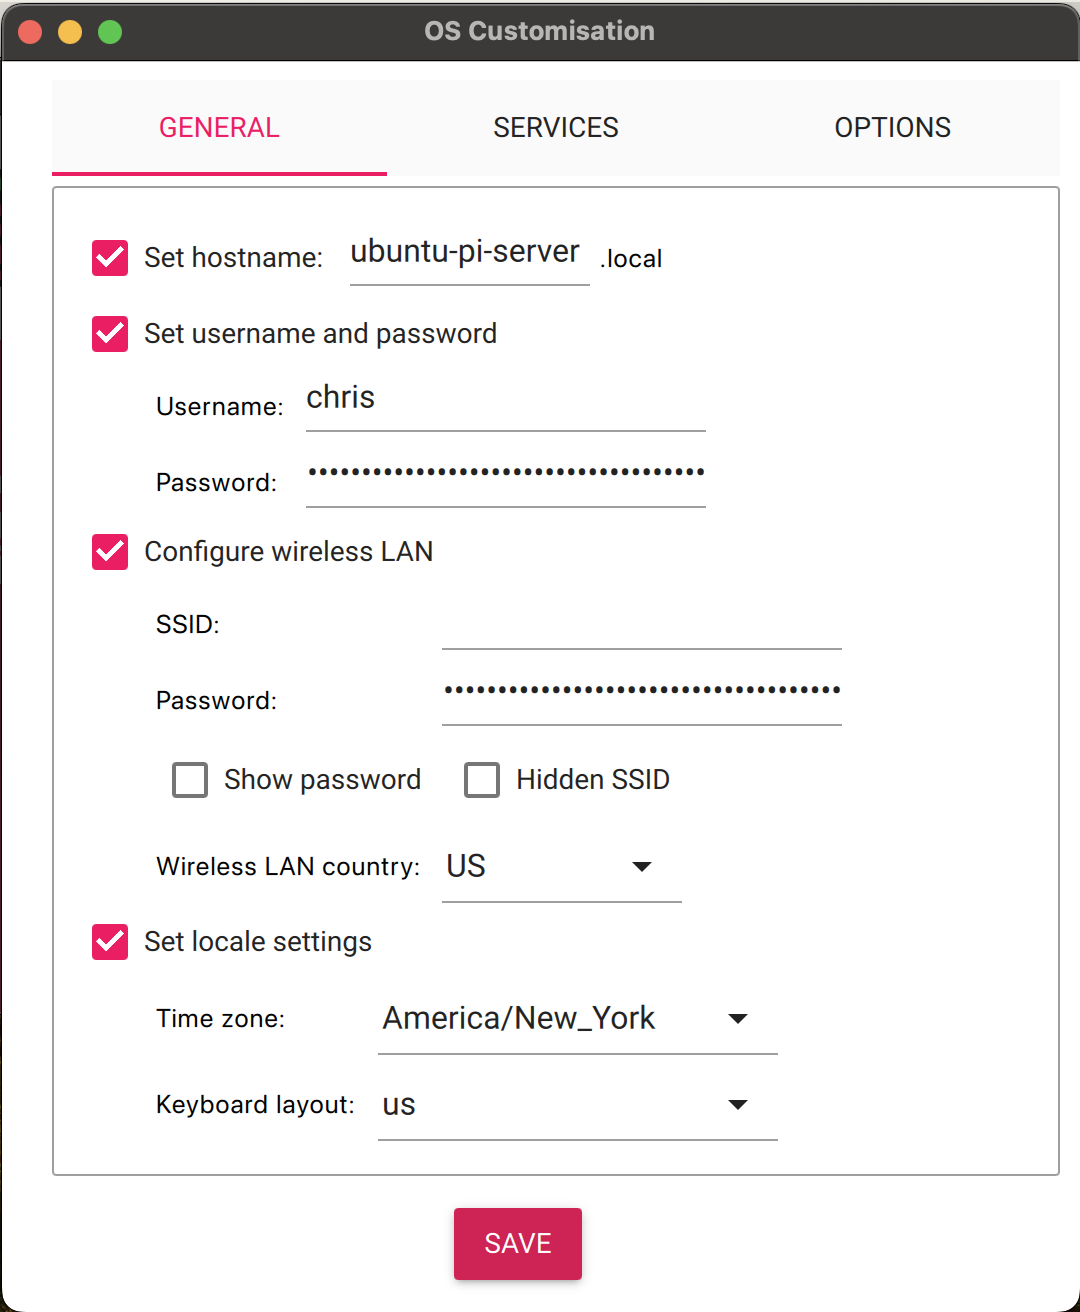 Here, you’ll configure your primary user ID and password; network connection; locale and timezone; and your hostname (the nickname your computer remembers the IP address as).
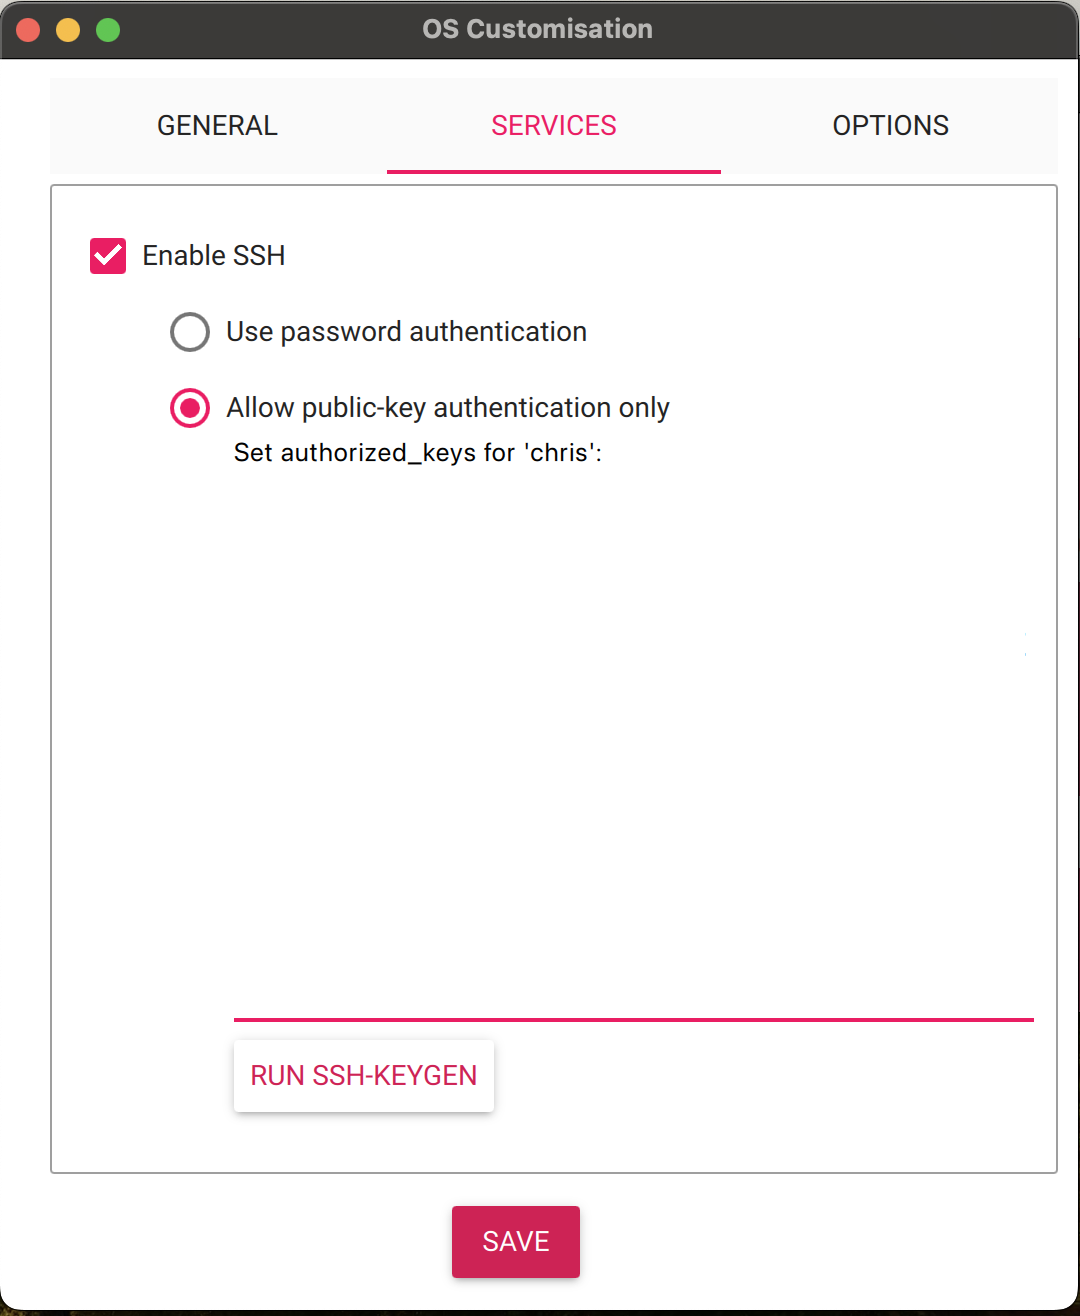 Here, you’ll configure your SSH settings. You should probably use public-key authentication only when dealing with SSH in production, but for learning purposes, you don’t need to at this time. Later in this guide, I’ll walk you through the steps to manually configure SSH, if you are unfamiliar.
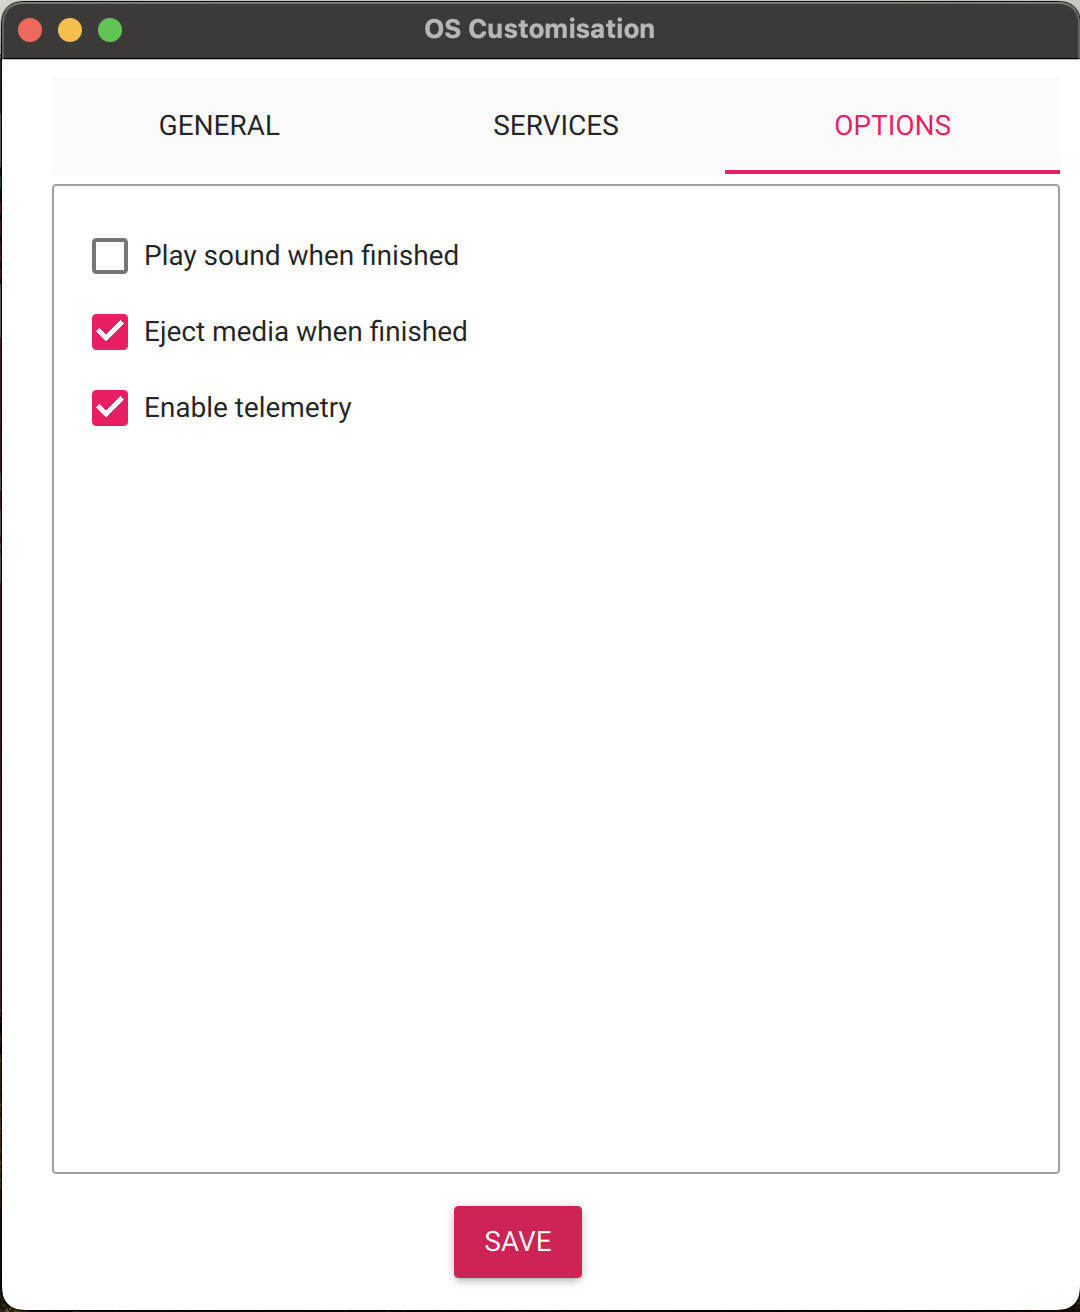 These are more preference based, but it’s nice to have the storage device automatically eject once the flashing is complete. Then, you just need to unplug it and plug it into your Raspberry Pi to get going.
Getting Started
It’s time to set up the actual Raspberry Pi device. For most of this guide, I recommend leaving the Pi outside of the case, because it’ll be easier to plug and unplug some of the devices—the microSD slot is not accessible while the case is on. Later, once we’ve got everything configured and set up as we like, we will attach the fan and case, so it’s a bit safer and able to run in an always-on state. I’ll share a picture of what my server looks like during the early development, and then later I’ll show what it looks like with everything connected and set up.
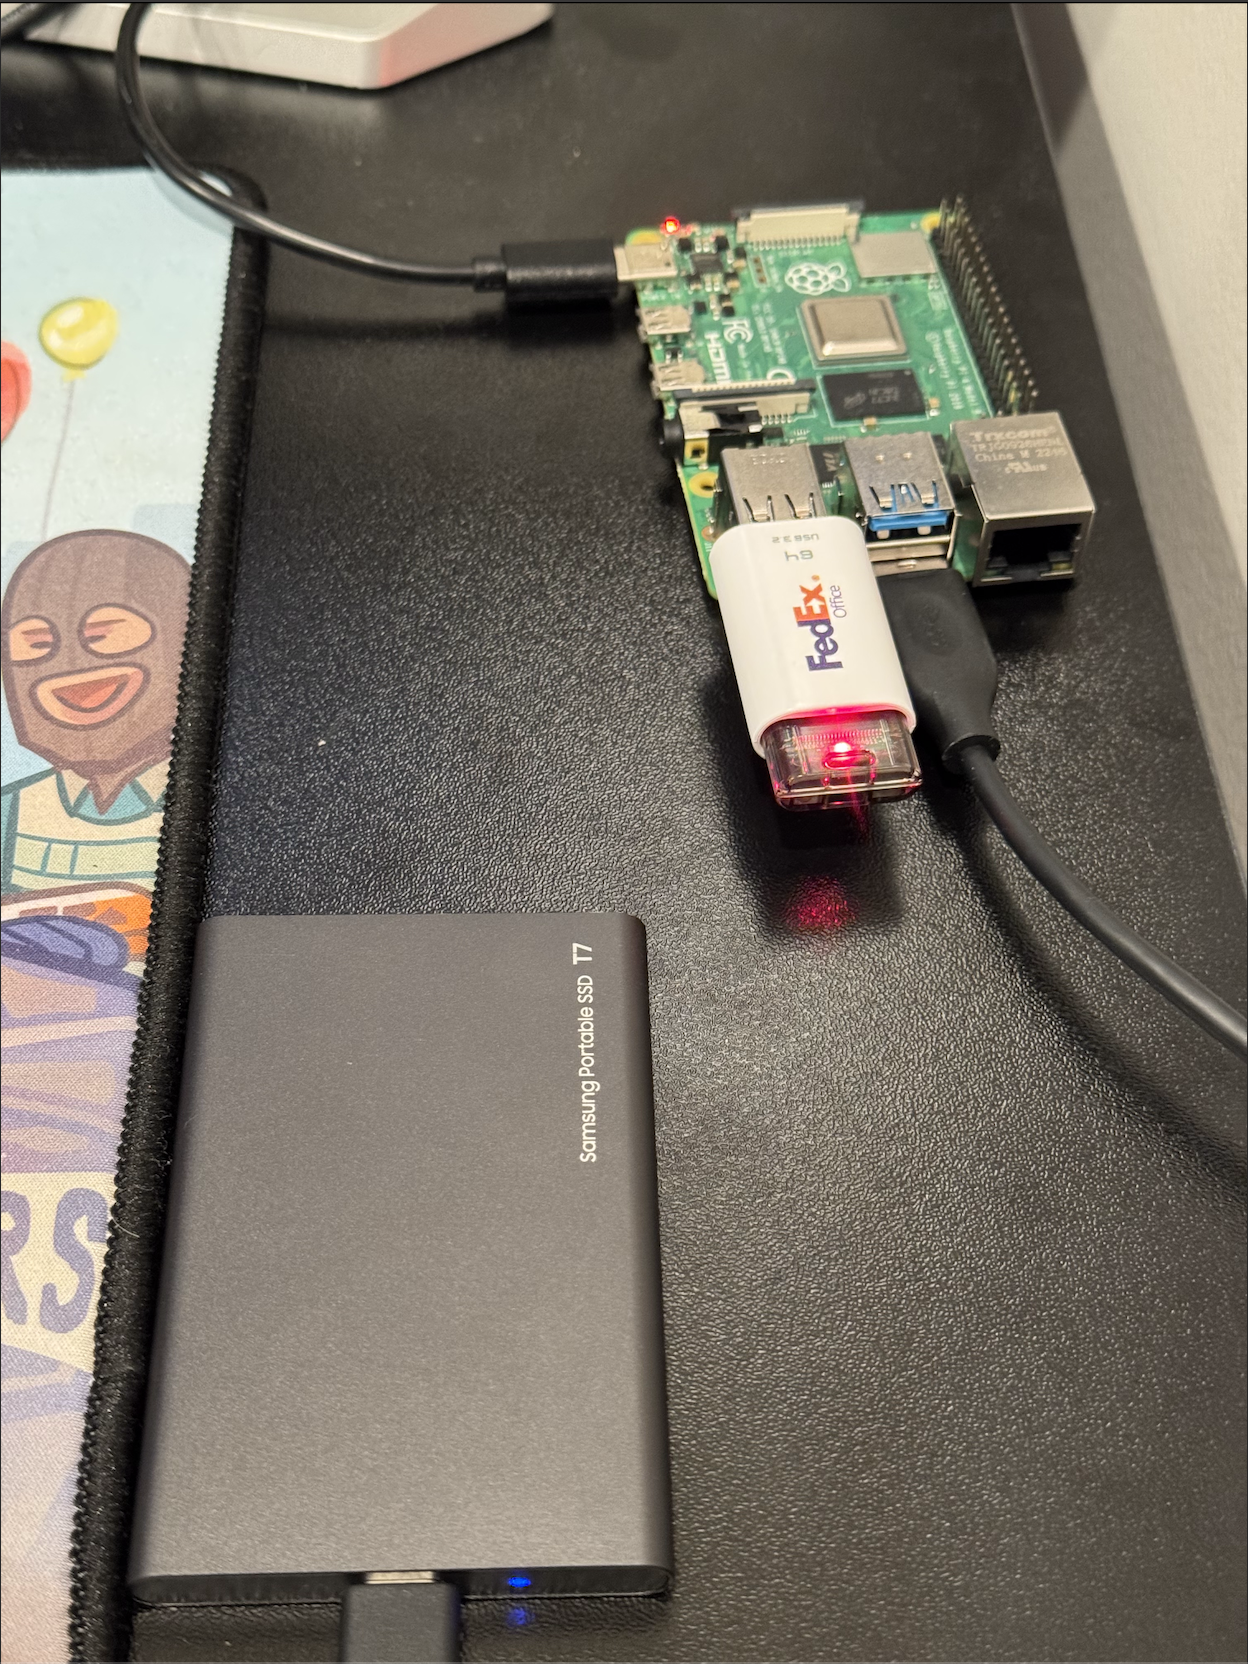
Now you’re ready to plug your boot media device (the Thumb Drive) into your Raspberry Pi. You should also connect a keyboard, monitor, and power supply. Once all of this is connected, your Raspberry Pi will boot up. Connecting a monitor and keyboard will allow you to directly interact with the system’s terminal. Ideally, you’ll use SSH, but it may be helpful to have direct access in case there are any network issues. Eventually, the SSD will serve as the boot media and primary storage device for the server; however, we can’t modify its partitions while it’s serving as the boot device. So, we’ll use a thumb drive as the boot media device until we complete the partitioning.
When first connecting from the wired keyboard and monitor, let all of the startup processes finish running (these will hopefully have brackets with the word Success in green). If the first boot fails, try to redo the boot again (plug in the power and boot media). If that doesn’t work, try re-flashing the image and restarting the boot process. Then, type in the name of the User ID you wish to login with, in my case it’s chris. Then, enter the password (no characters will show up as you type it in) and hit enter. You’ll see a plaintext message telling you the OS version, some system information (memory usage, temperature, etc.), and you’ll see a line where you can enter commands (the CLI). In my case, it looks like this: chris@ubuntu-pi-server:~$
Now you can run some basic commands to see where you are and what you have available to you. Spoiler alert, you’re in your home directory and have no files. In my case it’s /home/chris, where the /home directory is owned by root and /chris is owned by my user—UID 1000 (the default for new users on a fresh system/image). Right now your directory will be empty, outside of some hidden folders like .ssh. More on this later.
One final note, on why I chose Ubuntu Server LTS over Raspberry Pi’s OS. The reason is pretty simple: Ubuntu is a true open source OS that is widely used personally, professionally, and academically. I wasn’t sure if Raspberry Pi’s OS options would provide a similar level of education. Furthermore, as a complete newbie to server computing, I wanted to use an operating system that I knew had a long history and devoted community, because it would have ample resources for self-led research and troubleshooting.
Next we’ll cover what happened during the boot process, the basic structure of the Linux Server OS, and some important information related to permissions, before we move on to basic networking concepts and configurations.
Linux Server Basics
Key Terms
System Initialization Concepts:
- Initialization: The process of starting up the operating system and bringing it to an operational state.
- Boot Process: The sequence of steps that occur from powering on a computer to loading the operating system.
- BIOS/UEFI: Firmware interfaces that initialize hardware and start the boot process.
- Kernel: The core component of an operating system that manages system resources and hardware.
Systemd Terminology:
- systemd: The init system and system/service manager used by modern Linux distributions.
- Unit: Systemd’s representation of system resources, including services, devices, and mount points.
- Service Unit: Configuration files with .service extension that define how to start, stop, and manage daemons.
- Socket Unit: Configuration files with .socket extension that define communication sockets.
- Timer Unit: Configuration files with .timer extension that trigger actions at specified times.
- Target: A grouping of units that represents a system state (similar to runlevels in older systems).
- Daemon: A background process that runs continuously, providing services.
File System and Directory Terminology:
- FHS (Filesystem Hierarchy Standard): The standard directory structure and contents of Unix-like operating systems.
- Root Directory (
/): The top-level directory in a Linux filesystem hierarchy. - home Directory (
/home): Contains user home directories where personal files are stored. - etc Directory (
/etc): Contains system-wide configuration files. - bin Directory (
/bin): Contains essential command binaries needed for system functionality. - Hidden Files/Directories: Files or directories that begin with a dot (.) and don’t appear in default directory listings.
- Shell Configuration Files: Files like .bashrc and .profile that configure the user’s command-line environment.
User and Permissions Terminology:
- User: An account on a Linux system with specific privileges and access rights.
- Group: A collection of users with shared permissions to files and directories.
- UID (User ID): A numerical identifier assigned to each user on a Linux system.
- GID (Group ID): A numerical identifier assigned to each group on a Linux system.
- Permission: Access rights assigned to users and groups determining what actions they can perform on files and directories.
- chmod: Command used to change file and directory permissions.
- chown: Command used to change file and directory ownership.
- umask: Default permissions applied to newly created files and directories.
- ACL (Access Control List): Extended permissions that provide more granular control than traditional Unix permissions.
- setuid/setgid: Special permissions that allow users to execute files with the permissions of the file owner or group.
- Sticky Bit: A special permission bit that restricts file deletion in shared directories.
First Boot Process
When you first boot a fresh Ubuntu Server LTS image on your Raspberry Pi, several important initialization processes occur that don’t happen during subsequent boots. The first boot of your Ubuntu Server LTS on the Raspberry Pi is fundamentally different from subsequent boots because it performs one-time initialization tasks. While later boots will simply load the configured system, this first boot sets up critical system components.
- Hardware Detection: The system performs comprehensive hardware detection to identify and configure your Raspberry Pi’s components.
- Initial RAM Disk (initrd): The bootloader loads a temporary filesystem into memory that contains essential drivers and modules needed to mount the real root filesystem.
- Filesystem Check and Expansion: On first boot, the system checks the integrity of the filesystem and often expands it to utilize the full available space on your Flash Drive.
- Cloud-Init Processing: Ubuntu Server uses cloud-init to perform first-boot configuration tasks (the processes you see running on the monitor on startup)
- Setting the hostname
- Generating SSH host keys
- Creating the default user account
- Running package updates
- Machine ID Generation: A unique machine ID is generated and stored in /etc/machine-id.
- Network Configuration: The system attempts initial network setup based on detected hardware.
The key difference is that subsequent boots skip these initialization steps since they’ve already been completed, making them significantly faster.
Service Management with systemd
Systemd is the modern initialization and service management system for Linux. It’s responsible for bootstrapping the user space and managing all processes afterward. Key components of systemd include:
- Units: Everything systemd manages is represented as a “unit” with a corresponding configuration file. Units include:
- Service units (
.service): Define how to start, stop, and manage daemons (background processes that are always on) - Socket units (
.socket): Manage network/IPC sockets - Timer units (
.timer): Trigger other units based on timers - Mount units (
.mount): Control filesystem mount points
- Service units (
- Target units: Represent system states (similar to runlevels in older systems)
multi-user.target: Traditional text-mode systemgraphical.target: Graphical user interfacenetwork.target: Network services are ready
For example, let’s take a look at a generic SSH service file:
[Unit]
Description=OpenSSH server daemon
Documentation=man:sshd(8) man:sshd_config(5)
After=network.target auditd.service
Wants=network.target

[Service]
EnvironmentFile=-/etc/default/ssh
ExecStartPre=/usr/sbin/sshd -t
ExecStart=/usr/sbin/sshd -D $SSHD_OPTS
ExecReload=/usr/sbin/sshd -t
ExecReload=/bin/kill -HUP $MAINPID
KillMode=process
Restart=on-failure
RestartPreventExitStatus=255
Type=notify

[Install]
WantedBy=multi-user.target
To break this down:
- [Unit]: Metadata and dependencies
Description: Human-readable service descriptionDocumentation: Where to find documentationAfter: Units that should be started before this oneWants: Soft dependencies
- [Service]: Runtime behavior
ExecStart: Command to start the serviceExecReload: Command to reload the serviceRestart: When to restart the serviceType: How systemd should consider the service started
- [Install]: Installation information
WantedBy: Target that should include this service
Ubuntu Server’s current standard is systemd, but previously it was SysV. A few key improvements include:
- Parallel Service Startup: Systemd can start services in parallel, improving boot times.
- Dependency Management: Systemd handles service dependencies more effectively.
- Service Supervision: Systemd continuously monitors and can automatically restart services.
- Socket Activation: Services can be started on-demand when a connection request arrives.
Managing services is easy using the command line, a crucial component of headless applications. A few examples are:
- View service status:
systemctl status ssh - Start a service:
sudo systemctl start ssh - Stop a service:
sudo systemctl stop ssh - Enable at boot:
sudo systemctl enable ssh - Disable at boot:
sudo systemctl disable ssh - View logs:
journalctl -u ssh
Understanding Your Home Directory
Now that you’ve logged in and can work on your server, you may wonder where you are and what’s there. Running pwd will return the file path of your current location. Running ls -a will show you all available files and directories in your current location. Running these, you’ll see a few things specifically for Shell configuration (your terminal/CLI):
.bash_history: Contains a record of commands you’ve executed in the bash shell. This helps with command recall using the up arrow or history command..bash_logout: Executed when you log out of a bash shell. Often used for cleanup tasks like clearing the screen..bashrc: The primary bash configuration file that’s loaded for interactive non-login shells. It defines aliases, functions, and shell behavior. When you open a terminal window, this file is read..profile: Executed for login shells. It typically sets environment variables and executes commands that should run once per login session, not for each new terminal.
# Sample .bashrc section
# enable color support of ls and also add handy aliases
if [ -x /usr/bin/dircolors ]; then
    test -r ~/.dircolors && eval "$(dircolors -b ~/.dircolors)" || eval "$(dircolors -b)"
    alias ls='ls --color=auto'
    alias grep='grep --color=auto'
    alias fgrep='fgrep --color=auto'
    alias egrep='egrep --color=auto'
fi

# some more ls aliases
alias ll='ls -alF'
alias la='ls -A'
alias l='ls -CF'
Beyond those, you’ll also find hidden application directories:
.cache: Contains non-essential data that can be regenerated as needed. Applications store temporary files here to improve performance on subsequent runs..dotnet: Contains .NET Core SDK and runtime files if you’ve installed the .NET development platform..ssh: Stores SSH configuration files and keys:authorized_keys: Lists public keys that can authenticate to your accountubuntu_pi_ecdsa&ubuntu_pi_ecdsa.pub: Your private and public ECDSA keys (More on this in the SSH Section)known_hosts: Tracks hosts you’ve connected to previouslyssh_config: Optional configuration file for SSH connections
.sudo_as_admin_successful: A marker file created when you successfully use sudo. Its presence suppresses the “sudo capabilities” message when opening a terminal..vscode-server: Created when you connect to your server using Visual Studio Code’s remote development feature. Contains the VS Code server components. (More on this in the Remote Development with VS Code Section).wget-hsts: Wget’s HTTP Strict Transport Security database. Tracks websites that require secure (HTTPS) connections.
The Root Filesystem
The Linux filesystem follows the Filesystem Hierarchy Standard (FHS), which defines the directory structure and contents of Unix-like systems. Here’s a breakdown of key directories:
/bin: Contains essential command binaries (programs) needed for basic system functionality. These commands are available to all users and are required during boot or in single-user mode.- Historical note: Originally separated from /usr/bin because early Unix systems had limited disk space on the root partition.
/boot: Contains boot loader files including the Linux kernel, initial RAM disk (initrd), and bootloader configuration (GRUB).- For Raspberry Pi, this contains the firmware and various boot-related files.
/dev: Contains device files that represent hardware devices. These are not actual files but interfaces to device drivers in the kernel.- Example: /dev/sda represents the first SATA disk.
/etc: Contains system-wide configuration files. The name originated from “et cetera” but is now often interpreted as “Editable Text Configuration.” Critical files include:/etc/fstab: Filesystem mount configuration/etc/passwd: User account information/etc/ssh/sshd_config: SSH server configuration
/home: Contains user home directories where personal files and user-specific configuration files are stored./lib: Contains essential shared libraries needed by programs in /bin and system boot.- On modern 64-bit systems, you’ll also find /lib64 for 64-bit libraries.
/media: Mount point for removable media like USB drives and DVDs./mnt: Temporarily mounted filesystems. This is often used as a manual mount point./opt: Optional application software packages. Used for third-party applications that don’t follow the standard file system layout./proc: A virtual filesystem providing process and kernel information. Files here don’t exist on disk but represent system state.- Example: /proc/cpuinfo shows CPU information.
/root: Home directory for the root user. Separated from /home to ensure it’s available even if /home is on a separate partition./run: Runtime data for processes started since last boot. This is a tmpfs (memory-based) filesystem./sbin: System binaries for system administration tasks, typically only usable by the root user./srv: Data for services provided by the system, such as web or FTP servers./snap: The /snap directory is, by default, where the files and folders from installed snap packages appear on your system./sys: Another virtual filesystem exposing device and driver information from the kernel. Provides a more structured view than /proc./tmp: Temporary files that may be cleared on reboot. Applications should not rely on data here persisting./usr: Contains the majority of user utilities and applications. Originally stood for “Unix System Resources.”/usr/bin: User commands/usr/lib: Libraries for the commands in /usr/bin/usr/local: Locally installed software/usr/share: Architecture-independent data
/var: Variable data files that change during normal operation:/var/log: System log files/var/mail: Mail spool/var/cache: Application cache data/var/spool: Spool for tasks waiting to be processed (print queues, outgoing mail)
The core philosophy behind this structure separates:
- Static vs. variable content
- Shareable vs. non-shareable files
- Essential vs. non-essential components
Understanding this hierarchy helps you navigate any Linux system and locate important files intuitively.
User and Group Permissions
Basics
Linux inherits its permission system from Unix, providing a robust framework for controlling access to files and directories. Understanding this system is essential for maintaining security and proper functionality of your Raspberry Pi server, as well as any Linux-based system. At its core, the Linux permission model operates with three basic permission types applied to three different categories of users:
- Permission Types:
- Read (r): Allows viewing file contents or listing directory contents
- Write (w): Allows modifying file contents or creating/deleting files within a directory
- Execute (x): Allows running a file as a program or accessing files within a directory
- User Categories:
- Owner (u): The user who owns the file or directory
- Group (g): Users who belong to the file’s assigned group
- Others (o): All other users on the system
It’s not only important to know how to set permissions, but also how to view existing ones. When you run ls -l in a directory, you’ll see a detailed listing including permission information:
-rw-r--r-- 1 chris chris 1234 May 6 14:32 example.txtIn this example, the owner can read and write, while group members and others can only read. The first string of characters -rw-r--r-- represents the permissions:
- First character: File type (- for regular file, d for directory, l for symbolic link)
- Characters 2-4: Owner permissions (rw-)
- Characters 5-7: Group permissions (r–)
- Characters 8-10: Others permissions (r–)
chmod
The chmod command modifies file permissions in Linux. You can use it in two ways: symbolic mode or numeric (octal) mode.
Symbolic mode uses letters to represent permission categories (u, g, o, a) and permissions (r, w, x):
# Give the owner execute permission
chmod u+x script.sh

# Remove write permission from group and others
chmod go-w important_file.txt

# Set read and execute for everyone (a=all users)
chmod a=rx application

# Add write permission for owner and group
chmod ug+w shared_document.txt
Each symbol has a specific meaning:
u: Owner permissionsg: Group permissionso: Other user permissionsa: All permissions+: Add permissions-: Remove permissions=: Set exact permissions
Octal mode represents permissions as a 3-digit number, where each digit represents the permissions for owner, group, and others:
Read (r)= 4Write (w)= 2Execute (x)= 1
Permissions are calculated by adding these values:
7 (4+2+1)= Read, write, and execute6 (4+2)= Read and write5 (4+1)= Read and execute4 (4)= Read only0= No permissions
# rwxr-xr-x (755): Owner can read, write, execute; group and others can read and execute
chmod 755 script.sh

# rw-r--r-- (644): Owner can read and write; group and others can read only
chmod 644 document.txt

# rwx------ (700): Owner has all permissions; group and others have none
chmod 700 private_directory
Beyond the basic rwx permissions, Linux has three special permission bits:
setuid (4000): When set on an executable file, it runs with the privileges of the file owner instead of the user executing it.setgid (2000): Similar to setuid but for group permissions. When set on a directory, new files created within inherit the directory’s group.sticky bit (1000): When set on a directory, files can only be deleted by their owner, the directory owner, or root (commonly used for /tmp).
chown
The chown command changes the owner and/or group of files and directories. Do not change ownership in the root directories because many require specific ownership/permissions to function properly.
# Change the owner of a file
sudo chown chris file.txt

# Change both owner and group
sudo chown chris:developers project_files

# Change only the group
sudo chown :developers shared_documents

# Change recursively for a directory and all its contents
sudo chown -R chris:chris /home/chris/projects
The flags do the following:
-R, --recursive: Change ownership recursively-c, --changes: Report only when a change is made-f, --silent: Suppress most error messages-v, --verbose: Output a diagnostic for every file processed
# Verbose recursive ownership change
sudo chown -Rv chris:developers /opt/application
Understanding Permissions
Linux manages permissions through users and groups:
- Each user has a unique User ID (UID)
- Each group has a unique Group ID (GID)
- Users can belong to multiple groups
- The first 1000 UIDs/GIDs are typically reserved for system users/groups
Important files include:
/etc/passwd: Contains basic user account information- Fields: username, password placeholder, UID, primary GID, full name, home directory, login shell
chris:x:1000:1000:Chris Kornaros:/home/chris:/bin/bash/etc/shadow: Contains encrypted passwords and password policy information- Fields: username, encrypted password, days since epoch of last change, min days between changes, max days password valid, warning days, inactive days, expiration date
chris:$6$xyz...hash:19000:0:99999:7:::/etc/group: Contains group definitions- Fields: group name, password placeholder, GID, comma-separated list of members
developers:x:1001:chris,bob,aliceThere are two categories of groups you should understand, Primary and Supplementary:
- Primary Group: Set in /etc/passwd, used as the default group for new files
- Supplementary Groups: Additional groups a user belongs to, defined in /etc/group
You can view your current user’s groups with the groups command, or view them for a specific user with groups chris (replace chris with the name of the user). That being said, directory permissions differ slightly from file permissions:
- Read (r): List directory contents
- Write (w): Create, delete, or rename files within the directory
- Execute (x): Access files within the directory (crucial for navigation)
A common confusion: You may have read permission for a file but not execute permission for its parent directory, preventing access.
The umask (user mask) determines the default permissions for newly created files and directories:
- Default for files: 666 (rw-rw-rw-)
- Default for directories: 777 (rwxrwxrwx)
- The umask is subtracted from these defaults, for example, a umask of 022 results in:
- Files: 644 (rw-r–r–)
- Directories: 755 (rwxr-xr-x)
# View current umask (in octal)
umask

# Set a new umask
umask 027  # More restrictive: owner full access, group read/execute, others no access
Traditional Unix permissions have limitations regarding inheritance: new files don’t inherit permissions from parent directories and changing permissions doesn’t affect existing files. Modern solutions, however, include: the setgid bit on directories for group inheritance and ACLs (Access Control Lists) with default entries that apply to new files. To set up a collaborative directory with proper permissions:
# Create a shared directory for developers
sudo mkdir /opt/projects
sudo chown chris:developers /opt/projects
sudo chmod 2775 /opt/projects  # setgid bit ensures new files get 'developers' group
Advanced Permission Concepts
As I previously wrote, part of the modern permission solutions include ACLs, or Access Control Lists. ACLs extend the traditional permission model to allow specifying permissions for multiple users and groups. When ACLs are in use, ls -l will show a + after the permission bits. Here’s a basic example of how to create and manage an ACL:
# Install ACL support (if not already installed)
sudo apt install acl

# Set an ACL allowing a specific user read access
setfacl -m u:chris:r file.txt

# Set an ACL allowing a specific group write access
setfacl -m g:developers:rw file.txt

# Set default ACLs on a directory (inherited by new files)
setfacl -d -m g:developers:rw directory/

# View ACLs on a file
getfacl file.txt
-rw-rw-r--+ 1 chris developers 1234 May 6 14:32 file.txtA few final notes on permissions that are especially relevant for this project, because you’ll be working with external storage devices:
- Not all filesystems support the same permission features:
ext4: Full support for traditional permissions, ACLs, and extended attributesNTFS (via NTFS-3G): Simulated Unix permissions, basic ACL supportFAT32: No native permission support (mounted with fixed permissions)exFAT: No native permission support
- Common Permission Patterns:
- Configuration Files: 644 or 640 (owner can edit, restricted read access)
- Program Binaries: 755 (everyone can execute, only owner can modify)
- Web Content: 644 for regular files, 755 for directories
- SSH Keys: 600 for private keys (owner only), 644 for public keys
- Scripts: 700 or 750 (executable by owner or group)
Computer Networking
This section provides a brief example of how to connect your server to WiFi. It assumes you are already connected using the wireless network settings you configured in the Requirements Section. That being said, I’ll also go over some basic networking concepts and background information. As a result, some of the decisions and terminology in this guide will make more sense (it also helps me remember what I’m doing and why).
Key Terms
Basic Networking Concepts:
- Protocol: A set of rules that determine how data is transmitted between devices on a network. Examples include TCP, UDP, and HTTP.
- MAC Address: Media Access Control address; a unique hardware identifier assigned to network interfaces. It’s a 48-bit address (e.g., 00:1A:2B:3C:4D:5E) permanently assigned to a network adapter.
- IP Address: A numerical label assigned to each device on a network that uses the Internet Protocol. Functions like a postal address for devices.
- Packet: A unit of data transmitted over a network. Includes both the data payload and header information for routing.
- Subnet: A logical subdivision of an IP network that allows for more efficient routing and security segmentation.
- Gateway: A network node that serves as an access point to another network, typically connecting a local network to the wider internet.
- DNS: Domain Name System; translates human-readable domain names (like google.com) into IP addresses computers can understand.
- DHCP: Dynamic Host Configuration Protocol; automatically assigns IP addresses and other network configuration parameters to devices.
- CIDR Notation: Classless Inter-Domain Routing; a method for representing IP addresses and their subnet masks in a compact format (e.g., 192.168.1.0/24). The number after the slash indicates how many bits are used for the network portion of the address.
- OSI Model: Open Systems Interconnection model; a conceptual framework that standardizes the functions of a communication system into seven abstraction layers, from physical transmission to application interfaces.
- TCP/IP Model: Transmission Control Protocol/Internet Protocol model; a four-layer practical implementation of network communications used as the foundation of the internet, simplifying the OSI model for real-world application.
Network Types and Components:
- LAN: Local Area Network; a network confined to a small geographic area, like a home or office.
- WAN: Wide Area Network; connects multiple LANs across large geographic distances.
- Router: A device that forwards data packets between computer networks, determining the best path for data transmission.
- Switch: A networking device that connects devices within a single network and uses MAC addresses to forward data to the correct destination.
- Bandwidth: The maximum data transfer rate of a network connection, measured in bits per second (bps).
- Latency: The delay between sending and receiving data, typically measured in milliseconds.
Linux Networking Terminology:
- Interface: A connection between a device and a network. In Linux, these have names like eth0 (Ethernet) or wlan0 (wireless).
- Netplan: Ubuntu’s default network configuration tool that uses YAML files to define network settings.
- systemd-networkd: A system daemon that manages network configurations in modern Linux distributions.
- NetworkManager: An alternative network management daemon that provides detection and configuration for automatic network connectivity.
- Socket: An endpoint for sending or receiving data across a network, defined by an IP address and port number.
ip: A powerful, modern Linux networking utility that replaces older commands likeifconfig,route, andarp. Used to show/manipulate routing, devices, policy routing, and tunnels.
Security Concepts:
- Firewall: Software or hardware that monitors and filters incoming and outgoing network traffic based on predetermined security rules.
- fail2ban: An intrusion prevention software that protects servers from brute-force attacks by monitoring log files and temporarily banning IP addresses that show malicious behavior.
- ufw: Uncomplicated Firewall; a user-friendly interface for managing iptables firewall rules in Linux, designed to simplify the process of configuring a firewall.
- SSH: Secure Shell; a cryptographic network protocol for secure data communication and remote command execution.
- Encryption: The process of encoding information to prevent unauthorized access.
- Port: A virtual point where network connections start and end. Ports are identified by numbers (0-65535).
- NAT: Network Address Translation; allows multiple devices on a local network to share a single public IP address.
- VPN: Virtual Private Network; extends a private network across a public network, enabling secure data transmission.
Computer Networking
Simply put, a computer network is a collection of interconnected devices that can communicate with each other using a set of rules called protocols. Networking allows devices to share resources, exchange data, and collaborate on tasks. On a deeper level, it helps to understand the conceptual models that describe how data moves through a network. Before we dive in, let’s go over some basic terminology.
The OSI Model
Now that you understand some common terms and concepts, we can dive into the conceptual models. The Open Systems Interconnection (OSI) Model divides networking into seven layers, each handling specific aspects of network communication.
- Physical Layer: Physical medium, electrical signals, cables, and hardware
- Data Link Layer: Physical addressing (MAC addresses), error detection
- Network Layer: Logical addressing (IP addresses), routing
- Transport Layer: End-to-end connections, reliability (TCP/UDP)
- Session Layer: Session establishment, management, and termination
- Presentation Layer: Data translation, encryption, compression
- Application Layer: User interfaces and services (HTTP, SMTP, etc.)
The TCP/IP Model
The OSI Model is conceptual, but the TCP/IP Model is more practical and has four layers.
- Network Access Layer: Combines OSI’s Physical and Data Link layers
- Internet Layer: Similar to OSI’s Network layer (IP)
- Transport Layer: Same as OSI’s Transport layer (TCP/UDP)
- Application Layer: Combines OSI’s Session, Presentation, and Application layers
Understanding these network models isn’t just theoretical—it provides a systematic approach to troubleshooting. When connection issues arise, you can methodically check each layer: Is the physical connection working? Is IP addressing correct? Is the transport protocol functioning? This layered approach helps isolate and resolve problems efficiently.
Network Protocols
Remember, a protocol is a set of rules that determine how data is transmitted between devices on a network. You can think of protocols in one of two camps, Connection-Oriented and Connectionless. Within these camps, two protocols stand out as the backbone of the internet’s data transfers: TCP and UDP.
TCP (Transmission Control Protocol) is a connection-oriented protocol that establishes a dedicated end-to-end connection before transmitting data. TCP is used when reliability is more important than speed (e.g., web browsing, email, file transfers). It has four defining traits:
- Reliability: Guarantees delivery of packets in the correct order
- Flow Control: Prevents overwhelming receivers with too much data
- Error Detection: Identifies and retransmits lost or corrupted packets
- Handshake Process: Three-way handshake establishes connections
Common TCP Applications: Web browsing (HTTP/HTTPS), email (SMTP, IMAP), file transfers (FTP, SCP), and secure shell (SSH)
UDP (User Datagram Protocol) is a connectionless protocol that sends data without establishing a dedicated connection. UDP is used for real-time applications (e.g., video streaming, VoIP, online gaming). It also has four defining traits:
- Simplicity: No connection setup or maintenance overhead
- Speed: Faster than TCP due to fewer checks and guarantees
- Lower Reliability: No guarantee of delivery or correct ordering
- Efficiency: Better for real-time applications where occasional data loss is acceptable
Common UDP Applications: DNS lookups, DHCP address assignment, streaming video, VoIP calls, and online gaming
Beyond those, there are some other important protocols to know, because they provide the foundation for most of the user-friendly features we are used to today.
- IP (Internet Protocol)
- IP handles addressing and routing of packets across networks. There are two versions in common use:
- IPv4: 32-bit addresses (e.g., 192.168.1.1)
- IPv6: 128-bit addresses (e.g., 2001:0db8:85a3:0000:0000:8a2e:0370:7334)
- ICMP (Internet Control Message Protocol)
- ICMP helps diagnose network issues by sending error messages and operational information. The ping command uses ICMP to test connectivity.
- HTTP/HTTPS (Hypertext Transfer Protocol)
- HTTP and its secure variant HTTPS are application-layer protocols used for web browsing.
- DNS (Domain Name System)
- DNS translates human-readable domain names (like google.com) into IP addresses.
Many standard protocols have secure variants that add encryption: HTTP becomes HTTPS via TLS/SSL, telnet is replaced by SSH, and FTP gives way to SFTP or FTPS. These secure protocols wrap the original protocol’s data in encryption layers, protecting sensitive information from interception or tampering.
Network Connections
There are two ways for systems to connect to the internet: wired and wireless.
Wired Connections
Ethernet is the most common wired networking technology. Its name comes from the term ether referring to a theoretical medium that was believed to carry light waves through space. It was developed by Robert Metcalf and David Boggs at Xerox’s PARC facility in the 1970s. The goal was to provide a more stable LAN which could facilitate high-speed transfers between computers and laser printers. They succeeded, and had improved on a precursor’s, ALOHAnet, design by creating a system that could detect collisions—when two devices try to transmit at the same time. Here are some key traits:
- Reliability: Less susceptible to interference
- Speed: Typically faster and more stable than wireless
- Security: Harder to intercept without physical access
- Connectors: RJ45 connectors on Ethernet cables
- Standards: 10/100/1000 Mbps (Gigabit) are common speeds
| Cable Type | Max Speed | Max Distance | Notes |
|---|---|---|---|
| Cat 5e | 1 Gbps | 100 meters | Minimum for modern networks |
| Cat 6 | 10 Gbps | 55 meters | Better crosstalk protection |
| Cat 6a | 10 Gbps | 100 meters | Improved shielding |
| Cat 7/8 | 40+ Gbps | 100 meters | Fully shielded, enterprise use |
For most Raspberry Pi projects, Cat 5e or Cat 6 cables are more than sufficient.
Wireless Connections
Wi-Fi allows devices to connect to networks without physical cables. Its name is not short for Wireless Fidelity, but actually a marketing choice by the brand-consulting firm Interbrand. They chose the name because it sounded similar to Hi-Fi. Wi-Fi was developed by numerous researchers and engineers, but the key breakthrough was by Dr. John O’Sullivan from CSIRO in Australia. His work focused on a wireless LAN, which would eventually become the IEEE (Institute of Electrical and Electronics Engineers) 802.11 standard in 1997. Eventually, Apple would help with widespread adoption by including the AirPort feature on its laptops, enabling Wi-Fi connectivity out of the box. Here are some key traits:
- Convenience: No cables required, more flexible placement
- Standards: 802.11a/b/g/n/ac/ax (Wi-Fi 6) with varying speeds and ranges
- Security: WEP, WPA, WPA2, and WPA3 encryption standards (WPA2/WPA3 recommended)
Network Interface Names in Linux
In Ubuntu Server, network interfaces follow a predictable naming convention:
- eth0, eth1: Traditional Ethernet interface names
- enp2s0, wlp3s0: Modern predictable interface names (based on device location)
- Ubuntu moved to predictable interface naming to solve a critical problem:
- In traditional naming (eth0, eth1), names could change unexpectedly after hardware changes or reboots.
- Modern names like
enp2s0encode the physical location of the network card (PCI bus 2, slot 0), ensuring the same interface always gets the same name regardless of detection order.
- Ubuntu moved to predictable interface naming to solve a critical problem:
- wlan0, wlan1: Traditional wireless interface names
IP Addressing
An IP (Internet Protocol) Address is a unique identifier for a device on the internet, or a LAN. There are two different kinds of addresses: IPv4 and IPv6.
IPv4 uses 32-bit addresses, providing approximately 4.3 billion unique addresses (now largely exhausted):
- Format: Four octets (numbers 0-255) separated by dots (e.g., 192.168.1.1)
- Classes: Traditionally divided into classes A, B, C, D, and E
- Private Ranges:
- 10.0.0.0 to 10.255.255.255 (10.0.0.0/8)
- 172.16.0.0 to 172.31.255.255 (172.16.0.0/12)
- 192.168.0.0 to 192.168.255.255 (192.168.0.0/16)
- Subnet Masks: Used to divide networks (e.g., 255.255.255.0 or /24)
- Issues: IPv4 address exhaustion due to limited capacity
IPv6 uses 128-bit addresses, providing approximately 3.4×10^38 unique addresses:
- Format: Eight groups of four hexadecimal digits separated by colons (e.g., 2001:0db8:85a3:0000:0000:8a2e:0370:7334)
- Shorthand: Leading zeros in a group can be omitted, and consecutive groups of zeros can be replaced with :: (only once)
- Example: 2001:db8:85a3::8a2e:370:7334
- Address Types:
- Unicast: Single interface
- Anycast: Multiple interfaces (closest responds)
- Multicast: Multiple interfaces (all respond)
- Benefits: More addresses, improved security, simplified headers, no need for NAT
One final note, CIDR (Classless Inter-Domain Routing) notation represents IP addresses and their associated routing prefix:
- Format: IP address followed by “/” and prefix length (e.g., 192.168.1.0/24)
- Calculation: A prefix of /24 means the first 24 bits are the network portion, leaving 8 bits for hosts (allowing 2^8 = 256 addresses)
For a network using CIDR notation 192.168.1.0/24:
- The /24 means the first 24 bits (3 octets) identify the network
- This leaves 8 bits for hosts (2^8 = 256 potential addresses)
- Subtract 2 for network address (.0) and broadcast address (.255)
- Result: 254 usable IP addresses (192.168.1.1 through 192.168.1.254)
Ubuntu Server Networking Tools
Now that we’ve covered the basic concepts, it’s time to dive into the actual commands and tools that will let you configure and manage your server’s network. To start, you can view network interfaces and their statuses using the command ip link show, or ip addr show for your IP Address configuration. You can view only the IPv4 or IPv6 addresses using ip -4 addr or ip -6 addr, respectively.
Testing Connectivity
Although it seems redundant if you already viewed your IP addresses, you can also test connectivity using the ping and traceroute commands. These will be more useful for checking your server’s network status from your desktop or laptop.
Test basic connectivity to a host:
ping -c 4 google.com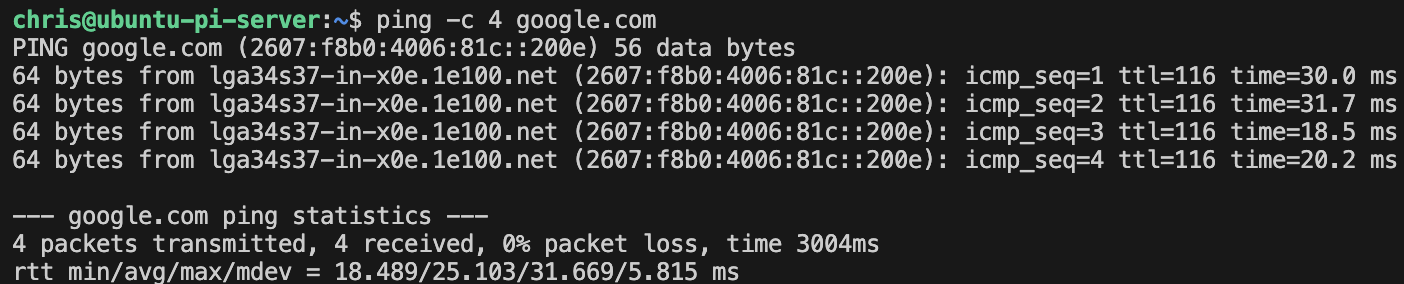
Trace the route to a destination:
# First update and install your packages
sudo apt update && sudo apt upgrade -y

# Install traceroute
sudo apt install traceroute -y

# Run traceroute
traceroute google.com
Check the DNS resolution:
nslookup google.com
# dig google.com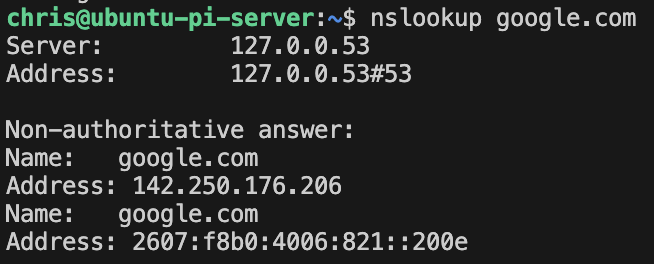
Viewing Network Statistics
You can view more specific network information with the ss command. This command’s name is an acronym for socket statistics and is used as a replacement for the older netstat plan because it offers faster performance and a more detailed output. Additionally, you can filter by specific protocol.
ss -tulnThe tuln flag is made up of four separate flags:
-t, displays only TCP sockets-u, displays only UDP sockets-l, displays listening sockets-n, displays addresses numerically, instead of resolving them
Configuration Files
Finally, there are a few crucial configuration files that will handle the bulk of your networking. In Ubuntu Server, network interfaces and DNS configurations are configured and stored in the /etc/ directory.
Network Interfaces:
/etc/netplan/:Contains YAML configuration files for Netplan/etc/network/interfaces:Configuration method (if NetworkManager is used)
DNS Configuration:
- /etc/resolv.conf: DNS resolver configuration
- /etc/hosts: Static hostname to IP mappings
- /etc/hostname: System hostname
systemd-networkd
systemd-networkd is a system daemon that manages network configurations in modern Linux distributions. It’s part of the systemd suite and provides network configuration capabilities through simple configuration files.
It generally works using three key components:
- Configuration Files: You define network settings in .network files located in /etc/systemd/network/
- Service Management: systemd-networkd runs as a system service to apply and maintain network configurations
- Integration: Works closely with other systemd components for DNS resolution and networking
Basic Wired Configuration
systemd-networkd uses configuration files with .network extension. Each file consists of sections with key-value pairs. A basic configuration for a static IP would look like this:
# /etc/systemd/network/20-wired.network
[Match]
Name=eth0

[Network]
Address=192.168.1.100/24
Gateway=192.168.1.1
DNS=8.8.8.8
DNS=8.8.4.4
Let’s walk through the configuration file’s structure:
- File Naming Convention:
- The file is named 20-wired.network.
- The number prefix (20-) determines the processing order (lower numbers processed first), allowing you to create prioritized configurations.
- The suffix .network tells systemd-networkd that this is a network interface configuration file.
- [Match] Section:
- This critical section determines which network interfaces the configuration applies to.
Name=eth0: This specifies that the configuration should apply to the eth0 interface only.- You can use wildcards (e.g., eth* would match all Ethernet interfaces) or match by other properties such as MAC address using MACAddress=xx:xx:xx:xx:xx:xx.
- Behind the scenes:
- systemd-networkd scans all available network interfaces.
- Compares their properties against those specified in the [Match] section.
- If all properties match, the configuration is applied to that interface.
- [Network] Section:
- This section defines the network configuration parameters.
Address=192.168.1.100/24: Sets a static IPv4 address with CIDR notation. The /24 represents the subnet mask (equivalent to 255.255.255.0) and defines the network boundary.Gateway=192.168.1.1: Specifies the default gateway for routing traffic outside the local network. All traffic not destined for the local subnet (192.168.1.0/24) will be sent to this IP address.DNS=8.8.8.8andDNS=8.8.4.4: These are Google’s public DNS servers. When specified, systemd-networkd will automatically configure /etc/resolv.conf through systemd-resolved. You can specify multiple DNS servers, and they will be tried in order.
- Behind the scenes:
- systemd-networkd identifies the eth0 interface
- Assigns the static IP address using kernel netlink sockets
- Sets up the routing table to use the specified gateway
- Communicates with systemd-resolved to configure DNS settings
- Maintains this configuration and reapplies it if the interface goes down and back up
This configuration example works well for server environments where static, predictable networking is preferable. This is a declarative configuration, it describes the desired state, rather than the steps to achieve it, so repeated application produces the same result.
DHCP with a Wired Connection
If you want to add DHCP, you can use the following:
# /etc/systemd/network/20-wired.network
[Match]
Name=eth0

[Network]
DHCP=yes
Let’s walk through the differences between a dynamic and static host configuration file structure:
DHCP=yes: This single line replaces all the static configuration parameters from the previous example.- It instructs systemd-networkd to obtain IP address, subnet mask, gateway, DNS servers, and other network parameters automatically from a DHCP server.
- You can also use
DHCP=ipv4to enable only IPv4 DHCP, orDHCP=ipv6for only IPv6 DHCP, orDHCP=yesfor both.
- Behind the scenes:
- systemd-networkd identifies the eth0 interface
- Initiates the DHCP client process, which follows the DHCP protocol’s Discover-Offer-Request-Acknowledge (DORA) sequence:
- The client broadcasts a DISCOVER message
- Available DHCP servers respond with OFFER messages
- The client selects an offer and sends a REQUEST
- The selected server sends an ACKNOWLEDGE
- Applies all the received network parameters (IP, subnet, gateway, DNS)
- Sets up a lease timer to manage when the configuration needs renewal
- Handles DHCP lease renewals automatically
- Advantages:
- Simplified configuration maintenance - no need to update parameters when network details change
- Works well in networks where IP assignments are centrally managed
- Automatically adapts to network changes
This configuration works well for environments where network parameters are dynamic or managed by a network admin through DHCP.
Wireless Configurations and wpa_supplicant
While wired connections are a basic part of networking, wireless connections require some extra work. More specifically, with systemd-networkd, you’ll need a tool like WPA. Wi-Fi Protected Access (WPA) emerged as a response to weaknesses in the original Wired Equivalent Privacy (WEP) security protocol. As wireless networks became ubiquitous, secure authentication and encryption mechanisms became essential. The Linux ecosystem offers several powerful tools for managing these connections:
wpa_supplicant: The core daemon that handles wireless connectionswpa_cli: A command-line interface for controlling wpa_supplicant dynamicallywpa_passphrase: A utility for generating secure password hashes
On the systemd-networkd side of things, the configuration is simple, broken down in detail below.
# /etc/systemd/network/25-wireless.network
[Match]
Name=wlan0

[Network]
DHCP=yes- Wireless Interface:
- The configuration targets wlan0, which is the traditional name for the first wireless network interface in Linux.
- Minimal Configuration:
- The file only has the information needed by systemd-networkd to manage the IP addressing aspect of the wireless connection. Note what’s missing: there’s no SSID, password, or security protocol information. This is because:
- systemd-networkd isn’t designed to handle wireless authentication and association
- This separation of concerns is intentional in the systemd design philosophy - specialized tools should handle specialized tasks
- Integration with wpa_supplicant:
wpa_supplicantis the standard Linux utility for managing wireless connectionssystemd-networkdhandles the network layer (Layer 3) configuration once wpa_supplicant establishes the data link layer (Layer 2) connection- This division follows the OSI model’s separation of network layers
- Behind the scenes:
- wpa_supplicant handles wireless scanning, authentication, and association
- Once a wireless link is established, it notifies the system
- systemd-networkd detects the active interface that matches wlan0
- It then initiates the DHCP client process to configure the network parameters
- This separation provides flexibility and security
- The wireless security operations are handled by a dedicated, well-tested component
- Networking remains under systemd-networkd’s control for consistency with other interfaces
While the systemd-networkd configuration is straightforward, things get more complicated with WPA. In standard wpa_supplicant configuration files, wireless passwords are often stored in plaintext. This creates a security vulnerability - anyone with access to the configuration file can view the password.
# /etc/wpa_supplicant/wpa_supplicant-wlan0.conf
ctrl_interface=/run/wpa_supplicant
update_config=1

network={
    ssid="YourNetworkSSID"
    psk="YourWiFiPassword"
}
The wpa_passphrase tool solves this problem by generating a pre-computed hash of the password. Running this is straightforward as the basic syntax is wpa_passphrase [SSID] [passphrase]. Then, WPA outputs a hashed version of your password.
# Generate a hashed passphrase
wpa_passphrase "MyHomeNetwork" "MySecurePassword123"
To then use the hashed password in your configuration, you can run the following command, just make sure to remove the line with the plaintext password from the config file after running it:
# Generate the hash and save directly to the configuration file
wpa_passphrase "MyHomeNetwork" "MySecurePassword123" | sudo tee -a /etc/wpa_supplicant/wpa_supplicant-wlan0.conf
When you use wpa_passphrase:
- It combines the SSID and password using the PBKDF2 (Password-Based Key Derivation Function 2) algorithm
- It applies 4096 iterations of HMAC-SHA1 for key strengthening
- The result is a 256-bit (32-byte) hash represented in hexadecimal format
- This hash is what’s actually used for the authentication process, not the original password
This approach makes it virtually impossible to reverse-engineer the original password from the hash.
# /etc/wpa_supplicant/wpa_supplicant-wlan0.conf
ctrl_interface=/run/wpa_supplicant
update_config=1

network={
    ssid="MyHomeNetwork"
    #psk="MySecurePassword123"
    psk=a8e665b82929d810746c5a1208c472f9d2a25db67a6bc32a99fa4158aea02175
}
Now that you have an idea about the basic structure of this file, let’s go over some key points:
- File Naming Convention:
- The file wpa_supplicant-wlan0.conf is specifically named to associate with the wlan0 interface.
- This naming allows different wireless interfaces to have different configurations.
- Configuration Directives:
ctrl_interface=/run/wpa_supplicant: This specifies the control interface path, which is a socket that allows programs to communicate with wpa_supplicant. This enables tools like wpa_cli to connect and control wpa_supplicant dynamically.update_config=1: Allows wpa_supplicant to update the configuration file automatically, useful when network details change or when using wpa_cli to add networks interactively.
- Network Block:
- The
network={}block defines a single wireless network configuration. ssid="YourNetworkSSID": The Service Set Identifier - the name of the wireless network to connect to.psk="YourWiFiPassword": The Pre-Shared Key - the password for the wireless network in plaintext.
- The
- Security Considerations:
- When you enter the password in plaintext as shown, wpa_supplicant will automatically convert it to a hash during processing.
- For better security, you can pre-hash the password using: wpa_passphrase “YourNetworkSSID” “YourWiFiPassword” and use the generated hash.
- The configuration file should have restricted permissions (600) to prevent other users from reading the passwords.
- Behind the scenes:
- wpa_supplicant reads this configuration at startup
- It scans for available wireless networks
- When it finds the specified SSID, it attempts to authenticate using the provided credentials
- It handles all the wireless protocol handshakes, including:
- Authentication and association with the access point
- Negotiation of encryption parameters
- Establishment of the encrypted channel
Once connected, it maintains the connection and handles roaming between access points with the same SSID. This configuration represents the minimum needed for a WPA/WPA2 Personal network connection. For more complex scenarios like enterprise authentication (WPA-EAP), additional parameters would be needed in the network block.
While the wpa_supplicant configuration files provide static configuration that saves when you write out, wpa_cli offers interactive, dynamic control over wireless connections. First ensure wpa_supplicant is running with a control interface by using ps aux | grep wpa_supplicant. If it’s running with the -c flag pointing to a config file that contains the ctrl_interface=/run/wpa_supplicant line, you can connect to it.
As a heads up, because we already created the wlan0 configuration file manually, the following steps are just for your knowledge. You’ll probably get some messages saying FAIL if you try to run some of the commands, but I think it’s good to learn them anyway—even though they aren’t necessarily important right now.
First, start the interactive mode with sudo wpa_cli, or specify the interface with sudo wpa_cli -i wlan0. Let’s go over some essential commands:
# Show help
help

# List all available commands
help all

# List available networks
scan
scan_results

# Show current status
status

# List configured networks
list_networks

# Add a new network
add_network
Step-By-Step: Adding a Network
> add_network
0
> set_network 0 ssid "MyNetwork"
OK
> set_network 0 psk "MyPassword"
OK
> set_network 0 priority 5
OK
> enable_network 0
OK
> save_config
OK

# For networks with hashed passwords
> add_network
0
> set_network 1 ssid "MyNetwork"
OK
> set_network 1 psk 0a1b2c3d4e5f6g7h8i9j0k1l2m3n4o5p6q7r8s9t0u1v2w3x4y5z
OK
> set_network 1 priority 10
OK
> enable_network 1
OK
> save_config
OK
It’s good to know that higher priority values (like 10) are preferred over lower ones (like 5). Now, you can also use wpa by running one-off commands or writing scripts with non-interactive mode. Additionally, you should know that when you first boot up your Raspberry Pi, the internet will be managed by Netplan (more on that later in this section). So, if you try to use wpa_cli save_config after creating the config files, that will return FAIL. Instead, once you write the files in the proper directories, run the reconfigure command.
# Scan for networks
sudo wpa_cli scan
sudo wpa_cli scan_results

# Save the current configuration
sudo wpa_cli save_config

# Reconnect to the network
sudo wpa_cli reconfigure
Finally, you can monitor signal quality and connection status by using the signal_poll command. The RSSI (Received Signal Strength Indicator) shows connection quality in dBm. Values closer to 0 indicate stronger signals. Additionally, you can debug connection issues using status.
> signal_poll
RSSI=-67
LINKSPEED=65
NOISE=9999
FREQUENCY=5220

> status
bssid=00:11:22:33:44:55
freq=5220
ssid=MyNetwork
id=0
mode=station
pairwise_cipher=CCMP
group_cipher=CCMP
key_mgmt=WPA2-PSK
wpa_state=COMPLETED
ip_address=192.168.1.100
Now that we’ve covered a lot of the great features available with wpa_cli, it’s time to continue configuring our server. You may remember me mentioning that the Raspberry Pi default networking tool is Netplan. Before we can enable and start the wlan0 service (meaning your primary wifi is on), we need to safely shut down Netplan.
Converting Netplan to networkd
It’s no surprise that Raspberry Pi uses Netplan as the default network manager because it provides a consistent interface for network configuration; however, there are several reasons you might want to use systemd-networkd directly:
- Simplicity: Direct systemd-networkd configuration eliminates a layer of abstraction
- Control: Direct access to all of systemd-networkd’s features without Netplan’s limitations
- Integration: Better alignment with other systemd components
- Learning: Understanding the underlying network configuration system
- Performance: Potentially faster setup without the translation layer
Ubuntu Server uses a layered approach to network configuration:
- User configuration layer: YAML files in /etc/netplan/
- Translation layer: Netplan reads YAML files and generates configurations for a backend
- Backend layer: Either systemd-networkd or NetworkManager applies the actual configuration
By removing the middle layer (Netplan), we’re configuring the backend directly. As you can see from the previous parts of this Networking section in the guide, I like the learning value and long-term potential of systemd, which is why I went with it over Netplan.
Step-by-step Migration
- Begin by creating backups of your current network configuration
# Create a backup directory
sudo mkdir -p /etc/netplan/backups

# Copy all netplan config files
sudo cp /etc/netplan/*.yaml /etc/netplan/backups/

# Document the current network state
sudo ip -c addr | sudo tee /etc/netplan/backups/current-ip-addr.txt
sudo ip -c route | sudo tee /etc/netplan/backups/current-ip-route.txt- Review your existing Netplan so you know what to recreate
# View your current netplan configs
cat /etc/netplan/*.yaml- Now, create the corresponding systemd-networkd configuration files in
/etc/systemd/network/.- For each interface (wired, wireless, etc.) in your Netplan configuration, create a corresponding
.networkfile, with the appropriate configurations (i.e. static vs. DHCP). - Remember: For wireless connections, you need both a systemd and a wpasupplicant configuration.
- For each interface (wired, wireless, etc.) in your Netplan configuration, create a corresponding
# Create the directory if it doesn't exist
sudo mkdir -p /etc/systemd/network/

# For an Ethernet configuration
sudo nano /etc/systemd/network/20-wired.network

# For a Wireless configuration
sudo nano /etc/systemd/network/25-wireless.network
sudo nano /etc/wpa_supplicant/wpa_supplicant-wlan0.conf- Now that your networkd configuration is in place, disable Netplan.
# Ensure systemd-networkd is enabled
sudo systemctl enable systemd-networkd
sudo systemctl enable systemd-resolved
sudo systemctl start systemd-networkd

# Move the Netplan configurations to a disabled state
sudo mkdir -p /etc/netplan/disabled
sudo mv /etc/netplan/*.yaml /etc/netplan/disabled/

# Create a minimal netplan configuration that defers to systemd-networkd
sudo tee /etc/netplan/01-network-manager-all.yaml > /dev/null << EOF
network:
  version: 2
  renderer: networkd
EOF
Let’s take a look at the systemctl enable and start commands, because without them we will lose connectivity when turning off netplan. Before we do that, however, what the minimal netplan configuration file does is essentially tell Netplan to just use networkd. We’ll remove it once we are sure everything is up and running.
- Enable Command:
sudo systemctl enable systemd-networkd: This configures systemd-networkd to start automatically when the system boots.- Behind the scenes:
- This command creates the necessary symbolic links in systemd’s unit directories so that the network daemon will be started by systemd during the boot process.
- It integrates the service into systemd’s dependency tree.
- Without this step, you would need to manually start networkd after each reboot, which is impractical for a server environment.
- Start Command:
sudo systemctl start systemd-networkd: This launches the systemd-networkd daemon immediately.- Behind the scenes:
- systemd spawns the networkd process, which then:
- Reads all .network, .netdev, and .link configuration files in
/etc/systemd/network/and/usr/lib/systemd/network/ - Applies the configurations to matching interfaces
- Sets up monitoring for network changes
- Reads all .network, .netdev, and .link configuration files in
- systemd spawns the networkd process, which then:
- Restart Command:
sudo systemctl restart systemd-networkd: This stops and then starts the daemon again, ensuring all configuration changes are applied.- Behind the scenes:
- systemd sends a termination signal to the running networkd process, waits for it to exit cleanly, and then starts a new instance.
- The new instance repeats the initialization process, reading all configuration files again.
- This is the command you’ll use most frequently when making changes to network configurations.
- Why Restart Is Necessary:
- While systemd-networkd does monitor for some changes, editing configuration files doesn’t automatically trigger a reconfiguration.
- The restart ensures that:
- All new or modified configuration files are re-read
- Any removed configurations are no longer applied
- All interface configurations are freshly evaluated against the current state
- Impact on Network Connectivity:
- A restart will temporarily disrupt network connectivity as interfaces are reconfigured
- For remote servers, use caution when restarting network services to avoid losing your connection
- For critical remote systems, consider using a command pipeline, like:
sudo systemctl restart systemd-networkd.service || (sleep 30 && sudo systemctl start systemd-networkd.service)- Which attempts to restart and then tries to start the service again after 30 seconds if connectivity is lost
- Apply the systemd-networkd network configuration
# Apply Netplan changes (this will do nothing as we now have a minimal config)
sudo netplan apply

# Restart systemd-networkd to apply our direct configuration
sudo systemctl restart systemd-networkd

# The next step is to enable and start the wpa_supplicant service.

sudo systemctl enable wpa_supplicant@wlan0.service
sudo systemctl start wpa_supplicant@wlan0.service
These commands are crucial for integrating wpa_supplicant with systemd, let’s break them down:
- Service Template:
- The
wpa_supplicant@wlan0.servicesyntax uses systemd’s template unit feature. - The @ symbol indicates a template service, and wlan0 is the instance name that gets passed to the template.
- This allows the same service definition to be used for different wireless interfaces.
- The
- Enable Command:
sudo systemctl enable wpa_supplicant@wlan0.service: This creates symbolic links from the system’s service definition directory to systemd’s active service directory, ensuring the service starts automatically at boot.- Behind the scenes:
- This modifies systemd’s startup configuration by adding the service to the correct target units. Typically multi-user.target.
- The symbolic links created point to the wpa_supplicant service template file.
- Start Command:
sudo systemctl start wpa_supplicant@wlan0.service: This immediately starts the service without waiting for a reboot.- Behind the scenes:
- systemd executes the wpa_supplicant binary with appropriate arguments
- Derived from the service template and the instance name (wlan0).
- The command effectively executed is similar to:
/usr/sbin/wpa_supplicant -c /etc/wpa_supplicant/wpa_supplicant-wlan0.conf -i wlan0
- Integration with systemd-networkd:
- When wpa_supplicant successfully connects to a wireless network, it brings the interface up
- systemd-networkd detects this state change through kernel events
- systemd-networkd then applies the matching network configuration (our earlier 25-wireless.network file)
- If DHCP is enabled, the DHCP client process begins
- Benefits of this systemd configuration:
- Dependency management (services can start in the correct order)
- Automatic restart if the service fails
- Standardized logging through journald
- Consistent management interface alongside other system services
- The template approach allows for modular configuration that can be easily expanded if you add more wireless interfaces to your Raspberry Pi.
- Verify the new configuration by checking the
systemctl statusand running simple network check commands
# Check systemd-networkd status
systemctl status systemd-networkd

# Check interface status
ip addr show

# Test connectivity
ping -c 4 google.com
You should see outputs that look like this: Note, I didn’t show the output of ip addr because I don’t want to accidentally post my actual IP address online.
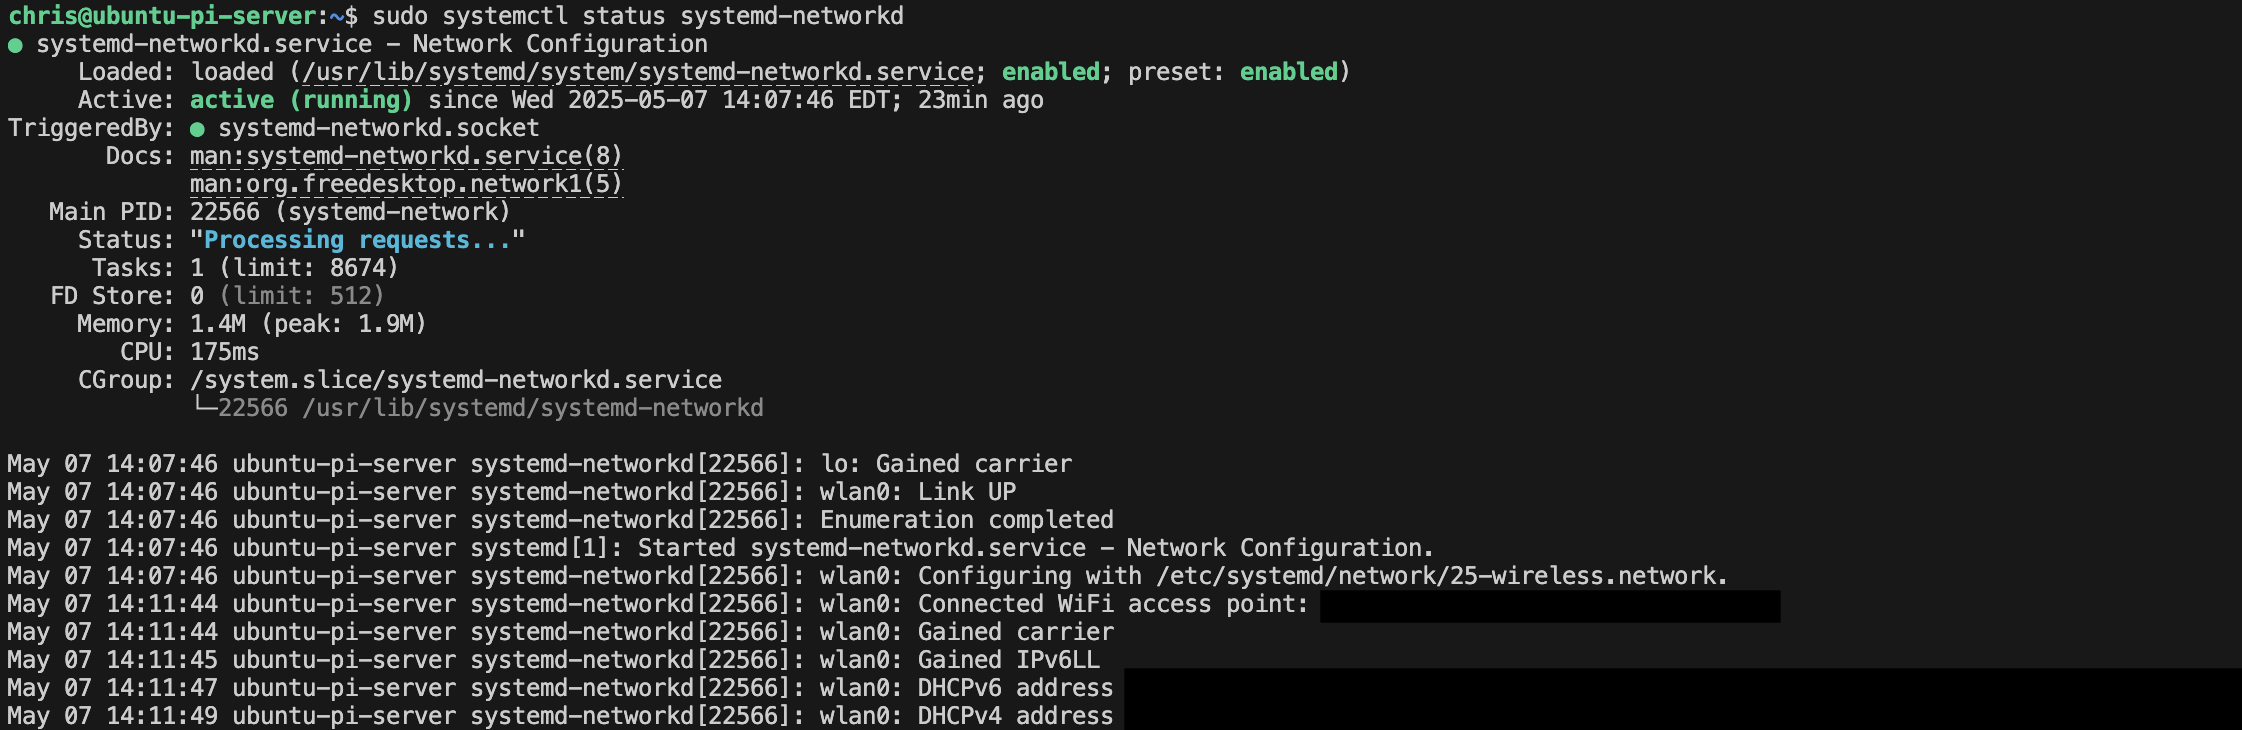
- Make the change permanent
# Remove the minimal Netplan configuration
sudo rm /etc/netplan/01-network-manager-all.yaml

# Mask the Netplan service to prevent it from running
sudo systemctl mask netplan-wpa@.service
sudo systemctl mask netplan-ovs-cleanup.service
sudo systemctl mask netplan-wpa-wlan0.service
One final note before moving on, by the time I removed the generic netplan configuration, my system did not have netplan-wpa.service or netplan-wpa-wlan0.service. I forgot to look before I tested the previous steps, so I’m not sure if I did, but I’ll leave them here just in case someone needs them. That being said, I was able to mask netplan-ovs-cleanup.service successfully.
Troubleshooting
Once you’ve finished making changes and applying them, verify that everything is up, running, and as you expect.
# Check systemd-networkd status
systemctl status systemd-networkd

# View network status
networkctl status

# List all network links
networkctl list
These are crucial commands for troubleshooting and confirming your network configuration, let’s break them down:
- systemd-networkd Status Check:
systemctl status systemd-networkd: This displays the current status of the systemd-networkd service. The output includes:- Whether the service is active, inactive, or failed
- When it was started and how long it’s been running
- The process ID and memory usage
- Recent log entries directly related to the service
- Behind the scenes:
- This queries systemd’s internal service management database and pulls relevant information from the journal logging system.
- Useful pattern: Look for “Active: active (running)” to confirm the service is working properly and check the logs for any warning or error messages.
- Network Status Overview:
networkctl status: This command provides a comprehensive overview of your system’s network state.- The output includes:
- Hostname and domain information
- Gateway and DNS server configurations
- Current network interfaces and their states
- Network addresses (IPv4 and IPv6)
- The output includes:
- Behind the scenes:
- This tool directly communicates with systemd-networkd using its D-Bus API to retrieve the current network state.
- This command is particularly useful because it aggregates information that would otherwise require multiple different commands to collect.
- Network Links Enumeration:
networkctl list: This lists all network interfaces known to systemd-networkd.- The output shows:
- Interface index numbers
- Interface names
- Interface types (ether, wlan, loopback, etc.)
- Operational state (up, down, dormant, etc.)
- Setup state (configured, configuring, unmanaged)
- The output shows:
- Behind the scenes:
- Like the status command, this uses systemd-networkd’s D-Bus API to enumerate all network links and their current states.
- This provides a quick way to verify which interfaces systemd-networkd is managing and their current status.
- Troubleshooting with These Commands:
- Start with systemctl status systemd-networkd to ensure the service is running
- Use networkctl list to see which interfaces are detected and their states
- If an interface shows “configuring” instead of “configured,” check for configuration errors
- Use networkctl status to verify DNS settings and addressing
- For more detailed logs: journalctl -u systemd-networkd shows all logs from the networkd service
These commands represent the primary diagnostic tools when working with systemd-networkd. They provide a layered approach to troubleshooting - from service-level status to detailed interface information - that helps pinpoint issues in your network configuration. If you need more:
- Network Connectivity Loss:
- Connect directly to the device via console or keyboard/monitor
- Check logs with
journalctl -u systemd-networkd - Restore the Netplan configuration from your backup if needed
- DNS Resolution Issues:
- Ensure systemd-resolved is running:
systemctl status systemd-resolved - Check
/etc/resolv.confis a symlink to/run/systemd/resolve/stub-resolv.conf - If not, create it:
sudo ln -sf /run/systemd/resolve/stub-resolv.conf /etc/resolv.conf
- Ensure systemd-resolved is running:
- Configuration Errors:
- Verify syntax with
networkctl listto see if interfaces are “configured” or “configuring” - Check for errors with
journalctl -u systemd-networkd -n 50
- Verify syntax with
systemd-networkd and systemd-resolved: Working Together
While systemd-networkd handles interface configuration and routing, systemd-resolved manages DNS resolution—they’re designed as complementary components that work together for complete network functionality. When you specify DNS servers in a networkd configuration file, networkd communicates this information to resolved, which then manages the actual DNS queries and caching.
This separation follows systemd’s philosophy of modular components with specific responsibilities. You can see this relationship in action when networkd applies a configuration with DNS settings—it doesn’t directly modify /etc/resolv.conf, but instead passes the information to resolved, which creates a special version of resolv.conf (usually a symlink to /run/systemd/resolve/stub-resolv.conf).
Both services need to be enabled and running for full functionality:
sudo systemctl enable systemd-networkd systemd-resolved
sudo systemctl start systemd-networkd systemd-resolved
If you’re troubleshooting DNS issues, remember to check both services’ status, as a problem with either one can affect name resolution. You can view resolved’s current DNS configuration with resolvectl status.
Advanced Networking
Subnets
A subnet is a logical subdivision of an IP network. Subnetting allows network administrators to partition a large network into smaller, more manageable segments. Subnetting serves several important functions:
- Address Conservation: More efficient allocation of limited IPv4 address space
- Security Segmentation: Isolating sensitive systems from general network traffic
- Broadcast Domain Control: Reducing broadcast traffic by limiting its scope
- Hierarchical Addressing: Simplifying routing tables and network management
- Traffic Optimization: Improving network performance by segregating traffic types
A subnet mask determines which portion of an IP address refers to the network and which portion refers to hosts within that network. Consider an IPv4 address: 192.168.1.10 with subnet mask 255.255.255.0 (/24)
- In binary:
- IP: 11000000.10101000.00000001.00001010
- Mask: 11111111.11111111.11111111.00000000
- The 1s in the mask represent the network portion, while the 0s represent the host portion.
- In CIDR Notation:
- /24 means the first 24 bits identify the network (equivalent to 255.255.255.0)
- /16 means the first 16 bits identify the network (equivalent to 255.255.0.0)
- Subnet Calculations: For a /24 network
- Network address: First address in range (e.g., 192.168.1.0)
- Broadcast address: Last address in range (e.g., 192.168.1.255)
- Available host addresses: 2^(32-prefix) - 2 = 2^8 - 2 = 254 usable addresses
Creating subnets involves both network design and interface configuration. Here’s how to implement subnetting on a Linux server using systemd-networkd:
- Scenario 1: Simple Subnet Isolation
- This configuration matches the eth1 interface
- Assigns it the IP 10.0.1.1 within a /24 subnet (255.255.255.0)
- Enables IP forwarding to allow traffic between this subnet and others
- When applied, this creates a subnet with 254 usable addresses (10.0.1.1 through 10.0.1.254, excluding the network address 10.0.1.0 and broadcast address 10.0.1.255).
# /etc/systemd/network/25-subnet.network
[Match]
Name=eth1

[Network]
Address=10.0.1.1/24
IPForward=yes- Scenario 2: Multiple Subnets on a Single Interface
- This configuration creates three separate subnets accessed through the same physical interface
- A /24 subnet (256 addresses) in the 192.168.1.x range
- A /24 subnet (256 addresses) in the 10.10.10.x range
- A /16 subnet (65,536 addresses) in the 172.16.x.x range
- This configuration creates three separate subnets accessed through the same physical interface
The system serves as a router/gateway for all three networks simultaneously.
# /etc/systemd/network/30-multi-subnet.network
[Match]
Name=eth0

[Network]
Address=192.168.1.10/24
Address=10.10.10.1/24
Address=172.16.1.1/16- DHCP Server Configuration for Subnets
- This configuration creates a subnet (10.0.1.0/24) on eth1
- Enables a DHCP server
- Allocates IPs from 10.0.1.11 (base + offset of 10) through 10.0.1.210 (for 200 addresses)
- Provides DNS server information to DHCP clients
# /etc/systemd/network/25-dhcp-server.network
[Match]
Name=eth1

[Network]
Address=10.0.1.1/24
IPForward=yes
DHCPServer=yes

[DHCPServer]
PoolOffset=10
PoolSize=200
EmitDNS=yes
DNS=8.8.8.8
Although more complicated than simple networking, subnetting can enhance security when configured properly. It improves isolation by putting separate sensitive services onto different subnets, segmentation by limiting broadcast domains to reduce the potential attack surface, and access control by implementing filters between subnets at the router level. You can see an example of a security-enhanced subnet configuration below, as well as a list of commands to troubleshoot your subnet with.
# /etc/systemd/network/25-secure-subnet.network
[Match]
Name=eth2

[Network]
Address=10.0.3.1/24
IPForward=yes
IPMasquerade=yes  # NAT for outgoing connections
ConfigureWithoutCarrier=yes

[DHCPServer]
PoolOffset=50
PoolSize=100
EmitDNS=yes
DNS=1.1.1.1

# Restrict routes between subnets for this segment
[Route]
Gateway=_ipv4gateway
Destination=0.0.0.0/0
# Check interface configuration
ip addr show
# Verify routing tables
ip route show
ip route show table 200 # For custom route tables
# Test connectivity between subnets
ping 10.0.1.1 # From another subnet
# View ARP table to verify proxy ARP functionality
ip neigh show
# Check systemd-networkd logs for issues
journalctl -u systemd-networkd -n 50SSH
Now that you have your basic Ubuntu Pi server configured and connected to a network, it’s time to do some final configurations before beginning the more coding-focused development. For the coding side of things, we’ll want to remotely connect using a different computer and connection than the wired keyboard/monitor with our Raspberry Pi. To do this, we’ll utilize VS Code, an open source IDE (integrated development environment) from Microsoft. Before that, we’ll need to set up and configure SSH (Secure Shell), one of the most common ways to connect to a remote server. Simply put, SSH is a network protocol that creates an encrypted tunnel between computers, allowing secure remote management. Think of it as establishing a private, secure telephone line that only authorized parties can use to communicate.
Once we have SSH set up, configured, and secured, we’ll use a feature in VS Code called Remote - SSH which lets us use the nice UI of an IDE while working on the actual server. This is really beneficial for a variety of reasons: one of them being the fantastic community-built extensions that drastically improve the development experience, another being the integration with other tools for things like CI/CD.
Key Terms
SSH Basic Concepts:
- SSH (Secure Shell): A cryptographic network protocol for secure communication between computers over an unsecured network.
- SSH Server: The computer or service that accepts incoming SSH connections.
- SSH Client: The application used to initiate connections to SSH servers.
- sshd: The SSH server daemon that listens for and handles SSH connections.
- ssh_config: The client-side configuration file that controls outgoing SSH connections.
- sshd_config: The server-side configuration file that controls incoming SSH connections.
- Host Key: A cryptographic key that identifies an SSH server.
Authentication Methods:
- Password Authentication: Authentication using a traditional username and password.
- Public Key Authentication: Authentication using asymmetric cryptographic key pairs.
- Private Key: The secret half of a key pair that should never be shared.
- Public Key: The shareable half of a key pair that can be distributed to servers.
- Passphrase: An optional password that encrypts and protects a private SSH key.
- authorized_keys: A file containing public keys that are allowed to authenticate to an SSH server.
- known_hosts: A file on the client side that stores server host keys to verify server identity.
SSH Key Types and Security:
- RSA (Rivest-Shamir-Adleman): A widely used public-key cryptosystem for secure data transmission.
- ECDSA (Elliptic Curve Digital Signature Algorithm): A cryptographic algorithm offering good security with shorter key lengths.
- Ed25519: A modern, secure, and efficient public-key signature system.
- Key Length: The size of a cryptographic key, typically measured in bits.
- Fingerprint: A short sequence used to identify a longer public key.
- SSH Agent: A program that holds private keys in memory to avoid repeatedly typing passphrases.
SSH Security and Tools:
- Port Forwarding: The ability to tunnel network connections through an SSH connection.
- SSH Tunnel: An encrypted network connection established through SSH.
- SCP (Secure Copy Protocol): A means of securely transferring files between hosts based on SSH.
- SFTP (SSH File Transfer Protocol): A secure file transfer protocol that operates over SSH.
- UFW (Uncomplicated Firewall): A simplified firewall management interface for iptables.
- Fail2Ban: An intrusion prevention software that protects servers from brute-force attacks.
SSH Basics
SSH Client vs Server Configuration
The SSH system uses two main configuration files with distinct purposes:
ssh_config:- Lives on your client machine (like your laptop)
- Controls how your system behaves when connecting to other SSH servers
- Affects outgoing SSH connections
- Located at
/etc/ssh/ssh_config(system-wide) and~/.ssh/config(user-specific)- If your server ever moves or connects to a new IP address, simply update it in the user config file
sshd_config:- Lives on your server (the Raspberry Pi)
- Controls how your SSH server accepts incoming connections
- Determines who can connect and how
- Located at
/etc/ssh/sshd_config - Requires root privileges to modify
- Changes require restarting the SSH service
Key-Based Authentication Setup
Understanding SSH Keys and Security
This guide uses ECDSA-384 keys, which offer several advantages:
- Uses the NIST P-384 curve, providing security equivalent to 192-bit symmetric encryption
- Better resistance to potential quantum computing attacks compared to smaller key sizes
- Standardized under FIPS 186-4
- Excellent balance between security and performance
Generating Your SSH Keys
You might remember from the beginning of this guide that you can generate an SSH key-pair when flashing the image using RPi Imager. Even if you did that, PasswordAuthentication will still be enabled in the server’s /etc/ssh/sshd_config. That being said, if you didn’t do that and want to learn how you can handle this all the old fashioned way, then on your laptop, generate a new SSH key pair:
# Generate a new SSH key pair using ECDSA-384
ssh-keygen -t ecdsa -b 384 -C "ubuntu-pi-server"
This command:
-t ecdsa: Specifies the ECDSA algorithm-b 384: Sets the key size to 384 bits-C "ubuntu-pi-server": Adds a descriptive comment
The command generates two files:
~/.ssh/ubuntu_pi_ecdsa: Your private key (keep this secret!)~/.ssh/ubuntu_pi_ecdsa.pub: Your public key (safe to share)
Installing Your Public Key on the Raspberry Pi
Transferring your public key to your Raspberry Pi is easy, just know the following will only work if you currently have password authentication enabled.
ssh-copy-id -i ~/.ssh/ubuntu_pi_ecdsa.pub chris@ubuntu-pi-serverThis command:
- Connects to your Pi using password authentication
- If you’re restoring your config, you’ll need to temporarily set PasswordAuthentication in
/etc/ssh/sshd_configto yes
- If you’re restoring your config, you’ll need to temporarily set PasswordAuthentication in
- Creates the
.sshdirectory if needed - Adds your public key to
authorized_keys - Sets appropriate permissions automatically
Server-Side SSH Configuration
A client-server relationship is a fundamental computing model that underpins most network communications and distributed systems. This architecture divides computing responsibilities between service requestors (clients, your laptop in this case) and service providers (servers, the Raspberry Pi in this case).
A server is a computer program or device that provides functionality, resources, or services to multiple clients. The Raspberry Pi in this case.
- Service Provider: Responds to client requests rather than initiating communication
- Resource Management: Manages shared resources (files, databases, computational power)
- Continuous Operation: Typically runs continuously, waiting for client requests
- Scalability: Often designed to handle multiple concurrent client connections
- Examples: Web servers, database servers, file servers, mail servers, authentication servers
Client-server communication follows a request-response pattern:
- Connection: The client establishes a connection to the server
- Request: The client sends a formatted request for a specific service
- Processing: The server processes the request according to its business logic
- Response: The server returns appropriate data or status information
- Disconnection or Persistence: The connection may be terminated or maintained for future requests
This communication typically occurs over TCP/IP networks using standardized protocols that define the format and sequence of messages exchanged.
Understanding Server Host Keys
Your Pi’s /etc/ssh and /home/chris/.ssh directories contain several important files:
- Authorized keys (in
/home/chris/.ssh/authorized_keys) - Host key pairs (public and private) for different algorithms (in
/etc/ssh) - Configuration files and directories
- The moduli file for key exchange
Client-Side Configuration
A client is a computer program or device that requests services, resources, or information from a server.
- Request Initiator: Clients always initiate communication with servers
- User Interface: Often provides the interface through which users interact with remote services
- Limited Resources: Typically has fewer resources than servers and offloads intensive processing
- Dependency: Relies on servers to fulfill requests and cannot function independently for networked operations
- Examples: Web browsers, email clients, SSH clients, mobile applications
From a technical perspective, clients:
- Formulate and send requests using specific protocols (HTTP, FTP, SMTP, etc.)
- Wait for and process server responses
- Present results to users or use them for further operations
Setting Up Your SSH Config
Create or edit ~/.ssh/config on your laptop:
Host ubuntu-pi-server
    HostName ubuntu-pi-server
    User chris
    IdentityFile ~/.ssh/ubuntu_pi_ecdsa
Port 45000If your ssh isn’t picking up on the ~/.ssh/ssh_config then you might need to specify it in the system config. Find the line in /etc/ssh/ssh_config that says Include and add the absolute file path. If you need to include more than your user specific config, such as the default /etc/ssh/ssh_config.d/* just add that absolute path separated by a space from any other path included.
Managing Known Hosts
- Back up your current known_hosts file:
cp ~/.ssh/known_hosts ~/.ssh/known_hosts.backup- View current entries:
ssh-keygen -l -f ~/.ssh/known_hosts- Remove old entries:
# Remove specific host
ssh-keygen -R ubuntu-pi-server- Hash your known_hosts file for security:
ssh-keygen -H -f ~/.ssh/known_hostsSecuring the Key File
When using SSH key-based authentication, adding a password to your key enhances security by requiring a passphrase to use the key. This guide explains how to add and remove a password from an existing SSH key.
Adding a Password to an SSH Key
If you already have an SSH key and want to add a password to it, use the following command:
ssh-keygen -p -f ~/.ssh/id_rsaExplanation:
-p: Prompts for changing the passphrase.-f ~/.ssh/id_rsa: Specifies the key file to modify (adjust if your key has a different name). You will be asked for the current passphrase (leave blank if none) and then set a new passphrase.
Removing a Password from an SSH Key
If you want to remove the passphrase from an SSH key, run:
ssh-keygen -p -f ~/.ssh/id_rsa -N ""Explanation:
-N "": Sets an empty passphrase (removes the password).- The tool will ask for the current passphrase before removing it.
Verifying the Changes
After modifying the key, test the SSH connection from your CLI, or using an SSH tunnel.
ssh -i ~/.ssh/id_rsa user@your-serverIf you added a passphrase, you’ll be prompted to enter it when connecting.
By using a passphrase, your SSH key is protected against unauthorized use in case it gets compromised. If you frequently use your SSH key, consider using an SSH agent (ssh-agent) to cache your passphrase securely.
Implementing SSH Security Measures
Securing SSH is critical because it serves as the primary gateway for remote server management, making it a prime target for attackers. A compromised SSH connection can lead to unauthorized access, data breaches, privilege escalation, and complete system takeover. By implementing robust SSH security measures like key-based authentication, non-standard ports, and intrusion prevention systems, you significantly reduce your attack surface while maintaining convenient remote access. Proper SSH hardening also helps meet compliance requirements for many industries while providing detailed audit logs for security monitoring. For a 24/7 self-hosted server exposed to the internet, optimized SSH security isn’t optional—it’s essential for protecting your system and the data it contains.
- Back up the original configuration:
sudo cp /etc/ssh/sshd_config /etc/ssh/sshd_config.backup-$(date +%Y%m%d)- Optimize host key settings in sshd_config:
# Specify host key order (prioritize ECDSA)
HostKey /etc/ssh/ssh_host_ecdsa_key
HostKey /etc/ssh/ssh_host_ed25519_key
HostKey /etc/ssh/ssh_host_rsa_key- Strengthen the moduli file:
# Back up the existing file
sudo cp /etc/ssh/moduli /etc/ssh/moduli.backup

# Remove moduli less than 3072 bits
sudo awk '$5 >= 3072' /etc/ssh/moduli > /tmp/moduli
sudo mv /tmp/moduli /etc/ssh/moduli- Apply changes:
# Test the configuration
sudo sshd -t

# Restart the SSH service (on Ubuntu Server)
sudo systemctl restart ssh

# Verify the service status
sudo systemctl status ssh
Just note, you’ll probably need to reboot (sudo reboot) your server before all of the changes fully take place. Once you’ve done that, you may need to run sudo systemctl start ssh.
Firewall Configuration with ufw
A firewall acts as a barrier between your server and potentially hostile networks by controlling incoming and outgoing traffic based on predetermined rules. UFW provides a user-friendly interface to the underlying iptables firewall system in Linux.
- Default Deny Policy: Start with blocking all connections and only allow specific permitted traffic
- Stateful Inspection: Track the state of active connections rather than just examining individual packets
- Port Control: Allow or block access based on specific network ports
- Source Filtering: Control traffic based on originating IP addresses or networks
# Install UFW (if it isn't already)
sudo apt install ufw

# Allow SSH connections
sudo ufw allow ssh

# Enable the firewall
sudo ufw enable
Behind the scenes, UFW translates these simple commands into complex iptables rules, making firewall management accessible without sacrificing security. The underlying iptables system uses a chain-based architecture to process packets through INPUT, OUTPUT, and FORWARD chains. Now, you’ll want to add rules for example, allowing traffic on a specific port if you took the step to choose a nonstandard, one that isn’t the default Port 22, for this guide, I’m choosing 45000.
# Add a new rule in the port/protocol format
sudo ufw add 45000/tcp

# Allow traffic between subnets 10.0.1.0/24 and 10.0.2.0/24
sudo ufw allow from 10.0.1.0/24 to 10.0.2.0/24

# See a list of all rules
sudo ufw status numbered

# Remove the default rules
sudo ufw delete 1
Fail2Ban
Fail2Ban is a security tool designed to protect servers from brute force attacks. It works by monitoring log files for specified patterns, identifying suspicious activity (like multiple failed login attempts), and banning the offending IP addresses using firewall rules for a set period. It’s especially useful for securing SSH, FTP, and web services.
The best part is the project is entirely open source, you can view the source code and contribute here.
# Install Fail2Ban
sudo apt update
sudo apt install fail2ban

# Start and enable Fail2Ban
sudo systemctl start fail2ban
sudo systemctl enable fail2ban

# Check the status of all jails
sudo fail2ban-client status

# Check the status of a specific jail
sudo fail2ban-client status sshd

# View banned IPs
sudo iptables -L -n | grep f2b
I want to add that fail2ban automatically pulls values for its jails depending on how you’ve configured things on your system, at least I assume so. I’m assuming that because I never configured specific ssh rules for fail2ban, but it knows to allow the port I set in my sshd_config. That being said, you can see how simple it was to setup these tools, and how they work together to create a comprehensive security system:
- UFW establishes the baseline by controlling which ports are accessible
- Fail2Ban adds behavioral analysis by monitoring authentication attempts
- Together they provide both static and dynamic protection
This layered approach follows the defense-in-depth principle essential to modern cybersecurity. By combining a properly configured firewall with an intrusion prevention system, you significantly reduce the attack surface of your Ubuntu Pi Server.
Regular Security Checks
- Monitor SSH login attempts:
sudo journalctl -u ssh- Check authentication logs:
sudo tail -f /var/log/auth.logSCP (Secure Copy Protocol) and rsync (Remote Sync)
This section outlines the process of securely copying files between your Ubuntu Pi Server and your Client machine. I’ll cover two powerful methods: SCP (Secure Copy Protocol) and rsync. Both tools operate over SSH, ensuring your file transfers remain encrypted and secure.
SCP is a simple file transfer utility built on SSH that allows you to copy files between computers. It’s straightforward for basic transfers but lacks advanced features for large or frequent transfers.
rsync is a more sophisticated file synchronization and transfer utility that offers several advantages over SCP:
- Incremental transfers: Only sends parts of files that changed
- Resume capability: Can continue interrupted transfers
- Bandwidth control: Can limit how much network it uses
- Preservation options: Maintains file timestamps, permissions, etc.
- Directory synchronization: Can mirror directory structures
- Exclusion patterns: Can skip specified files/directories
Ensuring Your SSH Configuration Works
Before attempting file transfers, verify your SSH connection is properly configured:
ssh -F ~/.ssh/config chris@ubuntu-pi-serverThis command explicitly specifies the user configuration file location with the -F flag.
Note: To ensure SSH always uses your user-specific config:
- Set proper permissions on your config file:
chmod 600 ~/.ssh/config- Update the system-wide SSH config to include your user config:
sudo nano /etc/ssh/ssh_configAdd this line:
Include ~/.ssh/configAfter applying these changes, you should be able to connect using the simplified command:
ssh ubuntu-pi-serverCopying Individual Files from Server to Client
The basic syntax for copying files from your server to your local machine is shown below. Know that in all code examples in this section, you should run it in a terminal on your client/local machine:
scp ubuntu-pi-server:~/configs/wpa_supplicant-wlan0.conf ~/Documents/raspberry_pi_server/configs
scp ubuntu-pi-server:~/configs/25-wireless.network ~/Documents/raspberry_pi_server/configs
Each command performs the following actions:
scp: Invokes the secure copy programubuntu-pi-server:~/configs/wpa_supplicant-wlan0.conf: Specifies the source file on the remote server~/Documents/raspberry_pi_server/25-wireless.network: Specifies the destination directory on your local machine
Copying Multiple Files at Once
To copy all Bash scripts from a directory in one command:
scp chris@ubuntu-pi-server:~/configs/*.sh ~/Documents/raspberry_pi_server/configsThe wildcard pattern *.sh tells SCP to match all files with the .sh extension. Here, I’ve included the username chris@ explicitly, which can help resolve connection issues if your SSH config isn’t being properly recognized.
Recursively Copying Directories
To copy entire directories with their contents:
scp -r chris@ubuntu-pi-server:~/mnt/backups/ ~/Documents/raspberry_pi_server/backups/configsThe -r flag (recursive) tells SCP to copy directories and their contents.
Copying Files from Client to Server
To send files in the opposite direction (local to remote):
scp -r ~/Documents/pi-scripts chris@ubuntu-pi-server:~/scriptsTransferring Files with rsync
For larger files or when you need to synchronize directories, rsync offers significant advantages over SCP.
To copy a single file from server to client:
rsync -avz ubuntu-pi-server:~/configs/25-wireless.network ~/Documents/raspberry_pi_server/configsLet’s break down these common flags:
-a: Archive mode, preserves permissions, timestamps, etc. (shorthand for-rlptgoD)-v: Verbose, shows detailed progress-z: Compresses data during transfer, saving bandwidth
Syncing Directories with rsync
To sync an entire directory from server to client:
rsync -avz --progress ubuntu-pi-server:~/configs/ ~/Documents/raspberry_pi_server/configsThe --progress flag shows a progress bar for each file transfer, which is particularly useful for large files.
Important Note: The trailing slash on the source path (~/configs/) is significant
- With trailing slash: Copies the contents of the directory
- Without trailing slash: Copies the directory itself and its contents
Syncing in Reverse (Client to Server)
To sync files from your client to the server:
rsync -avz --progress ~/Documents/raspberry_pi_server/configs chris@ubuntu-pi-server:~/configs/Using rsync with Dry Run
Before performing large transfers, you can see what would happen without actually making changes:
rsync -avzn --progress ~/Documents/raspberry_pi_server/configs chris@ubuntu-pi-server:~/configs/The -n flag (or --dry-run) simulates the transfer without changing any files, letting you verify what would happen.
Incremental Backups with rsync
rsync excels at keeping directories in sync over time. After the initial transfer, subsequent runs only transfer what’s changed:
rsync -avz --delete ~/Documents/raspberry_pi_server/configs chris@ubuntu-pi-server:~/configs/The --delete flag removes files from the destination that no longer exist in the source, creating a perfect mirror. Use with caution!
Advanced rsync Examples
Custom SSH Parameters
To specify specific ssh paramters, such as key file or port:
rsync -avz --progress -e 'ssh -p 45000 -i ~/.ssh/ubuntu_pi_ecdsa' chris@192.168.1.151:/mnt/backups/configs/master backups/configs/The e flag tells rsync to execute ssh with those specific flags, when it initiates the connection.
Excluding Files or Directories
To skip certain files or directories during transfer:
rsync -avz --exclude="*.tmp" --exclude="node_modules" ~/Documents/raspberry_pi_server/configs chris@ubuntu-pi-server:~/configs/This command excludes all .tmp files and the node_modules directory.
Setting Bandwidth Limits
If you need to limit how much network bandwidth rsync uses:
rsync -avz --bwlimit=1000 ~/Documents/raspberry_pi_server/configs chris@ubuntu-pi-server:~/configs/The --bwlimit=1000 restricts transfer speed to 1000 KB/s (approximately 1 MB/s).
Preserving Hard Links
When backing up systems that use hard links (like Time Machine or some backup solutions):
rsync -avH ~/Documents/raspberry_pi_server/configs chris@ubuntu-pi-server:~/configs/The -H flag preserves hard links, which can save significant space in backups.
Choosing Between SCP and rsync
Use SCP when: - You need a quick, one-time file transfer - You want a simple command with minimal options - The files are small and not changing frequently
Use rsync when: - You need to synchronize directories - You’re transferring large files that might get interrupted - You want to maintain exact mirrors of directory structures - You’re setting up automated backups - You need to preserve file attributes like permissions and timestamps - You need to exclude certain files or patterns
- SSH Configuration: Ensure your SSH config is properly set up before attempting file transfers
- SCP: Simple, straightforward file copying between systems
- rsync: More powerful synchronization tool with many options for efficiency
- SSH is now correctly configured and working using
ssh ubuntu-pi-server. - Bash scripts can be securely copied from the Ubuntu Pi Server to the client machine using
scp.- Just take note of the specific syntax used, namely
server-name:path/to/files
- Just take note of the specific syntax used, namely
- The user can now maintain local backups of important scripts efficiently.
- Enables you to develop where you’d like and then easily move files to test scripts
- SSH is now correctly configured and working using
- Trailing Slashes: Pay attention to trailing slashes in paths, as they change behavior
- Dry Run: Use
--dry-runwith rsync to preview what will happen - Automation: Consider creating scripts for routine backup tasks
Both SCP and rsync are invaluable tools for managing files on your Raspberry Pi server. While SCP is perfect for quick, simple transfers, rsync provides the power and flexibility needed for maintaining backups and keeping systems synchronized.
Remote Development with VS Code
Key Terms
Remote Development Concepts:
- IDE (Integrated Development Environment): A software application that provides comprehensive facilities for software development.
- Remote Development: Developing code on a remote machine while using local tools and interfaces.
- Headless Development: Writing code on a system without a graphical interface, often remotely.
- Extension: Add-ons that enhance the functionality of development tools.
- Workspace: A collection of files and folders that make up a development project.
- Sync: The process of keeping files consistent between local and remote systems.
- Port Forwarding: Redirecting communication from one network port to another.
- Development Container: A container configured specifically for development purposes.
VS Code Specific Terminology:
- VS Code: Visual Studio Code, a code editor developed by Microsoft.
- Remote - SSH Extension: A VS Code extension that allows connecting to and developing on remote machines over SSH.
- Remote Explorer: A VS Code interface for managing remote connections.
- SSH Target: A remote machine configured for SSH access in VS Code.
- SSH Config: Configuration file defining SSH connection properties.
- Dev Container: A containerized development environment defined for a VS Code project.
- Workspace Settings: Project-specific configurations in VS Code.
- Settings Sync: A feature that synchronizes VS Code settings across different instances.
- Task: Configured commands that can be executed within VS Code.
- Launch Configuration: Settings that define how to debug applications in VS Code.
VS Code and IDE-based Development
Remote development with Visual Studio Code transforms your Raspberry Pi server from a command-line environment into a fully-featured development platform. While terminal-based SSH access provides basic server management capabilities, VS Code Remote SSH creates a seamless bridge between your local machine’s powerful editor interface and your remote server’s computing resources. This approach combines the convenience of a graphical editor with syntax highlighting, intelligent code completion, and integrated debugging while executing code directly on your Raspberry Pi server—perfect for resource-intensive tasks or when working with server-specific configurations.
The VS Code Remote SSH extension uses your existing SSH configurations to establish a secure connection to your server. Once connected, the extension installs a lightweight VS Code server component on your Raspberry Pi, enabling real-time file editing, terminal access, and extension functionality—all while maintaining the security of your SSH connection. This method eliminates the need to constantly transfer files between local and remote systems, making development significantly more efficient.
Installing VS Code and the Remote - SSH Extension
First, you’ll need to install VS Code on your local machine (MacBook Air for me):
- Download the appropriate version for your operating system from VS Code’s official website
- Install VS Code following the standard installation process for your operating system
- Launch VS Code
Next, install the Remote SSH extension by selecting the VS Code extensions tab and then search for Remote - SSH.
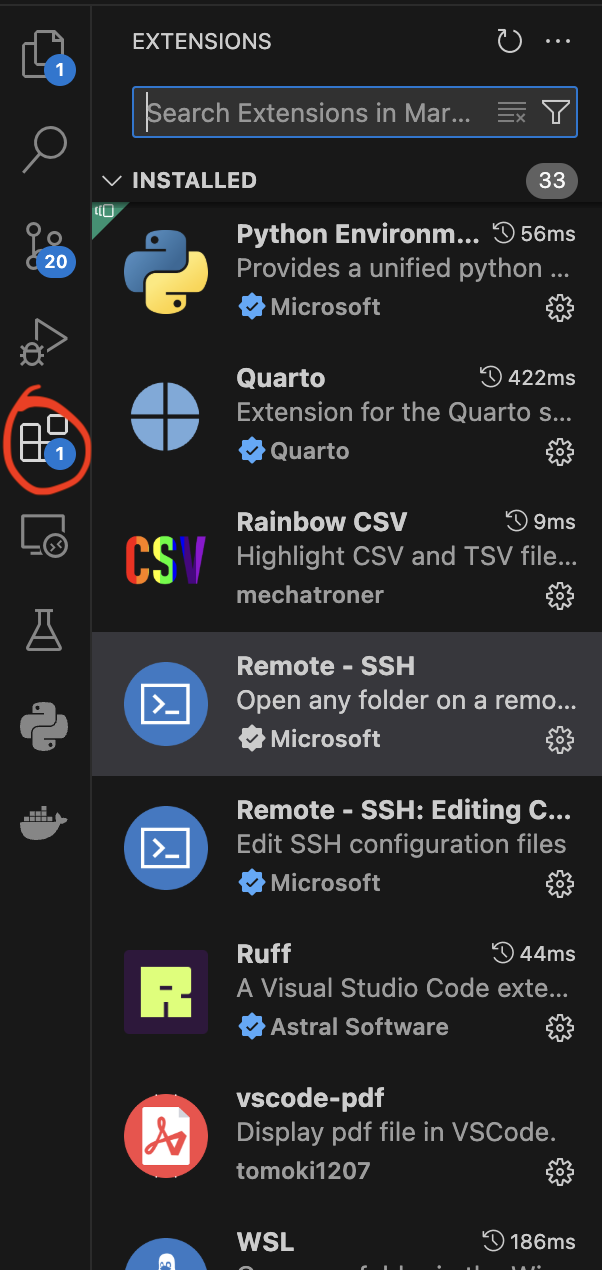
After that, install the extension.
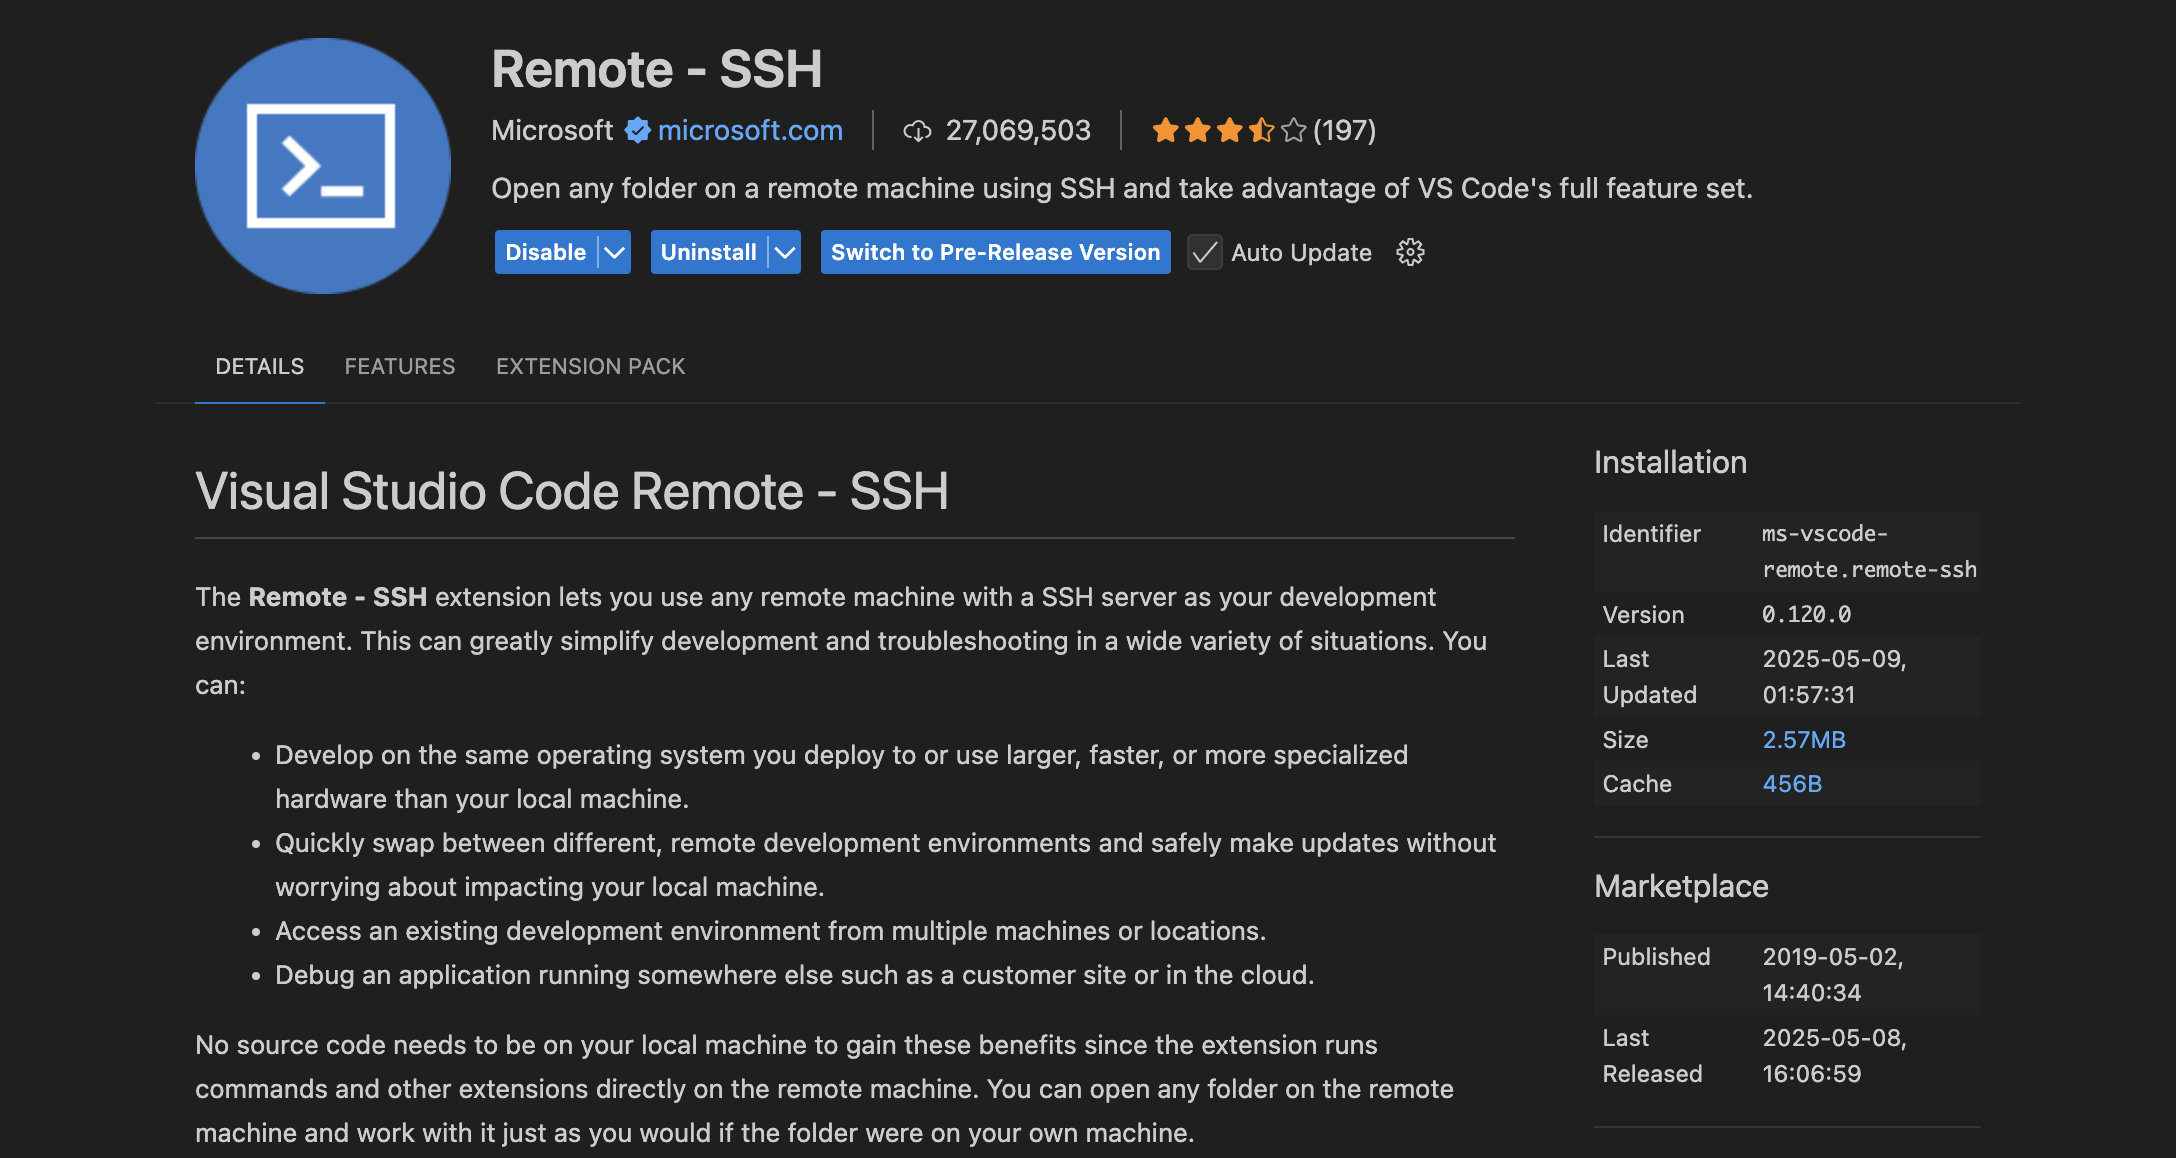
Now, it’s time to actually connect remotely. We’ll do this using VS Code’s command palette. The MacBook shortcut is Cmd+Shift+P. You’ll see that you can also open and edit your ssh_config in VS Code, using the command palette to select your configuration. Then, you’ll essentially interact with your server the same way you would a client-locally developed application in VS Code. First, select the folder you want to open, for the time being, I’m working out of my home directory /home/chris. Then, you can open up one of your backup scripts, notice how much nicer the UI is when dealing with bash scripts. Finally, you can also still run commands from the command line (obviously, otherwise it’d be hard to use a headless server), notice here I was copying some of the configuration files we’ve modified to my home. I do that so I can back those up to my laptop.

Select the Connect to Host... option.

Select the host you want to connect to, in my case ubuntu-pi-server.

You’ll see this along the bottom of your window, while VS Code connects to your remote server.
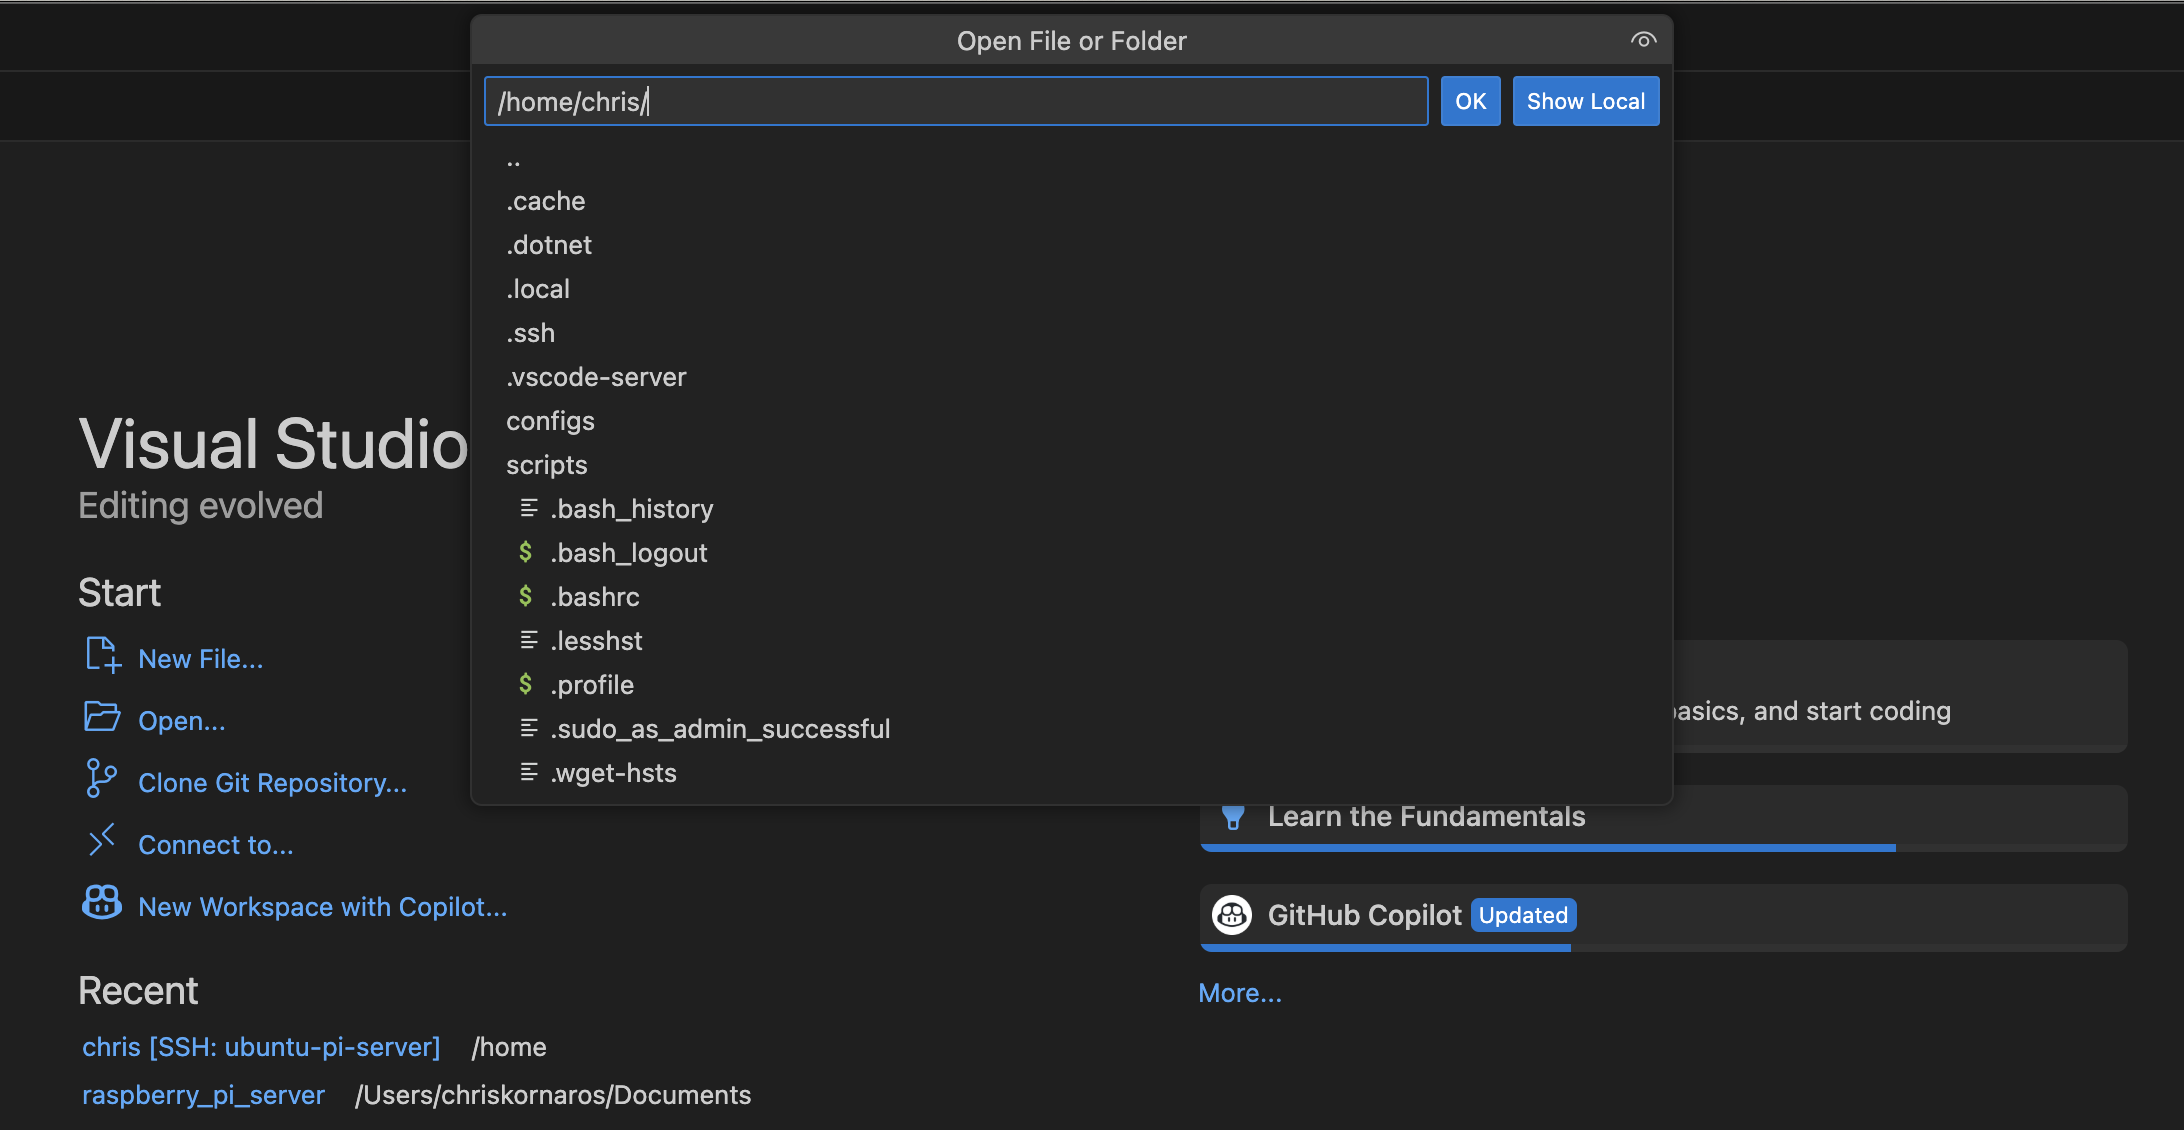
The first time you connect, VS Code will:
- Install the VS Code server component on your Raspberry Pi
- Create a
.vscode-serverdirectory in your home folder - Establish a secure connection
- Load the remote workspace
If you set up SSH key authentication as described earlier in the guide, the connection should establish without requiring a password. If you’re using a passphrase-protected SSH key, you’ll be prompted to enter it. Then, Select the folder option, same as you would locally with VS Code, and then select what you would like to work out of.
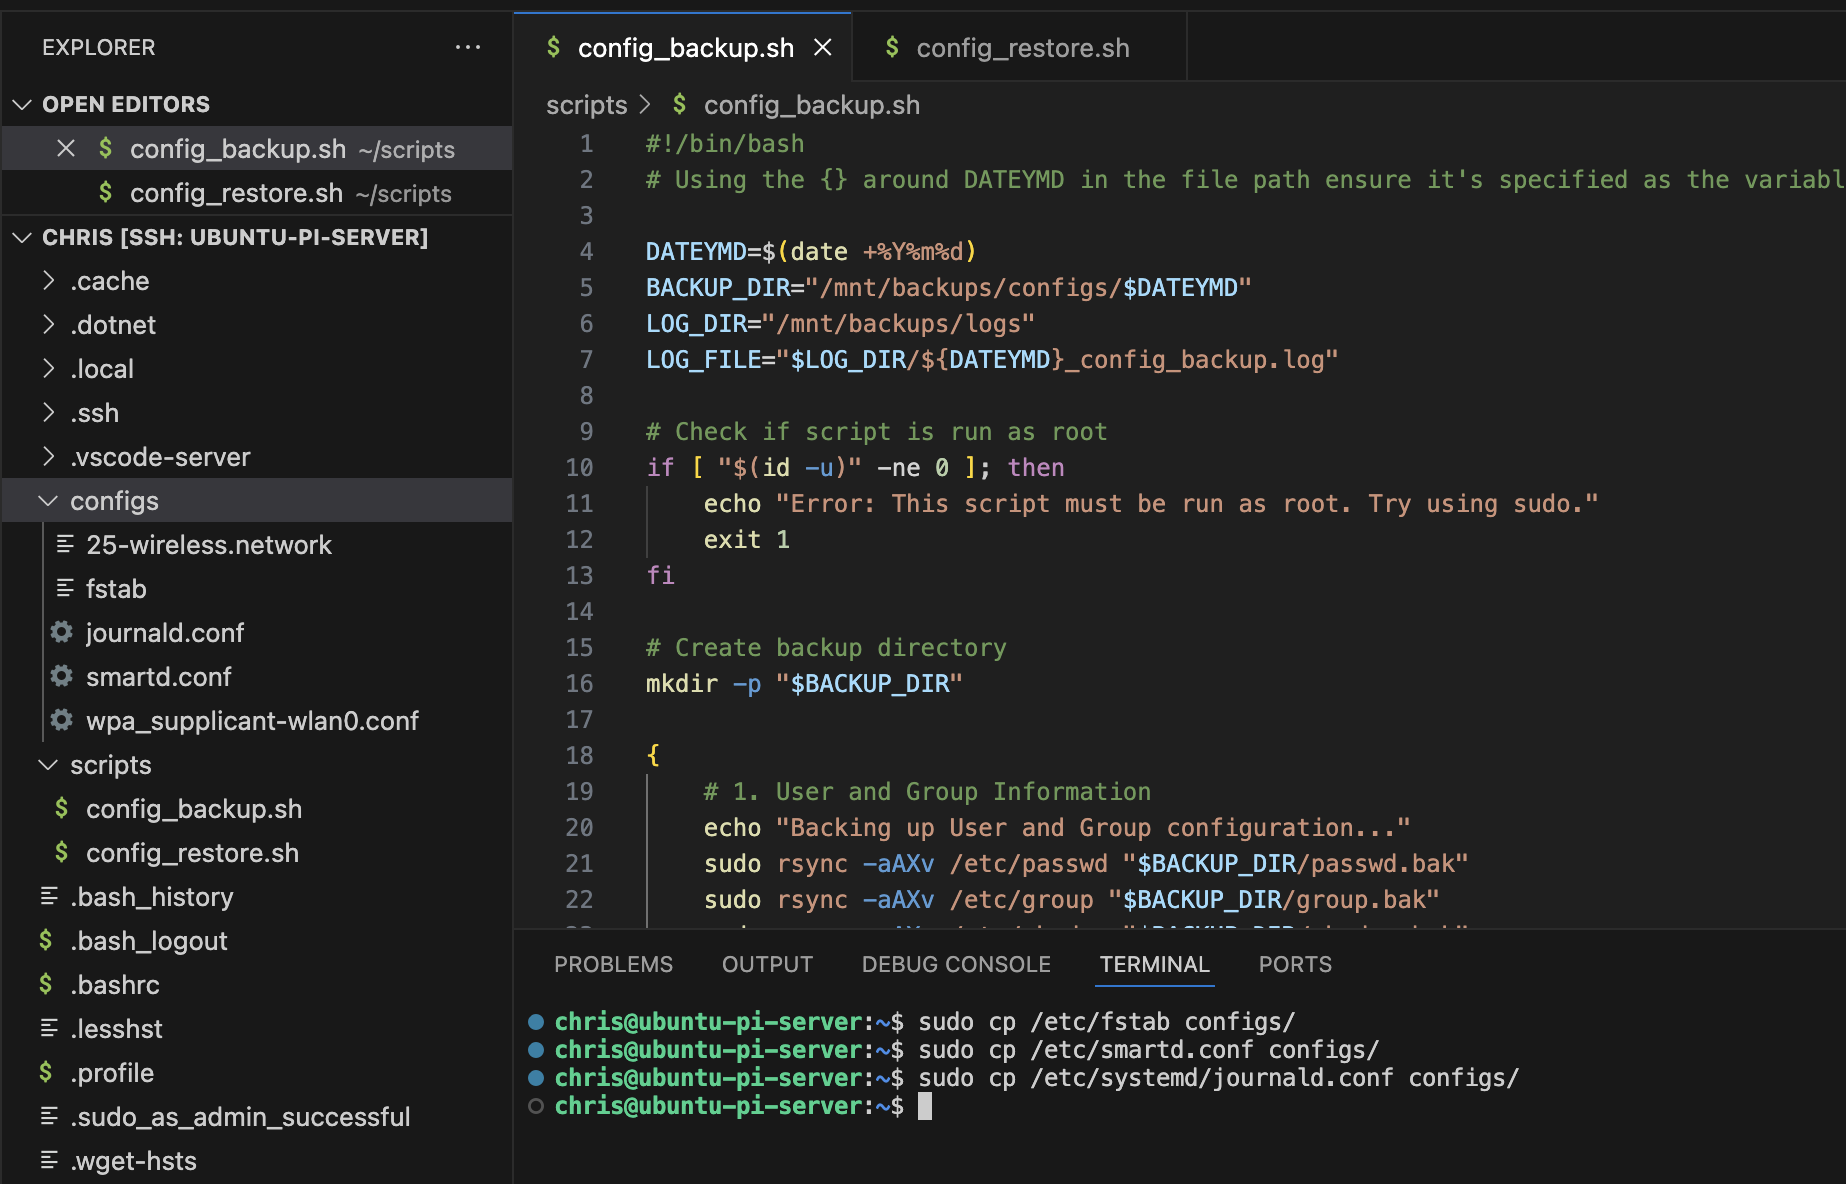
After connecting successfully, the remote connection is indicated in the bottom-left corner of the VS Code window where you’ll see “SSH: ubuntu-pi-server”. VS Code will operate as if you were working directly on the Raspberry Pi. Open a file by clicking on it in the file explorer, or type code filename.sh into your terminal CLI to open a file. You can open a new terminal by going to the command palette and selecting Terminal: Create New Terminal or, on MacOS, use Ctrl+backtick. Note: I haven’t been able to use this to edit files that require root privileges just yet. It seems like my issue is with how/where the code command is stored, and how sudo tries to interpret it.
The explorer view will now display the file system of your Raspberry Pi, not your local machine. Any file operations (create, edit, delete) will happen directly on the remote server.
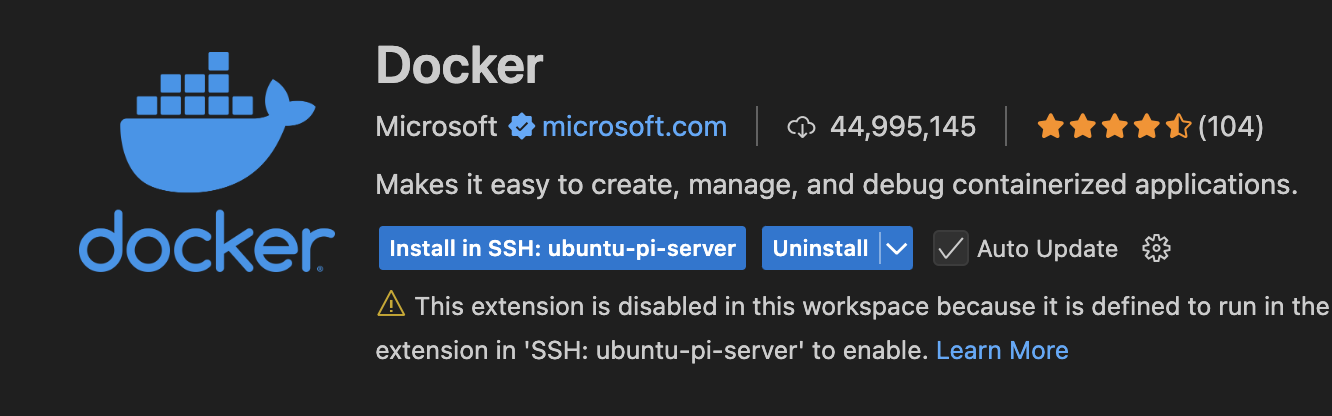
To install an extension that should run on the remote server (like language servers, debugging tools, etc.):
- Click on the Extensions icon in the activity bar
- Find the extension you want to install
- Click the “Install in SSH: ubuntu-pi-server” button instead of the regular “Install” button
Extensions are categorized into:
- UI Extensions: Run on your local machine (themes, UI enhancements)
- Workspace Extensions: Run on the remote server (language servers, debuggers)
This separation ensures optimal performance while providing a complete development experience.

Finally, remember to close your connection, although closing the window does the same.
Using VS Code with Remote SSH fundamentally transforms your development experience with the Raspberry Pi in several ways:
- Edit with confidence: No more struggling with terminal-based editors like nano or vim when complex editing is needed
- Seamless navigation: Easily browse the server’s filesystem with familiar GUI tools
- Integrated tools: Git integration, debugging, and terminal access all in one environment
- Extension ecosystem: Leverage thousands of VS Code extensions while working on your remote project
- Productive workflow: Maintain your preferred development environment regardless of the target platform
Partitions
Key Terms
Partition Basics:
- Partition: A logical division of a physical storage device.
- Disk: A physical storage device (HDD, SSD, etc.).
- Partition Table: A data structure on a disk that describes how the disk is divided.
- MBR (Master Boot Record): A traditional partition scheme limited to 2TB drives and 4 primary partitions.
- GPT (GUID Partition Table): A modern partition scheme supporting larger drives and more partitions.
- Primary Partition: A partition that can be bootable and hold an operating system.
- Extended Partition: A special type of partition that acts as a container for logical partitions (MBR only).
- Logical Partition: A partition created within an extended partition (MBR only).
- Boot Partition: A partition containing files needed to start the operating system.
- Root Partition: The primary partition containing the operating system and most files.
Filesystem Types:
- Filesystem: The method used to organize and store data within a partition.
- ext4: The fourth extended filesystem, a journaling filesystem commonly used in Linux.
- FAT32: File Allocation Table 32-bit, a simple filesystem compatible with most operating systems.
- exFAT: Extended File Allocation Table, designed for flash drives with support for larger files than FAT32.
- NTFS: New Technology File System, primarily used by Windows.
- Btrfs: B-tree File System, a modern Linux filesystem with advanced features like snapshots.
- Journaling: A technique that maintains a record of filesystem changes before committing them.
- Mounting: The process of making a filesystem accessible through the file hierarchy.
- Mount Point: A directory where a filesystem is attached to the system’s file hierarchy.
Partitioning Tools:
- fdisk: A traditional command-line utility for disk partitioning.
- parted: A more powerful partitioning tool with support for larger drives and GPT.
- gdisk: A GPT-focused partitioning utility.
- sfdisk: A scriptable version of fdisk for automation.
- gparted: A graphical partition editor for Linux.
- mkfs: Command used to create a filesystem on a partition.
- fsck: Filesystem consistency check and repair tool.
- blkid: Command that displays attributes of block devices like UUID.
- lsblk: Command that lists information about block devices.
- fstab: System configuration file that defines how filesystems are mounted.
Partitioning Basics
Partitions are logical divisions of a physical storage device. Think of a storage device like a large piece of land, and partitions as fenced areas within that land dedicated to different purposes. Each partition appears to the operating system as a separate disk, even though physically they’re on the same device. Remember from the beginning of this guide, I’m currently using a Flash Drive for my primary memory and a microSD card for backups; however, the SSD is what I want to serve as the boot device. Once we complete the partitioning, we can flash the base image from RPi onto the SSD and then reboot, with the SSD as the boot device.
- Separation of concerns: Isolate the operating system from user data, which improves security and simplifies backups
- Performance optimization: Different filesystems can be used for different workloads
- Multi-boot capability: Install multiple operating systems on the same physical device
- Data protection: Limiting the scope of filesystem corruption to a single partition
- Resource management: Setting size limits for specific system functions
For our Raspberry Pi server, proper partitioning creates a solid foundation for everything else you’ll build. We’ll primarily use ext4 for Linux partitions and FAT32 for the microSD card that needs broader compatibility.
| Filesystem | Best For | Features |
|---|---|---|
| ext4 | Linux |
|
| FAT32 | Cross-platform compatibility |
|
| exFAT | Modern cross-platform |
|
| NTFS | Windows compatibility |
|
| Btrfs | Advanced Linux systems |
|
Finally, let’s cover some important terms:
- Partition Table: A data structure on a disk that describes how the disk is divided
- MBR (Master Boot Record): Traditional partition scheme limited to 2TB drives and 4 primary partitions
- GPT (GUID Partition Table): Modern scheme supporting larger drives and more partitions
- Partition Types:
- Primary: Can be bootable and hold an operating system
- Extended: Acts as a container for logical partitions (MBR only)
- Logical: Created within an extended partition (MBR only)
- Filesystem: The method used to organize and store data within a partition
- Common Linux filesystems:
ext4,Btrfs - Cross-platform filesystems:
FAT32,exFAT
- Common Linux filesystems:
Partitioning Tools
Several command-line tools are available for disk partitioning on Linux. Each has strengths for different scenarios:
| Tool | Strengths | Limitations | Best For |
fdisk |
|
|
|
parted |
|
|
|
gdisk |
|
|
|
sfdisk |
|
|
|
For this project, and after doing some research, I chose parted for both the microSD card and SSD partitioning because:
- It fully supports both MBR and GPT partition tables
- It can handle drives larger than 2TB (relevant for the SSD)
- It provides a more consistent interface across different partition table types
- It supports both interactive and command-line usage
- It’s included in most Ubuntu installations
Partitioning a MicroSD Card for Backups
Let’s partition our microSD card to serve as backup media. You can get great quality cards from Amazon Basics that are perfect for this use case. We’ll use a simple, effective partition scheme. Before we dive into the actual commands, it’s important to remember that you can’t modify the memory of the active primary drive. Meaning, that you’ll need to use an SSD or thumb drive as the boot media while you modify the SD card. Similarly, you’ll need to use a different piece of boot media (you could use the micro SD) when partitioning the SSD.
Now, let’s walk through this step-by-step:
- Identify the device name of the microSD. Your microSD card will typically appear as something like /dev/mmcblk0 (what mine showed as) or /dev/sdX (where X is a letter like a, b, c). This command lists block devices with key information:
sudo lsblk -o NAME,SIZE,FSTYPE,TYPE,MOUNTPOINTThe lsblk command lists all block devices, which includes your storage devices. The -o flag specifies which columns to display in the output. This final check ensures you’re working with the correct device and helps you confirm the partition structure you just created.
- NAME: Device identifier
- SIZE: Storage capacity
- FSTYPE: Current filesystem type
- TYPE: Whether it’s a disk or partition
- MOUNTPOINT: Where it’s currently mounted (if applicable)
- For a backup microSD card, we’ll use a simple partition layout with a single partition using ext4 filesystem, which provides good performance and Linux compatibility.
# Start parted on the microSD card (replace /dev/mmcblk0 with your device)
sudo parted /dev/mmcblk0

# View the partition table for a specific device, or all
print mmcblk0
print all

# Inside parted, create a new GPT partition table
> (parted) mklabel gpt
Warning: The existing disk label on /dev/mmcblk0 will be destroyed and all data on this disk will be lost. Do you want to continue?
Yes/No? Yes

# Create a single partition using the entire card
> (parted) mkpart primary ext4 0% 100%

# Set a name for easy identification
> (parted) name 1 backups

# Verify the partition layout
> (parted) print

# Exit parted
> (parted) quit
mklabel gpt: Creates a new GPT partition table (preferred over MBR for modern systems)mkpart primary ext4 0% 100%: Creates a primary partition using the ext4 filesystem that spans the entire devicename 1 backup: Names the first partition “backup” for easy identificationprint: Shows the current partition layoutquit: Exits the parted utility
- After creating the partition, we need to format it with the ext4 filesystem. Double check the current layout of memory on your system with
sudo lsblk -o NAME,SIZE,FSTYPE,TYPE,MOUNTPOINTbefore formatting the filesystem, to get the specific SD Card partitions device name:
# Format the partition (adjust if your device/partition is different)
sudo mkfs.ext4 -L backups /dev/mmcblk0p1
-L backup: Sets the filesystem label to “backup”/dev/mmcblk0p1: The partition we just created (p1 indicates the first partition)- You’ll see an output similar to this:
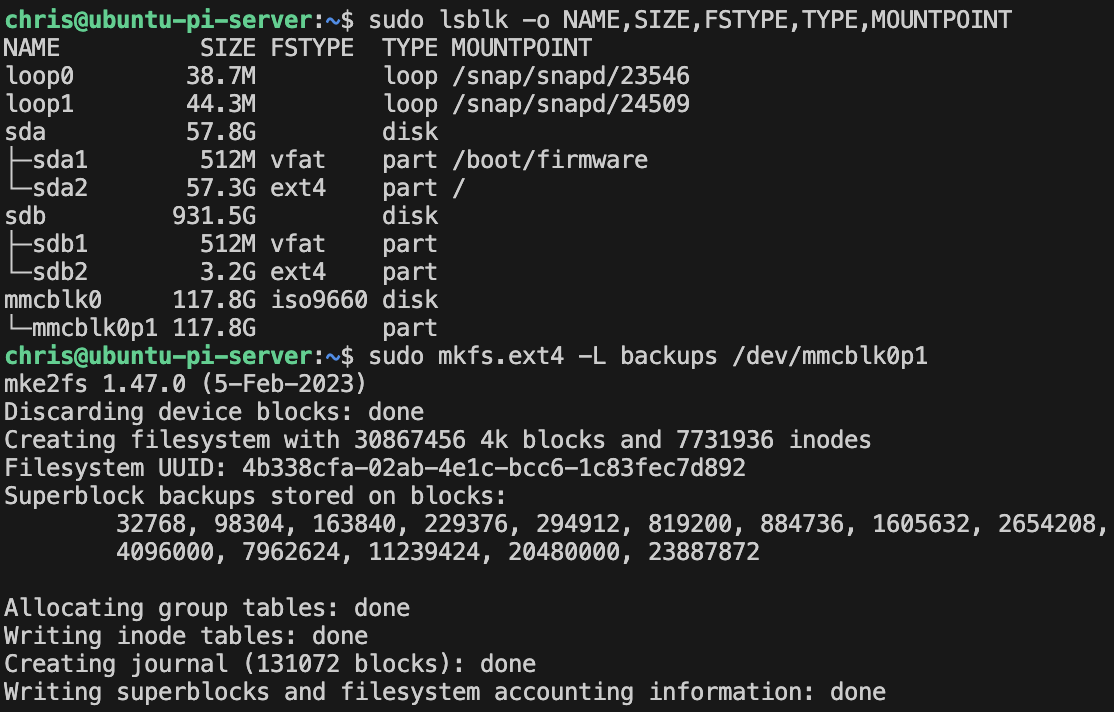
- Now, we need to prepare the SD card for backups. You can make those changes with the following commands:
# Create a mount point
sudo mkdir -p /mnt/backups

# Add an entry to /etc/fstab for automatic mounting
echo "UUID=$(sudo blkid -s UUID -o value /dev/mmcblk0p1) /mnt/backups ext4 defaults,noatime 0 2" | sudo tee -a /etc/fstab

# Restart the systemd daemon to get the changes made to fstab
sudo systemctl daemon-reload

# Mount the filesystem from fstab
sudo mount /dev/mmcblk0

# Create backup directories
sudo mkdir -p /mnt/backups/{configs,logs}

# Set ownership (replace 'chris' with your username)
sudo chown -R chris:chris /mnt/backups/

# Set secure permissions
sudo chmod -R 700 /mnt/backups/
mkdir -p: Creates directories and parent directories if they don’t existblkid -s UUID -o value: Gets the UUID (unique identifier) of the partitiondefaults,noatime: Mount options for good performance (noatime disables recording access times)0 2: The fifth field (0) disables dumping, the sixth field (2) enables filesystem checksmount -a: Mounts all filesystems specified in fstabchmod -R 700: Sets permissions so only the owner can read/write/execute
Partitioning your SSD
For a Raspberry Pi server, a two-partition scheme offers the perfect balance of simplicity and functionality. This approach mirrors what RPi Imager creates automatically, but gives us control over the sizes:
- A small
FAT32boot partition for firmware and boot files - A large
ext4root partition for the entire operating system and data
This simplified structure eliminates the complexity of separate swap and data partitions while maintaining full functionality. The Raspberry Pi can use swap files instead of dedicated partitions, which provides more flexibility for managing memory as your needs change.
- For the Samsung T7 SSD, we’ll follow a similar workflow. The Samsung T7 SSD will likely appear as
/dev/sdX(where X is a letter like a, b, c), mine is/dev/sdb.
sudo lsblk -o NAME,SIZE,FSTYPE,TYPE,MOUNTPOINT- In this code block, I’ll show you a way to use
partedwithout entering the interactive mode.
# Create a new GPT partition table
sudo parted /dev/sdb mklabel gpt

# Create the EFI System Partition (ESP)
sudo parted /dev/sdb mkpart boot fat32 1MiB 513MiB
sudo parted /dev/sdb set 1 esp on
sudo parted /dev/sdb set 1 boot on

# Create the root partition
sudo parted /dev/sdb mkpart ubuntu-root ext4 513MiB 100%

# Verify the partition layout
sudo parted /dev/sdb print/dev/sdc1: 512MB FAT32 partition for boot files./dev/sdc2: Remaining space (about 931GB) ext4 partition for the entire system.- The
set 1 boot oncommand marks the partition as bootable. - The
set 1 esp onmarks it as an EFI System Partition, ensuring compatibility with both legacy and UEFI boot methods.
- Now we need to format each partition.
# Format the ESP partition
sudo mkfs.fat -F32 -n BOOT /dev/sdb1

# Format the root partition
sudo mkfs.ext4 -L ubuntu-root /dev/sdb2
mkfs.fat -F32: Creates a FAT32 filesystem-n ESP: Sets the volume label to “ESP”mkfs.ext4: Creates an ext4 filesystem-L ubuntu-root: Sets the filesystem label/dev/sdb1, /dev/sdb2, etc.: The specific partitions we created
- Now, we will verify that the partitions went as we hoped
# Check the partition layout
sudo lsblk -o NAME,SIZE,FSTYPE,LABEL,TYPE,MOUNTPOINT

# Verify the filesystem types and labels
sudo blkid | grep sdc
This approach to partitioning offers several advantages:
- Matches RPi Imager default: Aligns with what users expect from standard Raspberry Pi installations
- Easier to manage: Fewer partitions mean simpler maintenance and troubleshooting
- The Raspberry Pi firmware requires a FAT32 boot partition to find and load the kernel.
- The 512MB size ensures plenty of space for kernel updates and multiple kernel versions if needed.
Now you’re ready to flash Ubuntu Server to these properly prepared partitions! The RPi Imager will use this partition structure and write the system files to the correct locations.
- Now we’ll need to mount the partitions by setting up mount points and telling the system to use them.
# Check the partition layout
sudo lsblk -o NAME,SIZE,FSTYPE,LABEL,TYPE,MOUNTPOINT

# Verify the filesystem types and labels
sudo blkid | grep sdc
Advanced Partitioning
As you begin to utilize your server more, you’re bound to use up more memory. So, it’s important to monitor your partition space usage.
# View disk usage
df -h

# View inode usage (for number of files)
df -i

# View detailed filesystem information
sudo tune2fs -l /dev/sda2 | grep -E 'Block count|Block size|Inode count|Inode size'
df -h: Shows disk usage in human-readable formatdf -i: Shows inode usage (inode = index node, representing a file)tune2fs -l: Lists filesystem information for ext2/3/4 filesystemsgrep -E: Filters output for specified patterns
Furthermore, you may realize that you want to reformat your SSD at some point because your storage needs changed. You can reformat the partitions using the following code.
# For online resizing of ext4 (unmounting not required)
sudo parted /dev/sda
(parted) resizepart 4 100%  # Resize partition 4 to use all available space
(parted) quit

# After resizing the partition, expand the filesystem
sudo resize2fs /dev/sda4
resizepart 4 100%: Resizes partition 4 to use 100% of the remaining available spaceresize2fs: Resizes an ext2/3/4 filesystem to match the partition size
Backups and Basic Automation
Now that we’ve configured the basics, from permissions to networking and ssh to partitions, we’ll want to save those changes in case something happens and to ensure a seamless transition to the SSD for boot media. You’ve already seen some basic backups. The process is the same, essentially creating a folder and then putting a copy of the current file into it and maybe adding a .bak extension to make it clear this is a previous version. That being said, to go through and do this for each and every folder we’ve made changes in is impractical now, let alone in the future when more complex configurations are done. So, in this section, we’ll go over creating a basic script to backup all of our configs and automating the backups.
For this section, we’ll use rsync because it provides several important advantages over simple copy commands, that you may remember from the section on ssh:
- Incremental backups that only transfer changed files
- Preservation of file permissions, ownership, and timestamps
- Built-in compression for efficient transfers
- Detailed progress information and logging
- The ability to resume interrupted transfers
Before we start, make sure you have:
- A mounted backup drive at
/mnt/backups/
Key Terms
Backup Concepts:
- Backup: A copy of data that can be recovered if the original is lost or damaged.
- Full Backup: A complete copy of all selected data.
- Incremental Backup: A backup of only the data changed since the last backup.
- Differential Backup: A backup of all data changed since the last full backup.
- Snapshot: A point-in-time copy of data, often using filesystem features for efficiency.
- Restoration: The process of recovering data from a backup.
- Retention Policy: Rules determining how long backups should be kept.
- Backup Rotation: A systematic approach to reusing backup media over time.
- Offsite Backup: Backups stored in a different physical location for disaster recovery.
Backup Tools and Methods:
- rsync: A utility for efficiently copying and synchronizing files locally or remotely.
- tar: Tape Archive, a utility for collecting multiple files into a single archive file.
- dd: A low-level utility that can copy data at the block level.
- cron: A time-based job scheduler in Unix-like systems.
- anacron: A job scheduler that doesn’t require the system to be running continuously.
- systemd timers: An alternative to cron for scheduling recurring tasks.
- Archive: A single file containing multiple files, often compressed.
- Compression: Reducing the size of data to save storage space.
- Deduplication: Eliminating duplicate copies of repeating data to save space.
- Checksums: Values calculated from file contents to verify data integrity.
Automation Concepts:
- Script: A file containing a series of commands to be executed.
- Shell Script: A script written in a shell language like Bash.
- Crontab: A configuration file specifying scheduled tasks.
- Scheduler: A system component that executes tasks at specified times.
- Environment Variable: A named value that can affect the behavior of running processes.
- Exit Code: A value returned by a command indicating its success or failure.
- Redirection: Changing where command input comes from or output goes to.
- Pipeline: Connecting multiple commands by passing the output of one as input to another.
- Background Process: A process that runs without user interaction, often denoted by an ampersand (&).
- Job Control: Managing the execution of multiple processes from a shell.
Backup Basics
First, in case you didn’t do this earlier, we’ll prepare the backup directory structure and set appropriate permissions:
# Create backup directories if they don't exist
sudo mkdir -p /mnt/backups/configs
sudo mkdir -p /mnt/backups/system

# Change ownership to your user (replace 'chris' with your username)
sudo chown -R chris:chris /mnt/backups

# Set appropriate permissions
sudo chmod -R 700 /mnt/backups  # Only owner can read/write/execute
While it’s definitely beneficial to have a local copy of your backups to easily roll back changes, it isn’t the most secure solution to have all of your information in one place. Furthermore, the SSD is partitioned, but it doesn’t currently have an OS or any files stored. So, now it’s time to take advantage of the microSD card we formatted earlier.
For the purpose of this guide, I’ll be showing you how to use rsync for a remote transfer to your client machine and how to automatically store backups on the SD card. The script we’ll use saves all of the key user and system information (things like passwords), as well as the configuration changes we made. Additionally, as long as your SD card is mounted to /mnt/backups the backup will automatically be saved to the external memory.
Config Backups
The following script demonstrates how to perform the backup while preserving all file attributes:
#!/bin/bash
# Using the {} around DATEYMD in the file path ensure it's specified as the variable's value, and the subsequent parts are not included

DATEYMD=$(date +%Y%m%d)
BACKUP_DIR="/mnt/backups/configs/$DATEYMD"
LOG_DIR="/mnt/backups/logs"
LOG_FILE="$LOG_DIR/${DATEYMD}_config_backup.log"

# Check if script is run as root
if [ "$(id -u)" -ne 0 ]; then
    echo "Error: This script must be run as root. Try using sudo."
    exit 1
fi

# Create backup directory
mkdir -p "$BACKUP_DIR"

{
    # 1. User and Group Information
    echo "Backing up User and Group configuration..."
    sudo rsync -aAXv /etc/passwd "$BACKUP_DIR/passwd.bak"
    sudo rsync -aAXv /etc/group "$BACKUP_DIR/group.bak"
    sudo rsync -aAXv /etc/shadow "$BACKUP_DIR/shadow.bak"
    sudo rsync -aAXv /etc/gshadow "$BACKUP_DIR/gshadow.bak"

    # 2. Crontab Configurations
    echo "Backing up Crontab configuration..."
    sudo rsync -aAXv /etc/crontab "$BACKUP_DIR/"
    sudo rsync -aAXv /var/spool/cron/crontabs/. "$BACKUP_DIR/crontabs/"

     # 3. SSH Configuration
    echo "Backing up SSH configuration..."
    sudo rsync -aAXv /etc/ssh/. "$BACKUP_DIR/ssh/"

    # Create user_ssh directory
    mkdir -p "$BACKUP_DIR/user_ssh"

    # Copy SSH user configuration with explicit handling of authorized_keys
    rsync -aAXv /home/chris/.ssh/config "$BACKUP_DIR/user_ssh/" 2>/dev/null || true
    rsync -aAXv /home/chris/.ssh/id_* "$BACKUP_DIR/user_ssh/" 2>/dev/null || true
    rsync -aAXv /home/chris/.ssh/known_hosts "$BACKUP_DIR/user_ssh/" 2>/dev/null || true

    # Explicitly backup authorized_keys if it exists
    if [ -f /home/chris/.ssh/authorized_keys ]; then
        echo "Backing up authorized_keys file..."
        rsync -aAXv /home/chris/.ssh/authorized_keys "$BACKUP_DIR/user_ssh/"
    else
        echo "No authorized_keys file found in /home/chris/.ssh/"
    fi

    # 4. UFW (Uncomplicated Firewall) Configuration
    echo "Backing up ufw configuration..."
    sudo rsync -aAXv /etc/ufw/. "$BACKUP_DIR/ufw/"
    sudo ufw status verbose > "$BACKUP_DIR/ufw_rules.txt"

    # 5. Fail2Ban Configuration
    echo "Backing up fail2ban configuration..."
    sudo rsync -aAXv /etc/fail2ban/. "$BACKUP_DIR/fail2ban/"

    # 6. Network Configuration
    echo "Backing up Network configuration..."
    sudo rsync -aAXv /etc/network/. "$BACKUP_DIR/network/"
    sudo rsync -aAXv /etc/systemd/network/. "$BACKUP_DIR/systemd/network/"
    sudo rsync -aAXv /etc/netplan/. "$BACKUP_DIR/netplan/"
    sudo rsync -aAXv /etc/hosts "$BACKUP_DIR/hosts.bak"
    sudo rsync -aAXv /etc/hostname "$BACKUP_DIR/hostname.bak"
    sudo rsync -aAXv /etc/resolv.conf "$BACKUP_DIR/resolv.conf.bak"
    sudo rsync -aAXv /etc/wpa_supplicant/. "$BACKUP_DIR/wpa_supplicant/"

    # 7. Systemd Services and Timers
    echo "Backing up Systemd Timers configuration..."
    sudo rsync -aAXv /etc/systemd/system/. "$BACKUP_DIR/systemd/"

    # 8. Logrotate Configuration
    echo "Backing up Logrotate configuration..."
    sudo rsync -aAXv /etc/logrotate.conf "$BACKUP_DIR/logrotate.conf.bak"
    sudo rsync -aAXv /etc/logrotate.d/. "$BACKUP_DIR/logrotate.d/"

    # 9. Timezone and Locale
    echo "Backing up Timezone and Locale configuration..."
    sudo rsync -aAXv /etc/timezone "$BACKUP_DIR/timezone.bak"
    sudo rsync -aAXv /etc/localtime "$BACKUP_DIR/localtime.bak"
    sudo rsync -aAXv /etc/default/locale "$BACKUP_DIR/locale.bak"

    # 10. Keyboard Configuration
    echo "Backing up Keyboard configuration..."
    sudo rsync -aAXv /etc/default/keyboard "$BACKUP_DIR/keyboard.bak"

    # 11. Filesystem Table (fstab)
    echo "Backing up filesystem table (fstab)..."
    sudo rsync -aAXv /etc/fstab "$BACKUP_DIR/fstab.bak"

    # 12. Backup Package List
    echo "Backing up package list..."
    dpkg --get-selections > "$BACKUP_DIR/package_list.txt"

    # Set appropriate permissions
    echo "Configuring backup directory permissions..."
    sudo chown -R chris:chris "$BACKUP_DIR"
    sudo chmod -R 600 "$BACKUP_DIR"

    echo "Configuration backup completed at: $BACKUP_DIR"

} > "$LOG_FILE" 2>&1

echo "Logs available at: $LOG_FILE"
# Make the script executable
chmod +x /scripts/config_backup.sh
# Run the script
./scripts/config_backup.shThe rsync commands use several important options:
-a: Archive mode, preserves almost everything-A: Preserve ACLs (Access Control Lists)-X: Preserve extended attributes-v: Verbose output--one-file-system: Don’t cross filesystem boundaries--hard-links: Preserve hard links--exclude: Skip specified directories
The package backup commands use specific flags as well:
dpkg --get-selections: outputs a list of all packages and their status (installed, deinstall, purge)- This creates a complete snapshot of your system’s package state
Remote Transfers of Backups
We covered rsync vs. scp earlier, so remember that rsync is specifically designed for copying and transferring files, so it offers more sophisticated file synchronization capabilities than basic tools like SCP. If you need a refresher, run the following command from your client machine (laptop), just change the paths to match what your system uses.
rsync -avz --partial --progress --update chris@ubuntu-pi-server:/mnt/backups/configs/master/ ~/Documents/raspberry_pi_server/backups/configs/masterThe flags do the following:
-a: Archive mode, which preserves permissions, timestamps, symbolic links, etc.-v: Verbose output, showing what files are being transferred-z: Compress data during transfer for faster transmission--partial: Keep partially transferred files, allowing you to resume interrupted transfers--progress: Show progress during transfer--update: Skip files that are newer on the receiver (only transfer if source is newer)
Restoring from Backup
Now that we’ve backed up all of the configurations we’ve made so far, it’s time to create a script that restores that backup. At the time of writing this, I’ve probably had to reflash a fresh image and reconfigure things between 10 and 20 times. I’m so good at it, that I can now do it all in under 20 minutes. That being said, it’s much easier to do when you can just run a script that takes all of the configurations from your Master backup and overwrites the defaults.
First, here are some important things to remember:
- The
--deleteoption during restore will remove files at the destination that don’t exist in the backup. Use with caution. - Consider using rsync’s
--dry-runoption to test backups and restores without making changes. - The backup includes sensitive system files. Store it securely and restrict access.
- Consider encrypting the backup directory for additional security.
- Test the restore process in a safe environment before using in production.
After writing this, you can test the script by running it on your server with the boot media you’ve been using (not the SSD)– just make sure you save the master/ backup and any scripts/configs externally first. You’ll know this succeeds, if nothing changes after the reboot. When you’ve verified that’s done, we’ll shutdown the server and make the SSD the boot media. For now, let’s write the config_restore script.
#!/bin/bash

# Simple Configuration Restoration Script for Ubuntu Pi Server
BACKUP_DIR=${1:-"/mnt/backups/configs/master"}

# Check if script is run as root
if [ "$(id -u)" -ne 0 ]; then
    echo "Error: This script must be run as root. Try using sudo."
    exit 1
fi

# Check if the backup directory exists
if [ ! -d "$BACKUP_DIR" ]; then
    echo "Error: Backup directory not found: $BACKUP_DIR"
    echo "Usage: $0 [backup_directory_path]"
    exit 1
fi

# Begin restoration process
echo "Starting configuration restoration from $BACKUP_DIR..."
echo "This will overwrite current system configurations with those from the backup."
read -p "Continue with restoration? (y/n): " CONFIRM
if [[ "$CONFIRM" != "y" && "$CONFIRM" != "Y" ]]; then
    echo "Restoration aborted by user."
    exit 0
fi

# 1. Restore User and Group Information
echo "Restoring user and group information..."
[ -f "$BACKUP_DIR/passwd.bak" ] && rsync -a "$BACKUP_DIR/passwd.bak" /etc/passwd
[ -f "$BACKUP_DIR/group.bak" ] && rsync -a "$BACKUP_DIR/group.bak" /etc/group
[ -f "$BACKUP_DIR/shadow.bak" ] && rsync -a "$BACKUP_DIR/shadow.bak" /etc/shadow
[ -f "$BACKUP_DIR/gshadow.bak" ] && rsync -a "$BACKUP_DIR/gshadow.bak" /etc/gshadow

# Explicitly Set Permissions for Critical System Files
echo "Fixing critical system file permissions..."
chmod 644 /etc/passwd   # Read-write for root, read-only for everyone else
chmod 644 /etc/group    # Read-write for root, read-only for everyone else
chmod 640 /etc/shadow   # Read-write for root, read-only for shadow group
chmod 640 /etc/gshadow  # Read-write for root, read-only for shadow group

# 2. Restore SSH Configuration
echo "Restoring SSH configuration..."
[ -d "$BACKUP_DIR/ssh" ] && rsync -a "$BACKUP_DIR/ssh/" /etc/ssh/
chmod 600 /etc/ssh/ssh_host_*_key 2>/dev/null || true
chmod 644 /etc/ssh/ssh_host_*_key.pub 2>/dev/null || true

# 3. Restore UFW Configuration
echo "Restoring UFW configuration..."
if [ -d "$BACKUP_DIR/ufw" ]; then
    apt-get install -y ufw >/dev/null
    rsync -a "$BACKUP_DIR/ufw/" /etc/ufw/
fi

# 4. Restore Fail2Ban Configuration
echo "Restoring Fail2Ban configuration..."
if [ -d "$BACKUP_DIR/fail2ban" ]; then
    apt-get install -y fail2ban >/dev/null
    rsync -a "$BACKUP_DIR/fail2ban/" /etc/fail2ban/
fi

# 5. Restore Network Configuration
echo "Restoring network configuration..."
[ -d "$BACKUP_DIR/network" ] && rsync -a "$BACKUP_DIR/network/" /etc/network/
[ -d "$BACKUP_DIR/systemd/network" ] && rsync -a "$BACKUP_DIR/systemd/network/" /etc/systemd/network/
[ -d "$BACKUP_DIR/netplan" ] && rsync -a "$BACKUP_DIR/netplan/" /etc/netplan/
[ -f "$BACKUP_DIR/hosts.bak" ] && rsync -a "$BACKUP_DIR/hosts.bak" /etc/hosts
[ -f "$BACKUP_DIR/hostname.bak" ] && rsync -a "$BACKUP_DIR/hostname.bak" /etc/hostname
[ -f "$BACKUP_DIR/resolv.conf.bak" ] && rsync -a "$BACKUP_DIR/resolv.conf.bak" /etc/resolv.conf
[ -d "$BACKUP_DIR/wpa_supplicant" ] && rsync -a "$BACKUP_DIR/wpa_supplicant/" /etc/wpa_supplicant/

# 6. Restore Filesystem Table (fstab)
echo "Restoring filesystem table (fstab)..."
[ -f "$BACKUP_DIR/fstab.bak" ] && rsync -a "$BACKUP_DIR/fstab.bak" /etc/fstab

# 7. Restore Package List
echo "Reinstalling packages from backup..."
if [ -f "$BACKUP_DIR/package_list.txt" ]; then
    apt-get update && apt-get install -y dselect
    dpkg --set-selections < "$BACKUP_DIR/package_list.txt"
    apt-get dselect-upgrade -y

# Restart services
systemctl restart systemd-networkd wpa_supplicant@wlan0.service ssh ufw fail2ban

echo "Configuration restoration completed. A system reboot is recommended."
read -p "Would you like to reboot now? (y/n): " REBOOT
[[ "$REBOOT" == "y" || "$REBOOT" == "Y" ]] && reboot

exit 0
You probably have some questions about the script let me explain some of the decisions I made while doing some trial and error testing.
- Originally, I had the backup directory as a value in the script call itself, now it just defaults to the
master/backup- This backup is one I know that works and is in the format I’m hoping
- Easier to have a standard version to reference than relying on monthly backups
- I had a lot of issues with incorrect permissions after restoring backups previously, so it needs to be run with
sudo - First, the user and group information is important, a lot of processes behind the scenes rely on these configurations
- Part of this, I added an explicit
chmodcall because after the reboot, I was getting an error withwhoami- The command
whoamireturns which user you are/currently running commands as - The user and group info wasn’t exactly the same, it was leaving my user
chrisas UID 1000, but changing the group to 1003 - The
chmodcall fixes that - You can use
getent group | grep 'chris'to view all group IDs and assignments
- The command
- Part of this, I added an explicit
- Second, restoring the
sshconfigurations ensures security and remote connectivity - Third,
ufwincreases your system security - Fourth,
fail2bandoes the same by improving security - Fifth, restoring the network configurations, originally, I had issues because
networkdwasn’t included- This block ensures all of the
systemdconfigurations are included
- This block ensures all of the
- Sixth, restoring the Filesystem Table (
fstab)- This is easy, since
fstabis already a file, we just overwrite what’s there
- This is easy, since
- Seventh, package restoration
dpkg --set-selections: takes the saved list and marks packages for installation or removalapt-get dselect-upgrade: then acts on these selections to install missing packages- The
dselecttool is installed first because it’s needed for the upgrade process
- Then, the specific services we modified are all explicitly started
- While developing this, some of the services wouldn’t necessarily start, so I would run into network or ssh issues post-reboot
- Finally, the script asks you to
rebootyour system so all of the changes take affect
# Make the script executable
chmod +x /scripts/config_restore.sh

# Run the script
sudo ./scripts/config_restore.sh
Automating Backups with Crontab
Now that we have both backup and restore scripts in place, the next step is to automate the backup process. Manual backups are valuable but prone to human error, we might forget to run them– or run them inconsistently. Automation ensures your server configurations are backed up regularly without requiring your intervention, providing an essential safety net against data loss and configuration issues.
Cron is a time-based job scheduler in Unix-like operating systems, including Ubuntu. It enables users to schedule commands or scripts to run automatically at specified intervals. The crontab (cron table) is a configuration file that contains the schedule of cron jobs with their respective commands. Each user on the system can have their own crontab file, and there’s also a system-wide crontab that requires root privileges to modify.
Creating Automated Backup Jobs
Let’s schedule our configuration backup script to run automatically every week. First, we’ll open the crontab editor for the entire system. If you’re running a more robust system with various users and groups, you’ll probably want to use crontab -e to configure your user specific schedules. That being said, for the time being and because the system is configured, I’ll setup my cron jobs to be system-wide as well:
# Open the crontab file for the system
sudo nano /etc/crontab

# Run configuration backup every Sunday at 10:00 PM
0 22 * * 0 root /home/chris/scripts/config_backup.sh
Here’s a handy way to visualize the crontab syntax, with some explanations for each component down below. Note that we’re using the absolute path /home/chris/scripts/config_backup.sh rather than ./scripts/config_backup.sh. The absolute path starts from the root directory, making it work correctly regardless of the current working directory when cron executes the job as root. When cron runs your commands, it doesn’t necessarily use the same current or home directory you might expect, so absolute paths are more reliable.
0: - At minute 022: At 10 PM*: Every day of the month*: Every month0: Only on Sunday (day 0)root: Run the command as the root usersudo home/chris/scripts/config_backup.sh: The command to execute
┌───────────── minute (0-59)
│ ┌───────────── hour (0-23)
│ │  ┌───────────── day of the month (1-31)
│ │  │ ┌───────────── month (1-12)
│ │  │ │ ┌───────────── day of the week (0-6) (Sunday=0)
│ │  │ │ │ ┌───────────── user to run the command as
│ │  │ │ │ │
0 22 * * 0 root /scripts/config_backup.sh
You may also want to create a monthly backup job that you can use for a /master backup more consistent with your most recent development.
# Add line to create a master backup on the 1st of every month at 4:00 AM
0 4 1 * * root /home/chris/scripts/config_backup.sh && rsync -a /mnt/backups/configs/$(date +\%Y\%m\%d)/ /mnt/backups/configs/master/
This job runs at 4:00 AM on the first day of each month, creating a regular backup and then copying it to the /mnt/backups/configs/master/ directory. The date command is escaped with backslashes (%) because crontab interprets percent signs specially. Finally, To prevent our backup drive from filling up, let’s add a job to automatically remove backups older than 90 days, except for the master backup:
# Add this line to the system crontab
0 23 * * 0 root find /mnt/backups/configs/ -maxdepth 1 -type d -name "20*" -mtime +90 -not -path "*/master*" -exec rm -rf {} \;
0 5 * * 0: Run at 5:00 AM every Sundayfind /mnt/backups/configs/: Start searching in the configs directory-maxdepth 1: Only look in the immediate directory, not subdirectories-type d: Only look for directories-name "20*": Only match directories starting with “20” (our date-formatted directories)-mtime +90: Only match items modified more than 90 days ago-not -path "*/master*": Exclude anything with “master” in the path-exec rm -rf {} \;: Delete each matching directory
Verifying Jobs
Now, let’s verify that everything saved and works. First, close out of nano using Ctrl+O (write-out, or save) and Ctrl+X (Exit). Then let’s print the contents with cat /etc/crontab. You can also run the following:
# Check cron service status
sudo systemctl status cron

# View cron logs
sudo grep CRON /var/log/syslog
Troubleshooting
I had no issues while making the above changes; however, after restarting cron I got the following message from the systemctl status command.
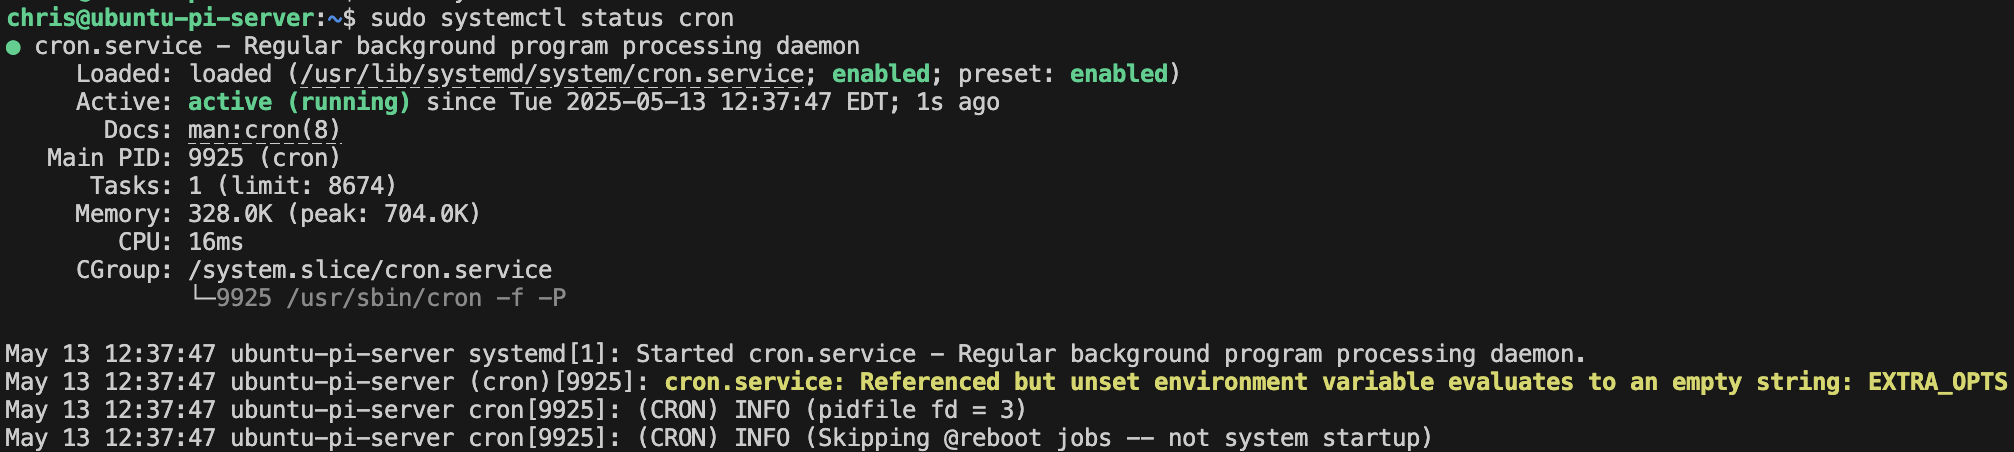
After doing some research, I ran sudo systemctl cat cron.service to view the systemd configuration for cron. In the cron.service file there is the line ExecStart=/usr/sbin/cron -f -P $EXTRA_OPTS. The service is trying to use the $EXTRA_OPTS variable, but it’s not defined anywhere. The service is configured to look for environment variables in a file specified by this line EnvironmentFile=-/etc/default/cron. The dash before the filepath means this file is optional - if it doesn’t exist, systemd continues anyway. This explains why cron still works despite the warning, which is why the status command returned a warning, but not any errors. Here’s what the cron ini file looks like.
# /usr/lib/systemd/system/cron.service
[Unit]
Description=Regular background program processing daemon
Documentation=man:cron(8)
After=remote-fs.target nss-user-lookup.target

[Service]
EnvironmentFile=-/etc/default/cron
ExecStart=/usr/sbin/cron -f -P $EXTRA_OPTS
IgnoreSIGPIPE=false
KillMode=process
Restart=on-failure
SyslogFacility=cron

[Install]
WantedBy=multi-user.target
Let’s try resolving this by utilizing systemd and creating a system override. We’ll add one line to the etc/systemd/system/cron.service.d/override.conf. As a note, you’ve probably run into the .d/ paths on your server. Whenever you see .d added to the end of a file path, like /etc/systemd/system/cron.service.d, it just means that’s a directory which has config overrides.
# Create a systemd override
sudo systemctl edit cron.service
### Editing /etc/systemd/system/cron.service.d/override.conf
### Anything between here and the comment below will become the contents of the drop-in file
Environment="EXTRA_OPTS="
### Edits below this comment will be discarded
### /usr/lib/systemd/system/cron.service
# [Unit]
# Description=Regular background program processing daemon
# Documentation=man:cron(8)
# After=remote-fs.target nss-user-lookup.target
#
# [Service]
# EnvironmentFile=-/etc/default/cron
# ExecStart=/usr/sbin/cron -f -P $EXTRA_OPTS
# IgnoreSIGPIPE=false
# KillMode=process
# Restart=on-failure
# SyslogFacility=cron
#
# [Install]
# WantedBy=multi-user.targetAfter you implement the solution, restart the systemctl daemon and the cron service.
sudo systemctl daemon-reload
sudo systemctl restart cron
sudo systemctl status cron
Now, you should see everything working correctly.
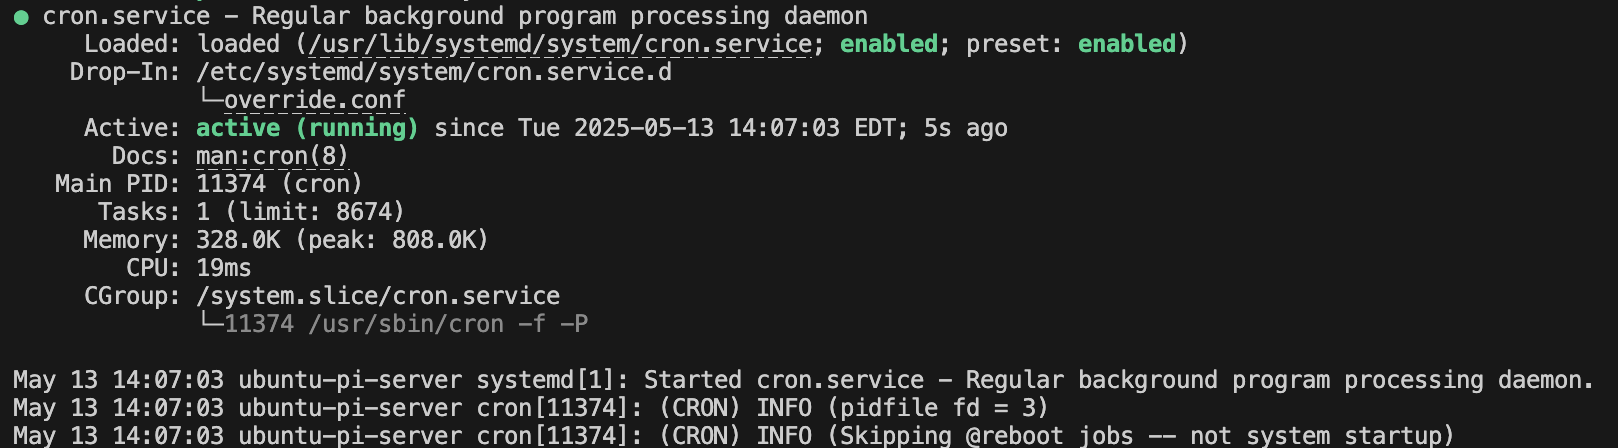
This should resolve the warning message. The service is already working correctly with -f (stay in foreground, which systemd needs) and -P (send messages to syslog) flags, so we’re just providing an empty value for the EXTRA_OPTS variable to stop systemd from complaining about it being undefined.
With these automated backup jobs in place, your Raspberry Pi server will maintain a regular backup schedule without manual intervention. The weekly backups provide recent restore points, while the monthly master backup ensures you always have a stable configuration to fall back on if needed. The cleanup job prevents your backup drive from running out of space over time.
Changing Your Boot Media Device
Key Terms
Boot Process Terminology:
- Boot Sequence: The ordered steps followed during system startup.
- Boot Media: The storage device from which a system loads its operating system.
- Boot Loader: Software responsible for loading the operating system kernel.
- Firmware: Software embedded in hardware that provides low-level control.
- UEFI (Unified Extensible Firmware Interface): A modern firmware interface that replaces BIOS.
- EFI System Partition (ESP): A FAT32-formatted partition containing boot loaders and files needed by UEFI.
- Boot Flag: A marker that identifies a partition as bootable.
- GRUB (GRand Unified Bootloader): A popular boot loader for Linux systems.
- Kernel Parameters: Options passed to the Linux kernel during boot.
initramfs: An initial RAM filesystem loaded during boot to prepare the actual root filesystem.
Media Transition Concepts:
- Cloning: Creating an exact copy of a storage device or partition.
- Imaging: Creating a file representation of the contents of a storage device.
- Bootable Media: Storage media configured to start an operating system.
- Flash: To write data to a memory device, particularly firmware or an operating system image.
- Device ID: A unique identifier assigned to hardware components.
- UUID (Universally Unique Identifier): A standardized identifier format used to identify filesystems.
- Partition UUID: A unique identifier assigned to a specific partition.
- Filesystem UUID: A unique identifier assigned to a filesystem on a partition.
- syslinux: A lightweight boot loader for Linux systems.
dd: A command-line utility used for low-level copying of data between devices.
Boot Configuration Transition Process
When you’re moving from one boot device to another on a Raspberry Pi, you’re essentially telling the system where to find its operating system files. The Raspberry Pi’s bootloader looks for specific files on a FAT32 partition to begin the boot process, then loads the main operating system from the root partition. This transition is a fundamental server administration skill that every system administrator should understand.
The transition involves several critical steps.
- First, we prepare the SSD with a fresh operating system installation.
- Then we properly shut down the system to ensure no data corruption occurs.
- Next, we physically reconfigure the hardware to make the SSD the primary boot device.
- Finally, we verify that everything works correctly and remove the temporary boot media.
Think of this process like moving into a new house. You’ve already built the structure (partitioning), but now you need to move all your belongings (the operating system) into it, update your mailing address (boot configuration), and ensure everything works in the new location.
The good news, we’ve already done most of the work required and what we haven’t is going to be something we did for the original boot device. We’ll first run a few commands from the server, do one thing on a different computer, and then we’ll be back to the server.
1. First, you’ll need to flash a fresh Ubuntu Server LTS image onto your newly partitioned SSD. This process will write the operating system files to the appropriate partitions you created. This should be done on your Raspberry Pi server.
# Before removing the SSD, check its device identifier one more time
sudo lsblk -o NAME,SIZE,FSTYPE,LABEL,TYPE,MOUNTPOINT
Now you’ll need to use RPi Imager on your MacBook:
- Connect the SSD to your MacBook
- Open Raspberry Pi Imager
- Select Ubuntu Server LTS (same version you used before)
- Select your SSD as the storage device
- Use the exact same advanced settings you used when first setting up your Raspberry Pi:
- Same username (chris)
- Same password
- Same SSH key settings
- Same WiFi credentials
The reason we use identical settings is to reduce the amount of changes needed to replicate the environment we previously configured. Your SSH keys, user permissions, and network configurations will all match what we know works for an initial boot, eliminating the need to reconfigure everything from scratch.
2. Before making any hardware changes, we need to ensure all data is written to disk and all processes are safely terminated. This prevents corruption and data loss during the transition.
# Save any unsaved work and exit all applications
# Ensure no important processes are running

# Sync all file system buffers to disk
sudo sync

# Check for any open files on your current boot device (thumb drive)
sudo lsof | grep -E '^[^ ]+ +[^ ]+ +[^ ]+ +[^ ]+ +[^ ]+ +[^ ]+ +FIFO'

# Display active processes to ensure nothing critical is running
ps aux | grep -v '\['- The
synccommand forces all pending disk writes to complete immediately. This is crucial because Linux uses write caching for performance, meaning data might still be in memory waiting to be written. - The
lsofcommand lists open files, helping you identify any processes that might be accessing the current boot device. - The
ps auxcommand shows all active processes, giving you a final check that nothing important is running.
3. A proper shutdown sequence ensures all services stop gracefully and file systems are cleanly unmounted:
# Perform a clean system shutdown
sudo shutdown -h now
The shutdown command initiates a clean shutdown sequence. The -h flag tells the system to halt (power off) after shutdown. This is important because the system may not power off, especially on older systems—it could just bring it to single-user mode or runlevel 1, depending on configuration. While now indicates the shutdown should happen immediately. This command:
- Sends a termination signal to all running processes
- Allows services to save their state and clean up
- Unmounts all filesystems in the correct order
- Finally powers down the system
4. Now comes the physical hardware transition. With your Raspberry Pi powered off:
- Remove the thumb drive (current boot device)
- Connect the SSD via USB to the Raspberry Pi
- Set aside the microSD card (backup device)
- Ensure all connections are secure
This step is straightforward but crucial. The Raspberry Pi will attempt to boot from the first bootable device it finds. By removing the thumb drive and connecting the SSD, we’re ensuring the Pi finds and uses the SSD as its boot device. We do not need to remove the SD card used for backups, because it never had an OS flashed onto it. The card’s file system just provides extra memory, instead of being an extra operating system.
5. Power on your Raspberry Pi and observe the boot process.
Make sure to connect your monitor and keyboard before the boto begins. The boot process should proceed similarly to your initial setup. The Raspberry Pi firmware reads the configuration from the SSD’s boot partition, loads the kernel, and then mounts the root filesystem. If everything works correctly, you should see the familiar Ubuntu Server boot messages and eventually reach a login prompt.
Good news, you won’t need to do this again (for this server). After this, you’ll have your core system, memory, and configurations complete.
6. After booting, you’ll need to log in directly to the Raspberry Pi using a keyboard and monitor. This is because the SSH service may not be running automatically on the fresh installation.
- Connect a keyboard and monitor to your Raspberry Pi
- Log in with your username and password
- Start the SSH service manually:
# Start the SSH service to enable remote connections
sudo systemctl start ssh

# Verify the service is running
sudo systemctl status ssh

# Test a remote connection from your client machine
# Test SSH connection (initially with password authentication)
ssh chris@192.168.1.151- You’ll need to specify the local IP because none of the ssh configs are updated yet
- Your nonstandard port,
45000in this guide - The local IP may be a different one in the 192.168.0.0/16 range (which is reserved for local IPs)
- Your nonstandard port,
- If this is working and you can remotely connect, then we can move on to the next step
7. With SSH access established, transfer your configuration backup and restore scripts from your computer to the Raspberry Pi:
First, make sure to create the directory, because it won’t exist on a fresh boot. The, from your client computer, a MacBook in my case, you’ll run the rsync commands to move the master backup and scripts. Notice that you can use either the ~ shortcut to denote your home directory, or write the path explicitly. We’ll also need to move the master backup to the proper backup directory, so the restore script works properly.
# On the Raspberry Pi, create the backup directory structure
sudo mkdir -p /mnt/backups/configs/

# From your MacBook, copy your backup files to the Pi
rsync -avz ~/path/to/backups/configs/master chris@ubuntu-pi-server:/home/chris/

# Copy your restore script to the Pi
rsync -avz ~/path/to/scripts/config_restore.sh chris@ubuntu-pi-server:~/scripts/

# Move the master backup directory to the correct location
sudo mv /home/chris/master /mnt/backups/configs/
8. Run the Configuration Restore Script
# Make sure the script is executable
chmod +x ~/scripts/config_restore.sh

# Run the restore script
sudo ./scripts/config_restore.sh
9. Verify the System
# Verify the root filesystem device
df -h /

# Verify the microSD card is mounted properly
df -h /mnt/backups

# Check that your backup files are accessible
ls -la /mnt/backups/configs/

# Verify your network settings
ip addr show

# Check System configurations
sudo systemctl status ssh
sudo systemctl status ufw
sudo systemctl status fail2ban
sudo systemctl status systemd-networkd
sudo systemctl status wpa_supplicant@wlan0.service
The df -h / command shows disk usage statistics for the root filesystem, including which device it’s mounted from. You should see /dev/sdb2 (or similar) listed as the root device, and /dev/sdb1 as the boot device, not the thumb drive identifier you used before. You’ll see a similar output, just focused on your /backups directory when running the second command. The ls -la command shows you all of the contents of a directory, as well as the permissions. The other commands you should be familiar with by now.
Final Thoughts
Our Ubuntu Raspberry Pi Server is now booting from the SSD, and all your previous configurations have been restored. You may notice that on reboot, running sudo lsblk will show your SSD under a different This configuration provides a solid foundation for the more advanced server features we’ll implement in the next sections. By moving to SSD boot, we’ve significantly improved our server’s performance profile. SSDs offer several advantages over traditional storage media:
- Faster boot times: Your Raspberry Pi will start much more quickly
- Improved I/O performance: Database operations, file access, and application loading will be noticeably faster
- Better reliability: SSDs have no moving parts, making them more resilient to physical impacts
- Lower power consumption: SSDs typically use less power than traditional hard drives
The transition to SSD boot also aligns with modern server practices, where solid-state storage is becoming the standard for production environments. This configuration will serve us well as we expand into containerization with Docker and orchestration with Kubernetes.
The last thing to do, is give your Raspberry Pi some decency. Now, I’ll attach the fan and case to the Raspberry Pi, so it’ll be ready to run 24/7. This is a straightforward process, but I needed the internet’s help to figure out which cables connected to which pin.
- Safely shutdown your server, and unplug everything.
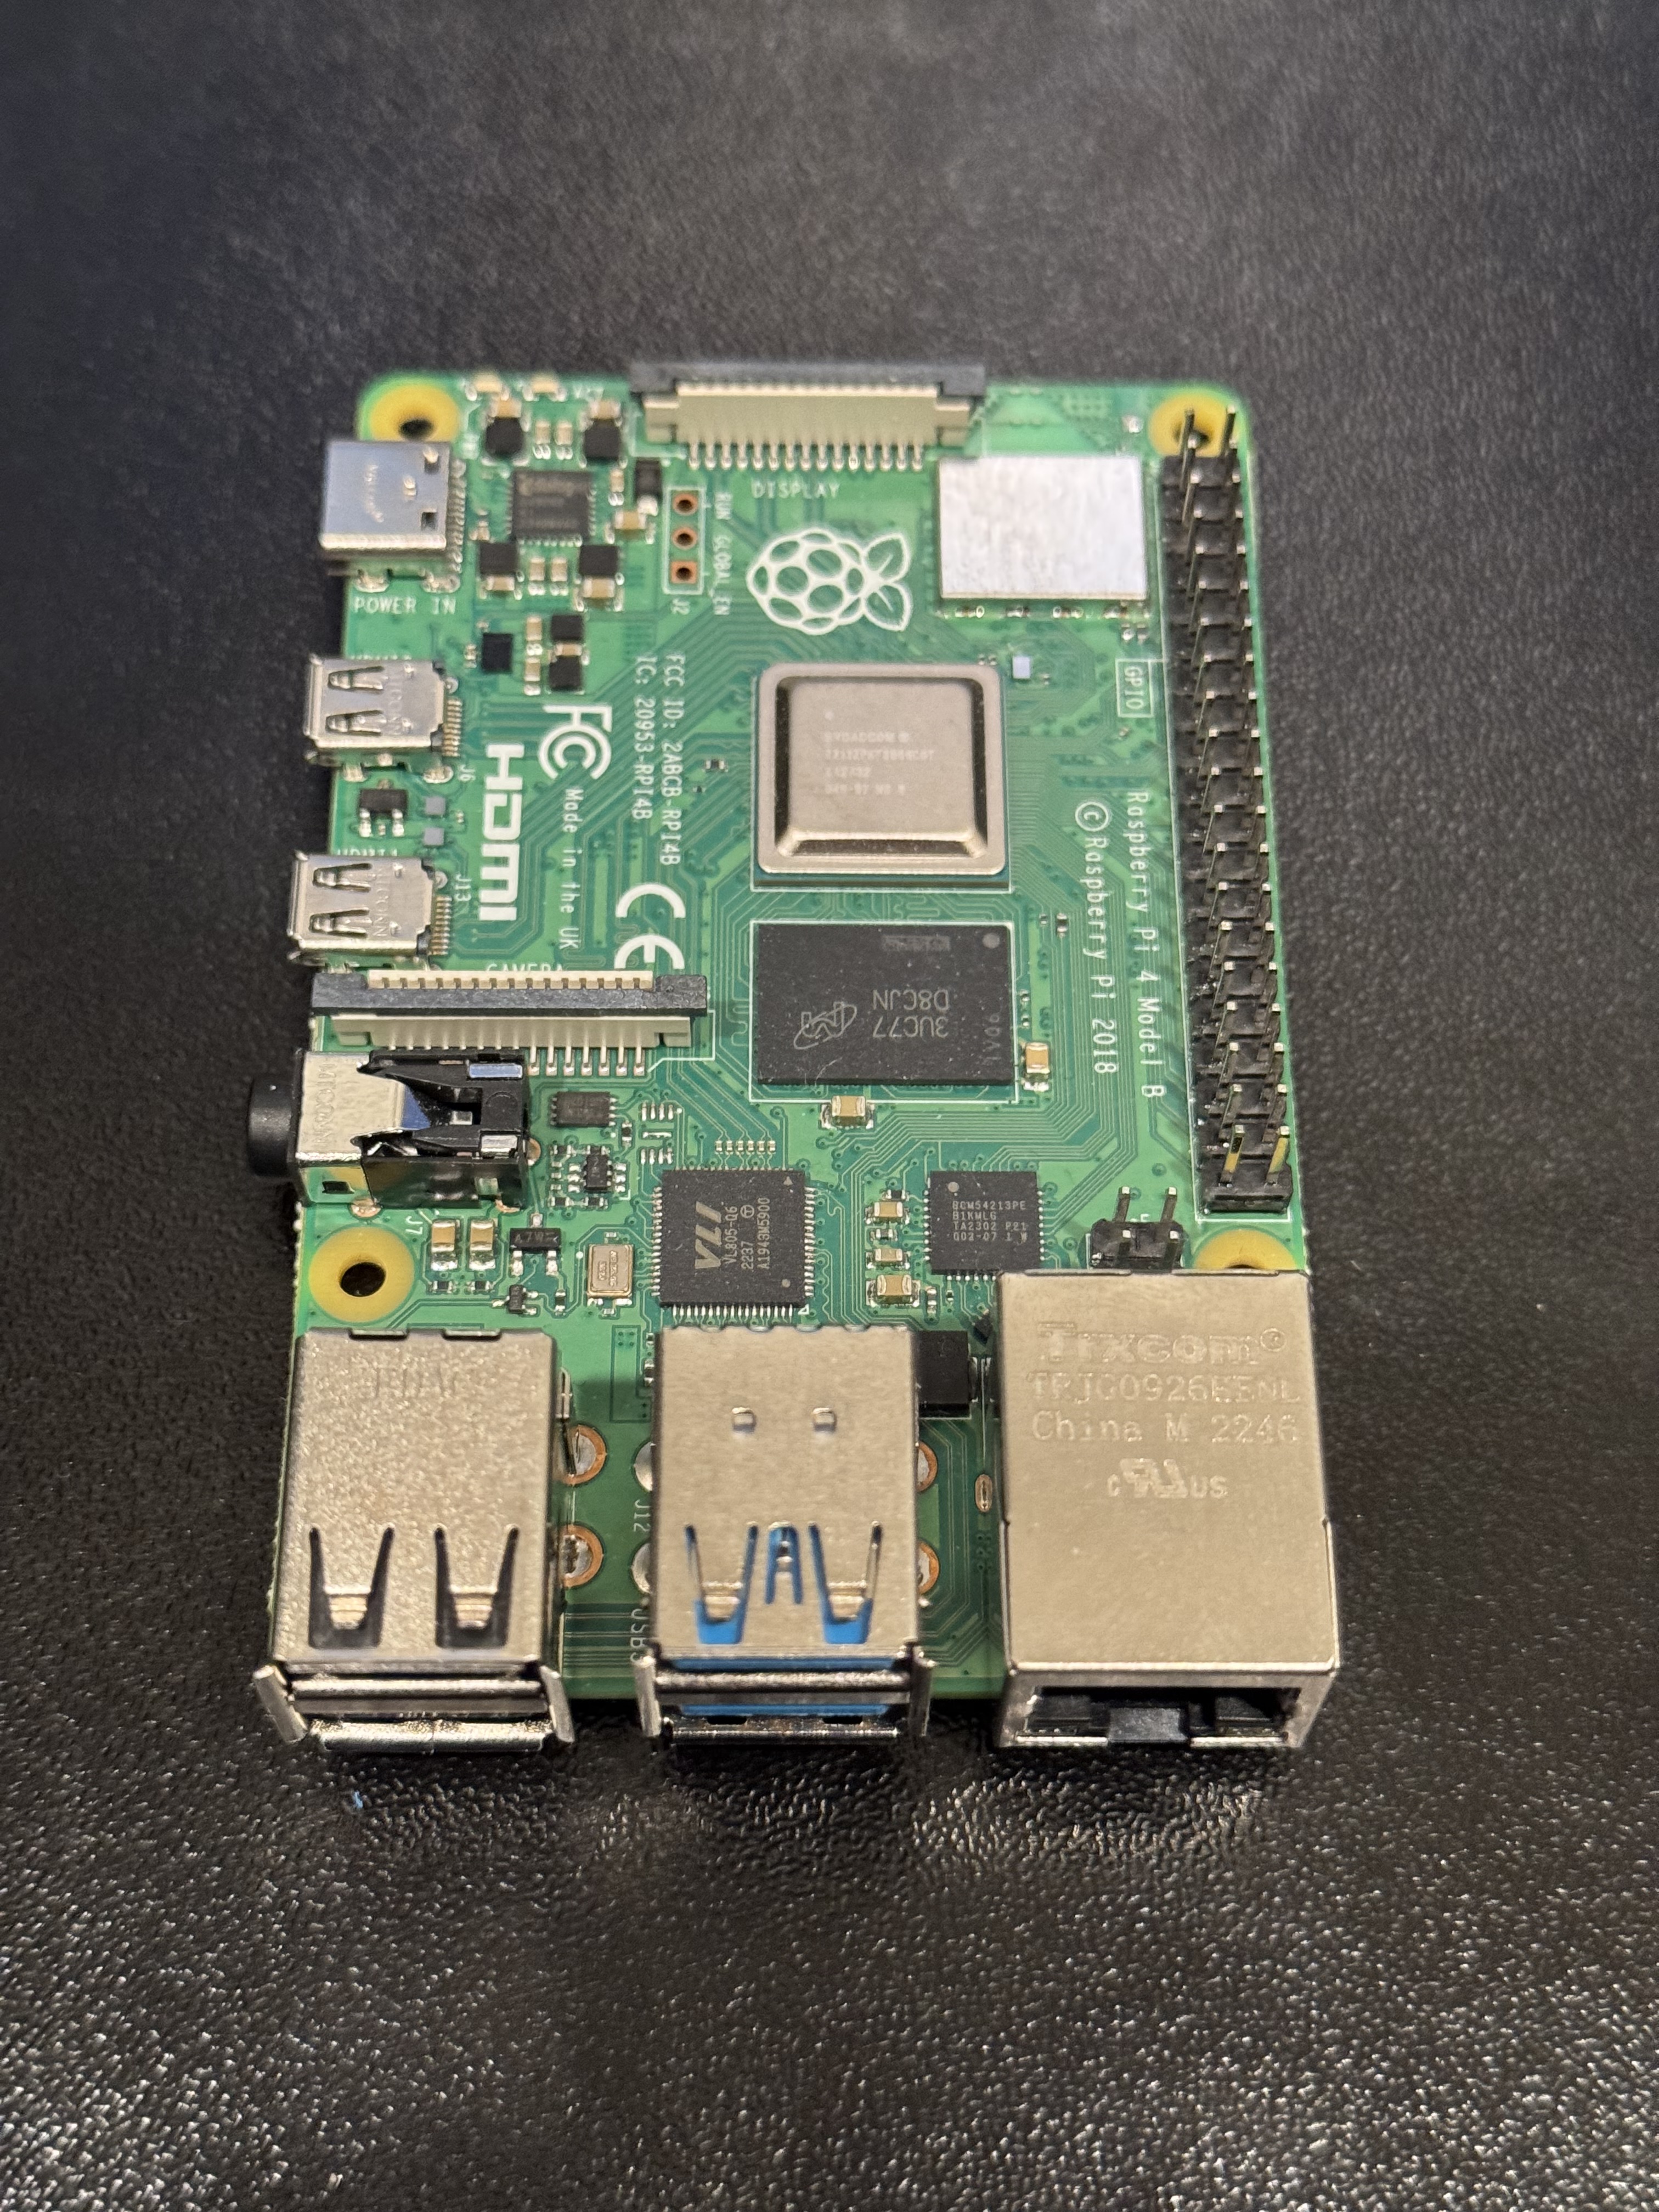
- Insert the fan into the case.

- Insert the board, with the SD Card inserted, into the case.
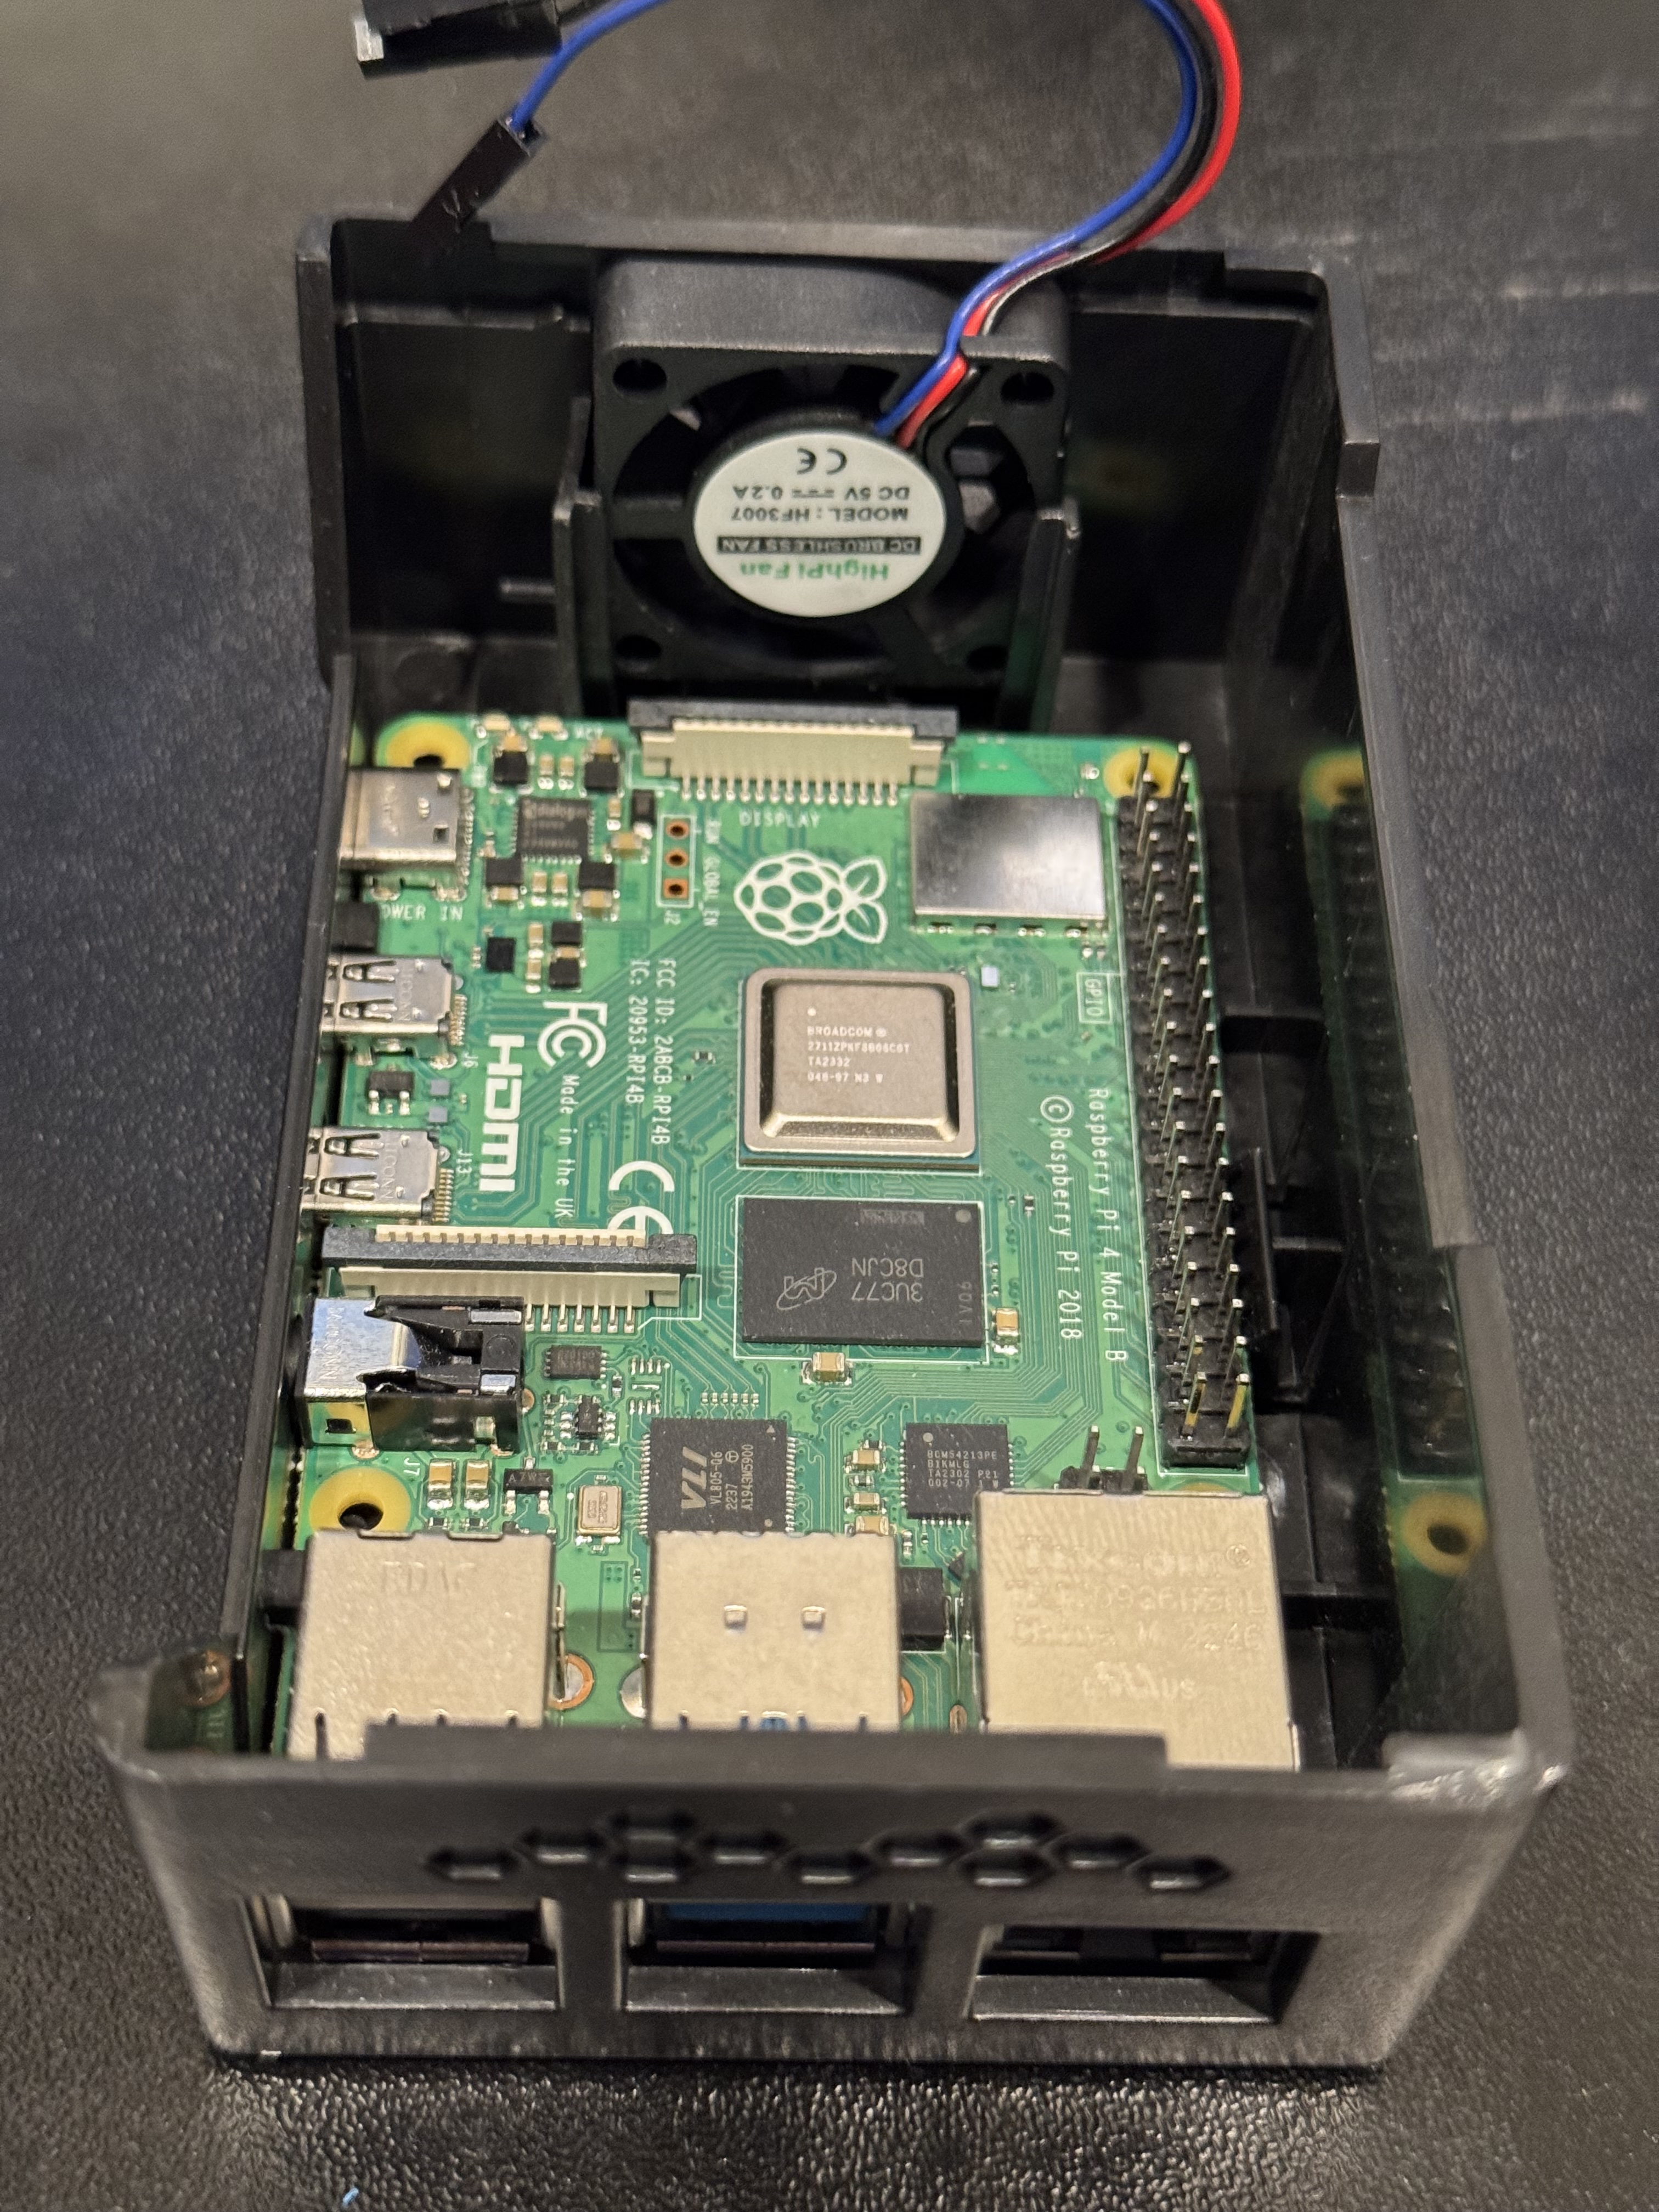
- Connect the Red Wire to Pin 4 (5V), Black Wire to Pin 6 (GND), and the Blue Wire to Pin 8 (GPIO14). Leave the Blue Wire unplugged if you want the fan to be always on.
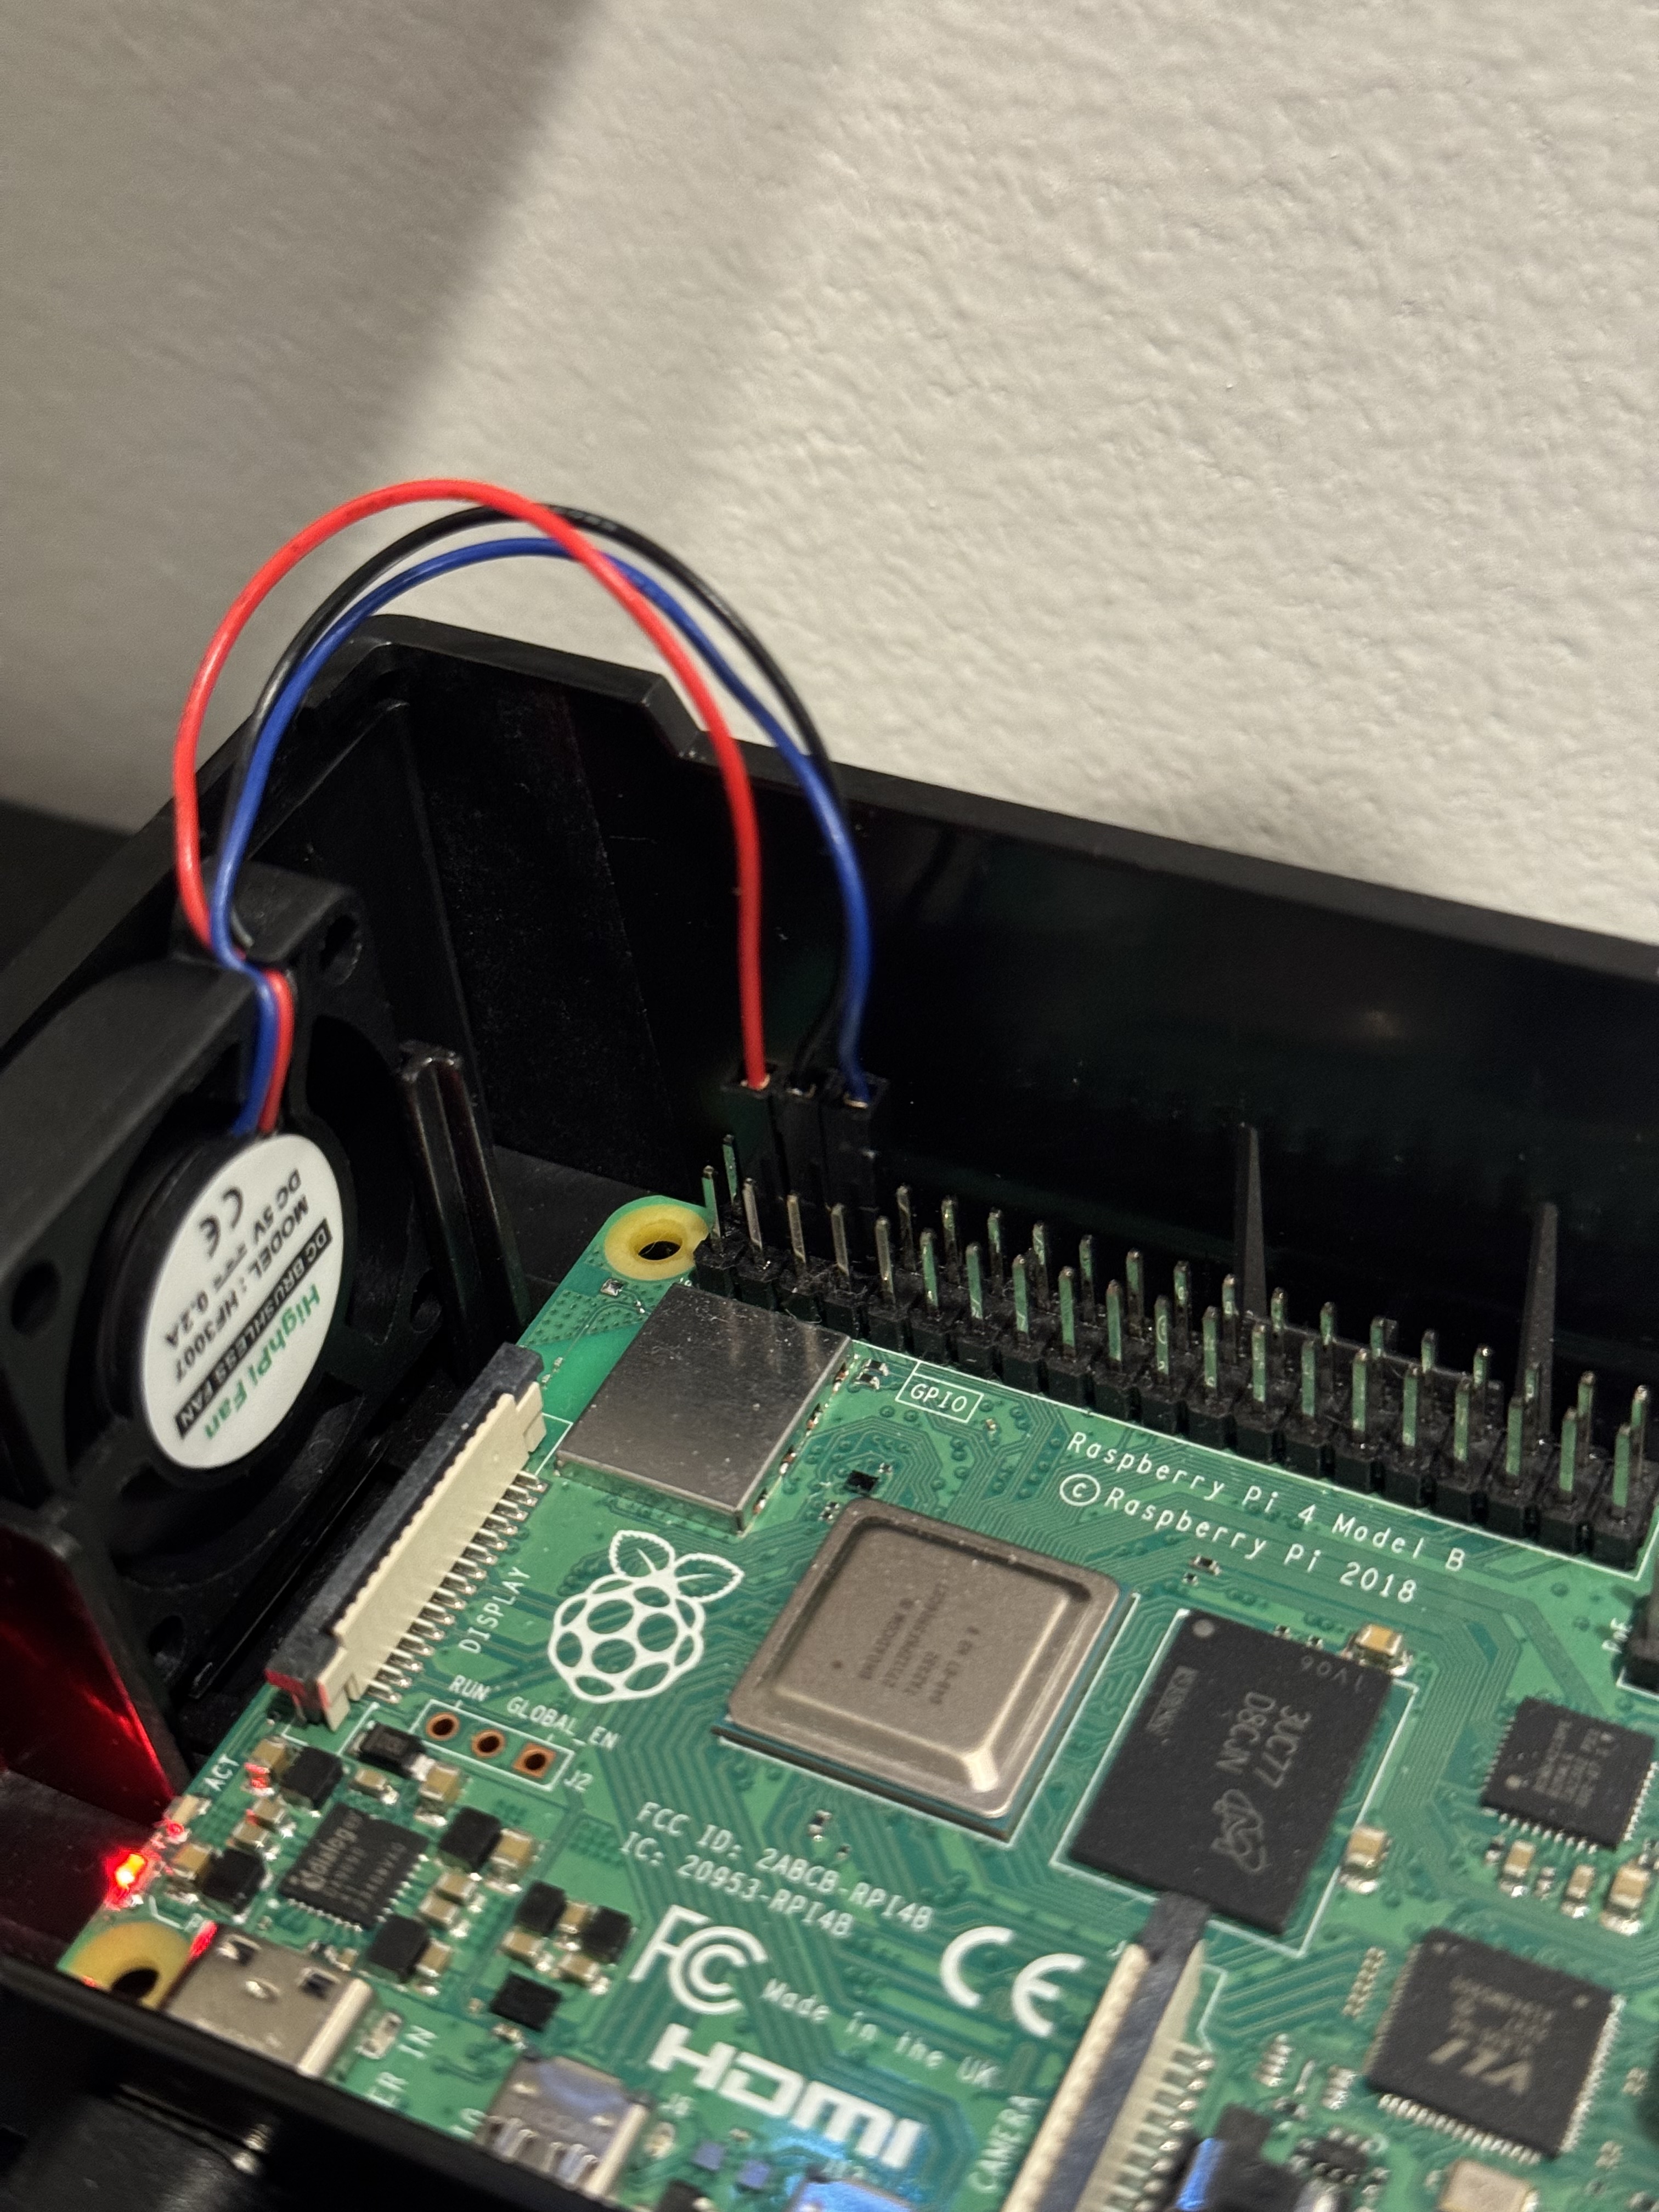
- Make sure everything is all set, if you are passionate about wire management, you can probably make it prettier than I did.
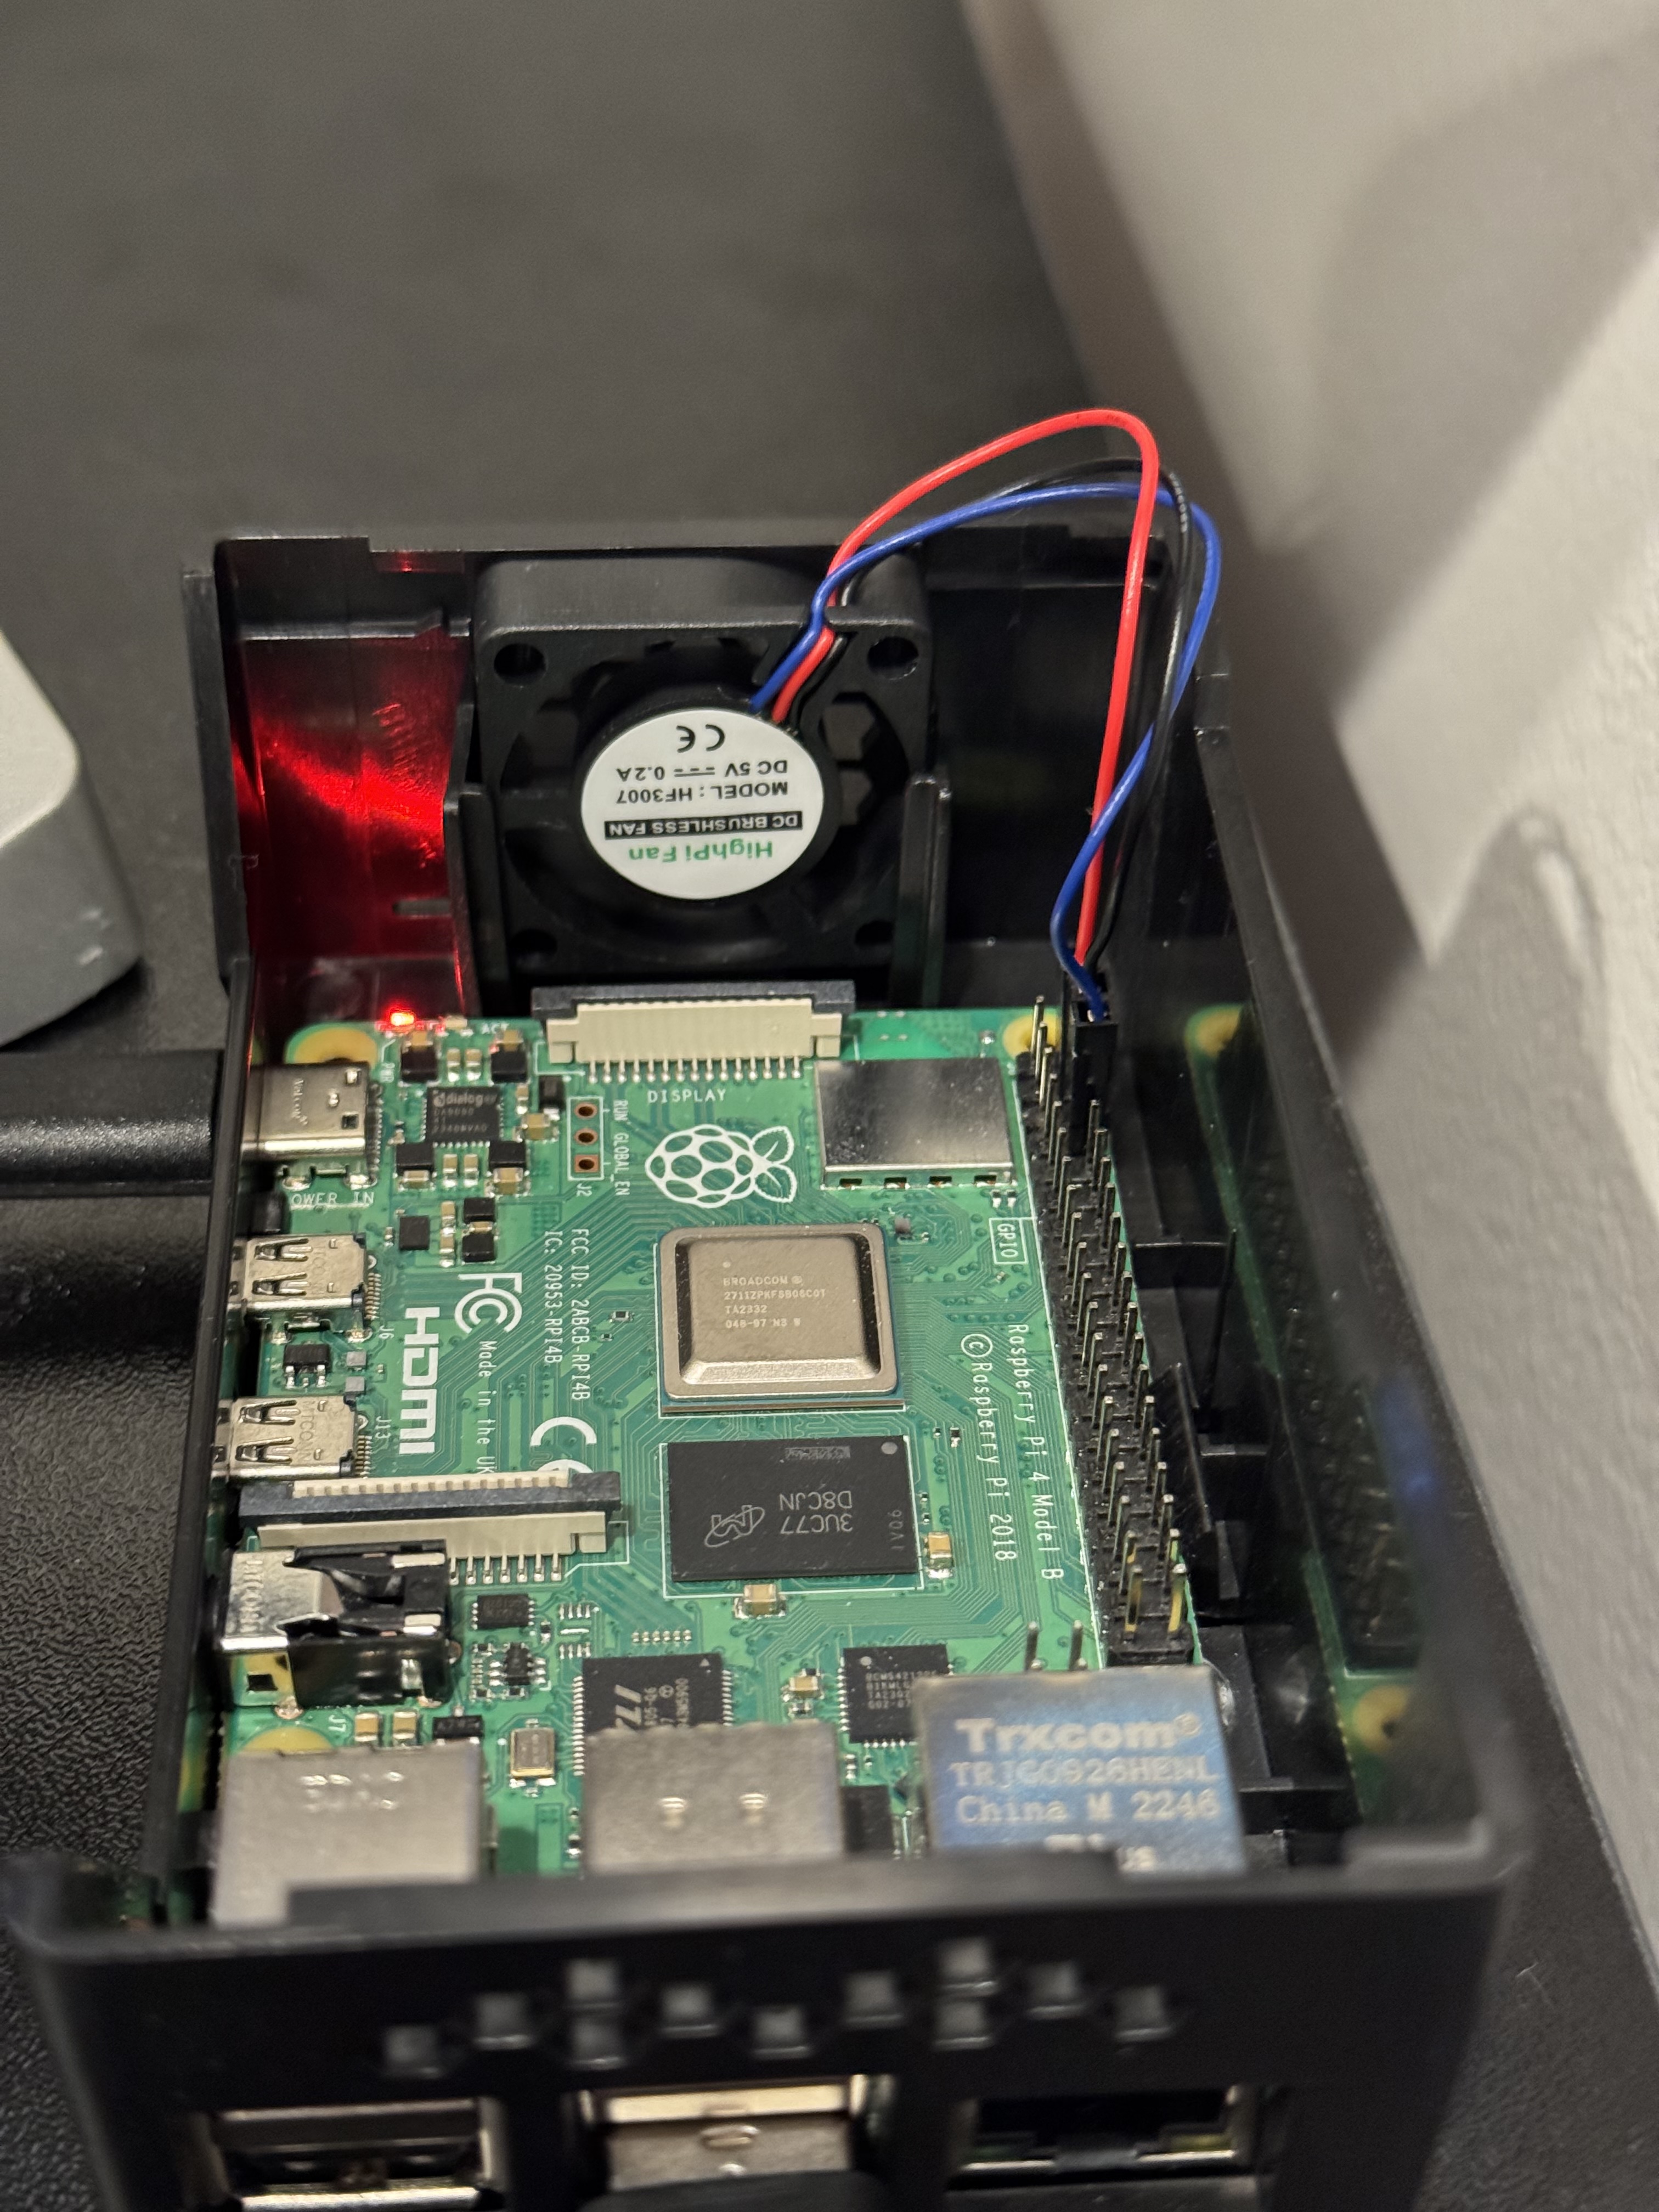
- Admire your handsome server
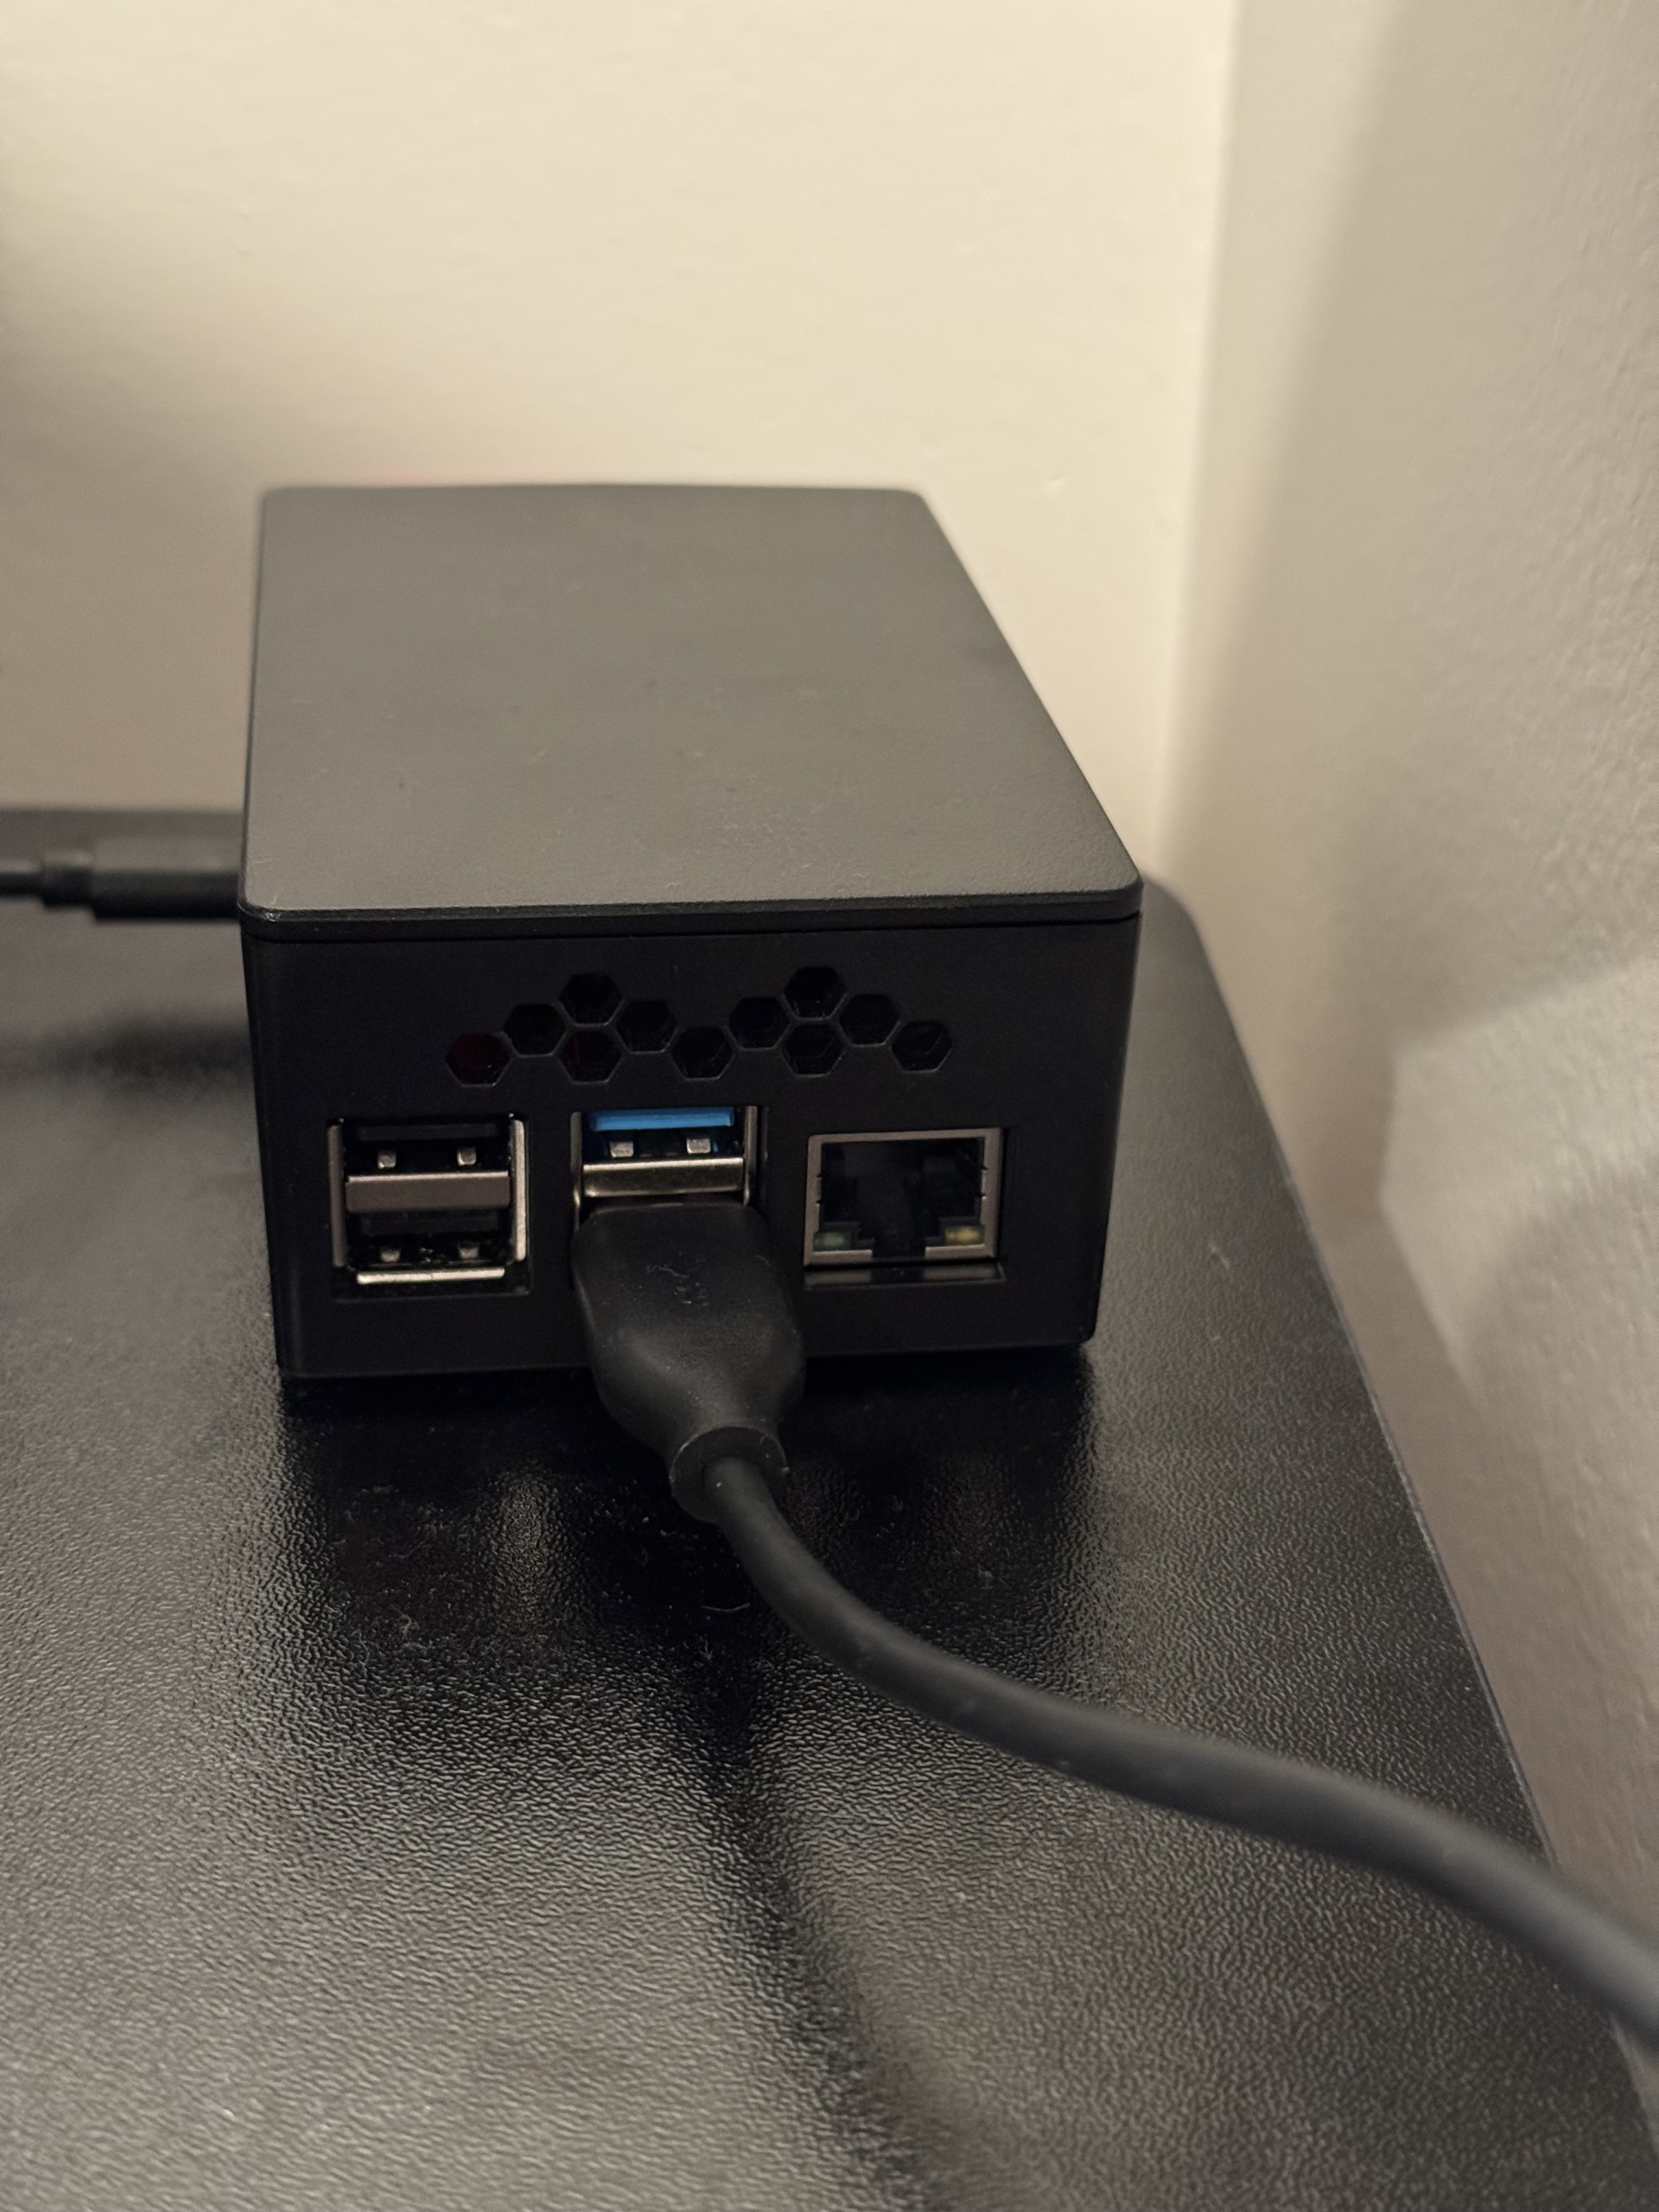
Now, we’re ready to move on to some of the fun stuff. If youre fan didn’t turn on right away, it’s probably because you followed my images and plugged in the blue (control) wire. When this is connected, it turns the fan off. From what I researched online, it sounds like there is a way to keep it plugged in and then configure the fans usage parameters. That being said, I felt like diving into managing a circuit board from your OS would have been too much of a tangent/rabbit hole for this guide, so that’s probably something I’ll explore in the future, separately.
Monitoring and Maintenance
Key Terms
System Monitoring Concepts:
- Monitoring: The process of observing and tracking system performance and status.
- Metrics: Measurable values that indicate performance or resource usage.
- Resource Utilization: The degree to which system resources are being used.
- Load Average: A measure of CPU utilization over time.
- Threshold: A predefined value that, when exceeded, may trigger notifications or actions.
- Baseline: Normal or expected performance values for comparison.
- Real-time Monitoring: Observing system status as it happens.
- Historical Data: Saved metrics showing performance trends over time.
- Alert: A notification triggered when monitored values exceed thresholds.
- Dashboard: A visual interface displaying multiple metrics at once.
Monitoring Tools and Commands:
top: A command-line utility showing real-time system resource usage.htop: An enhanced version of top with a more user-friendly interface.iotop: A utility for monitoring disk I/O usage by processes.iostat: A command that reports CPU and disk I/O statistics.vmstat: A tool that displays virtual memory statistics.free: A command that displays amount of free and used memory.df: A utility that reports filesystem disk space usage.du: A command that estimates file and directory space usage.netstat: A command-line tool that displays network connections, routing tables, and interface statistics.ss: A modern replacement for netstat for investigating sockets.
Maintenance Terminology:
- Patch: A piece of software designed to update or fix issues in a program.
- Update: New versions of software that add features or fix bugs.
- Upgrade: A significant update that may involve major changes.
- Package Manager: A system for installing, updating, and removing software packages.
apt: Advanced Package Tool, the package management system used by Debian and Ubuntu.- Repository: A storage location from which software packages can be retrieved.
- Dependency: A software package required by another package to function.
- Cleanup: The process of removing unnecessary files or data.
- Scheduled Maintenance: Regular, planned maintenance activities.
- Preventive Maintenance: Activities performed to prevent system failures.
Log Management:
- Log: A record of events that occur within the system.
syslog: A standard for message logging.journald: Systemd’s logging service that collects and stores logging data.- Log Rotation: The process of archiving and removing old log files.
- Log Level: The severity or importance assigned to a log entry.
stdout: Standard output stream where normal process output is written.stderr: Standard error stream where error messages are written.- Audit Log: A record of events relevant to security.
- logrotate: A utility that manages automatic rotation of log files.
- Centralized Logging: Collecting logs from multiple systems in a central location.
Monitoring and Maintenance Basics
For a 24/7 server, storage reliability is critical. A self-hosted server relies heavily on its storage device, and I/O errors can disrupt services and potentially lead to data loss. Monitoring your SSD’s health and properly configuring your system to handle power interruptions are essential practices for maintaining a reliable self-hosted server.
Continuous uptime demands proactive management rather than reactive troubleshooting. Without proper monitoring, subtle hardware degradation can progress undetected until catastrophic failure occurs, resulting in extended downtime and potential permanent data loss. Regular maintenance prevents small issues from cascading into system-wide failures and helps maintain consistent performance over time. For Raspberry Pi servers specifically, where hardware operates in potentially suboptimal conditions (varying temperatures, consumer-grade power supplies, and external storage), monitoring becomes even more crucial. Proper maintenance routines extend hardware lifespan, optimize resource usage, and ensure security vulnerabilities are promptly addressed. The slight overhead of implementing monitoring and scheduled maintenance is substantially offset by avoiding the significant costs of emergency recovery, both in terms of lost data and service disruption. Furthermore, systematically collected performance data enables informed decisions about capacity planning and system upgrades, ensuring your server evolves to meet changing demands without overprovisioning or unexpected resource exhaustion.
After chaning my boot media, I ended up with a an I/O error on my SSD, which resulted in data loss. To give a quick summary, this means the processs by which data is written to and read from memory had an issue. This section will walk through how to diagnose and resolve that issue, how and why to configure security updates on a patching schedule, finally how we can manage logs to ensure effective system information and memory usage.
Diagnosing and Resolving SSD Issues
1. Install the primary tool for storage health monitoring
# Always update your current system packages before installing a new one
sudo apt update
sudo apt install -y smartmontools
The smartmontools package provides utilities for monitoring storage devices using SMART (Self-Monitoring, Analysis, and Reporting Technology) - a monitoring system included in most modern storage devices. These tools allow you to check the internal health parameters of your storage device and identify potential issues before they lead to data loss.
2. Identify your SSD
sudo lsblk -o NAME,SIZE,MODEL,SERIAL,MOUNTPOINT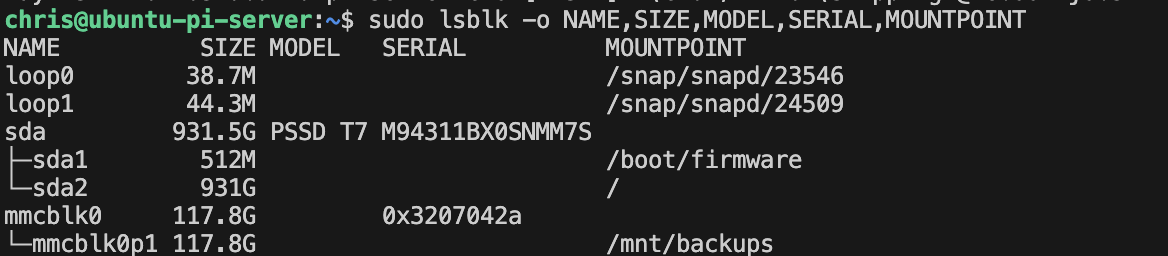
Remember, this command lists all block devices with their names, sizes, model information, serial numbers, and mount points. From the output, we can see:
- The Samsung T7 SSD (PSSD T7) is
/dev/sdawith a capacity of 931.5GB - It has two partitions:
sda1(boot partition) andsda2(root filesystem) - An SD card is mounted at
/mnt/backups
The -o flag specifies which columns to display, giving us a comprehensive view of all storage devices connected to the Raspberry Pi.
3. Check Basic SSD Health
sudo smartctl -H /dev/sda
The -H flag performs a basic health check, asking the drive to evaluate its own condition. The result “PASSED” indicates the drive believes it’s functioning properly at a hardware level. This is the quickest way to assess if the drive has detected any internal failures.
4. View Detailed SMART Information
sudo smartctl -a /dev/sda
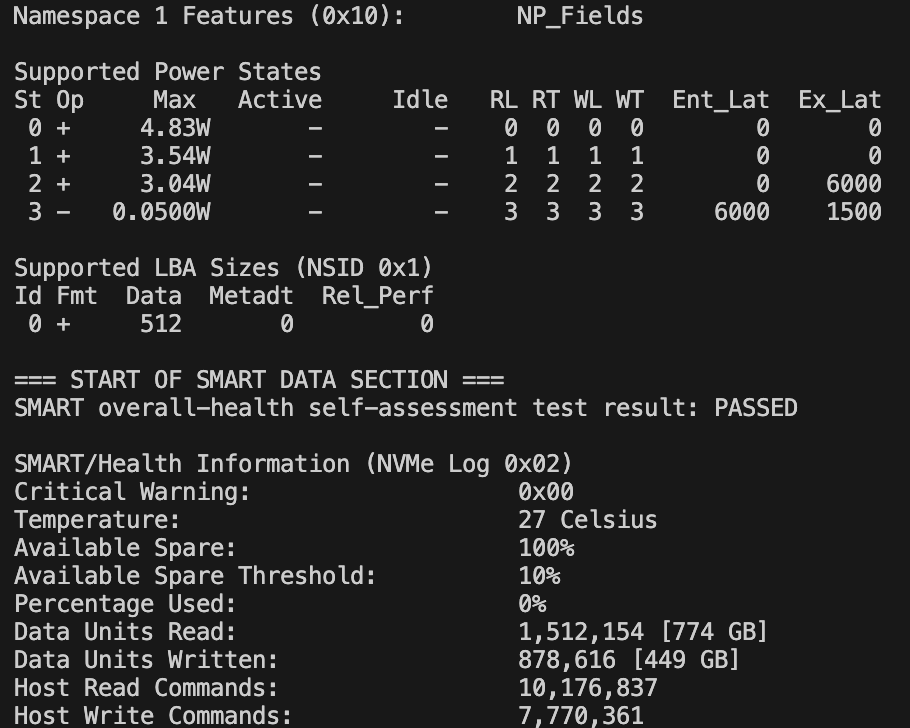
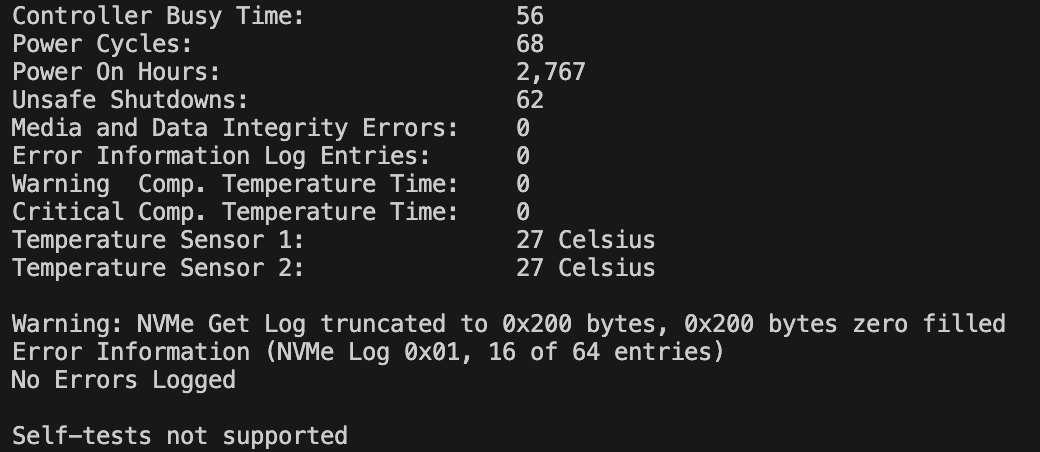
Key findings from the output:
- Temperature: 27°C (excellent, well below the 52°C warning threshold)
- Power On Hours: 2,673 (about 111 days)
- Unsafe Shutdowns: 61 (significant issue)
- Media and Data Integrity Errors: 0 (good)
- Available Spare: 100% (excellent)
- Percentage Used: 0% (drive health is excellent)
The 62 Unsafe Shutdowns occur when the system loses power or crashes without properly unmounting the filesystems. When this happens:
- Write operations may be interrupted: If the system is writing data to the SSD when power is lost, the write operation may be incomplete, leading to partially written files.
- Journal transactions remain unfinished: Modern filesystems like ext4 use journaling to track changes before they’re committed. Power loss can leave these journals in an inconsistent state.
- Filesystem metadata corruption: Critical filesystem structures may be left in an inconsistent state, potentially making files or directories inaccessible.
- Dirty cache data loss: Data waiting in the cache to be written to disk is lost during a sudden power cut.
These unsafe shutdowns are particularly problematic for SSDs because they use complex internal mechanisms like wear leveling and garbage collection. Interrupting these processes can lead to:
- Partial page programming
- Incomplete block erasures
- Inconsistent mapping tables
- Lost block allocation information
While modern SSDs have power loss protection mechanisms, consumer-grade external SSDs like the Samsung T7 may have limited protection compared to enterprise-grade drives. The high number (62) indicates a pattern of improper shutdowns, likely due to:
- Power interruptions to the Raspberry Pi
- This was definitely one of the issues I had
- I was using
sudo shutdown nowand then unplugging, rather than adding the-hflag to halt power - Sometimes, I just unplugged the power (this is bad too)
- System crashes requiring hard resets
- Unplugging the SSD without properly unmounting it
- This also happened at least once and was probably a major contributor
- Power saving features improperly configured
The -a flag displays all SMART information available from the drive, providing a comprehensive view of the drive’s health and history.
5. Attempt a SMART Self-Test
This step doesn’t apply, if you’re using the Samsung T7, because it doesn’t support self-tests, which you can see from the smartctl output. That being said, if you’re using an SSD that allows this, the step may be helpful. The Samsung T7 portable SSD doesn’t support SMART self-tests. This is common for external/portable SSDs, as they often implement a more limited set of SMART commands. The -t short flag attempts to initiate a short self-test, which would typically take a few minutes to complete.
sudo smartctl -t short /dev/sdaThis is the output I received.
smartctl 7.4 2023-08-01 r5530 [aarch64-linux-6.8.0-1024-raspi] (local build)
Copyright (C) 2002-23, Bruce Allen, Christian Franke, www.smartmontools.org
Self-tests not supported
6. Check Filesystem Integrity
# Check the boot partition
sudo fsck -n /dev/sda1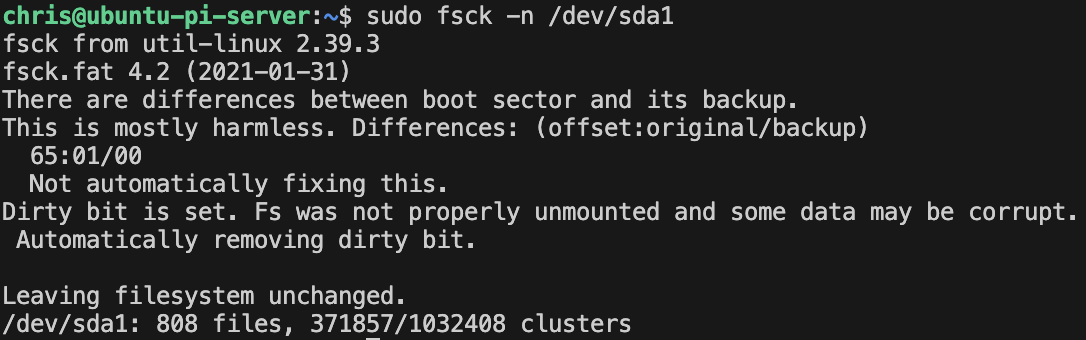
Output shows two issues:
- Differences between boot sector and backup
- Dirty bit set - indicating improper unmounting
# Check the root partition
sudo fsck -n /dev/sda2
Output indicates the filesystem is clean but warns it’s currently mounted.
- The
-nflag performs a read-only check without making changes, allowing you to safely examine mounted filesystems. - The findings confirm that improper shutdowns have affected the filesystem integrity, particularly on the boot partition.
7. Check System Logs for Errors
sudo dmesg | grep -i 'error\|ata\|sda\|failed\|i/o'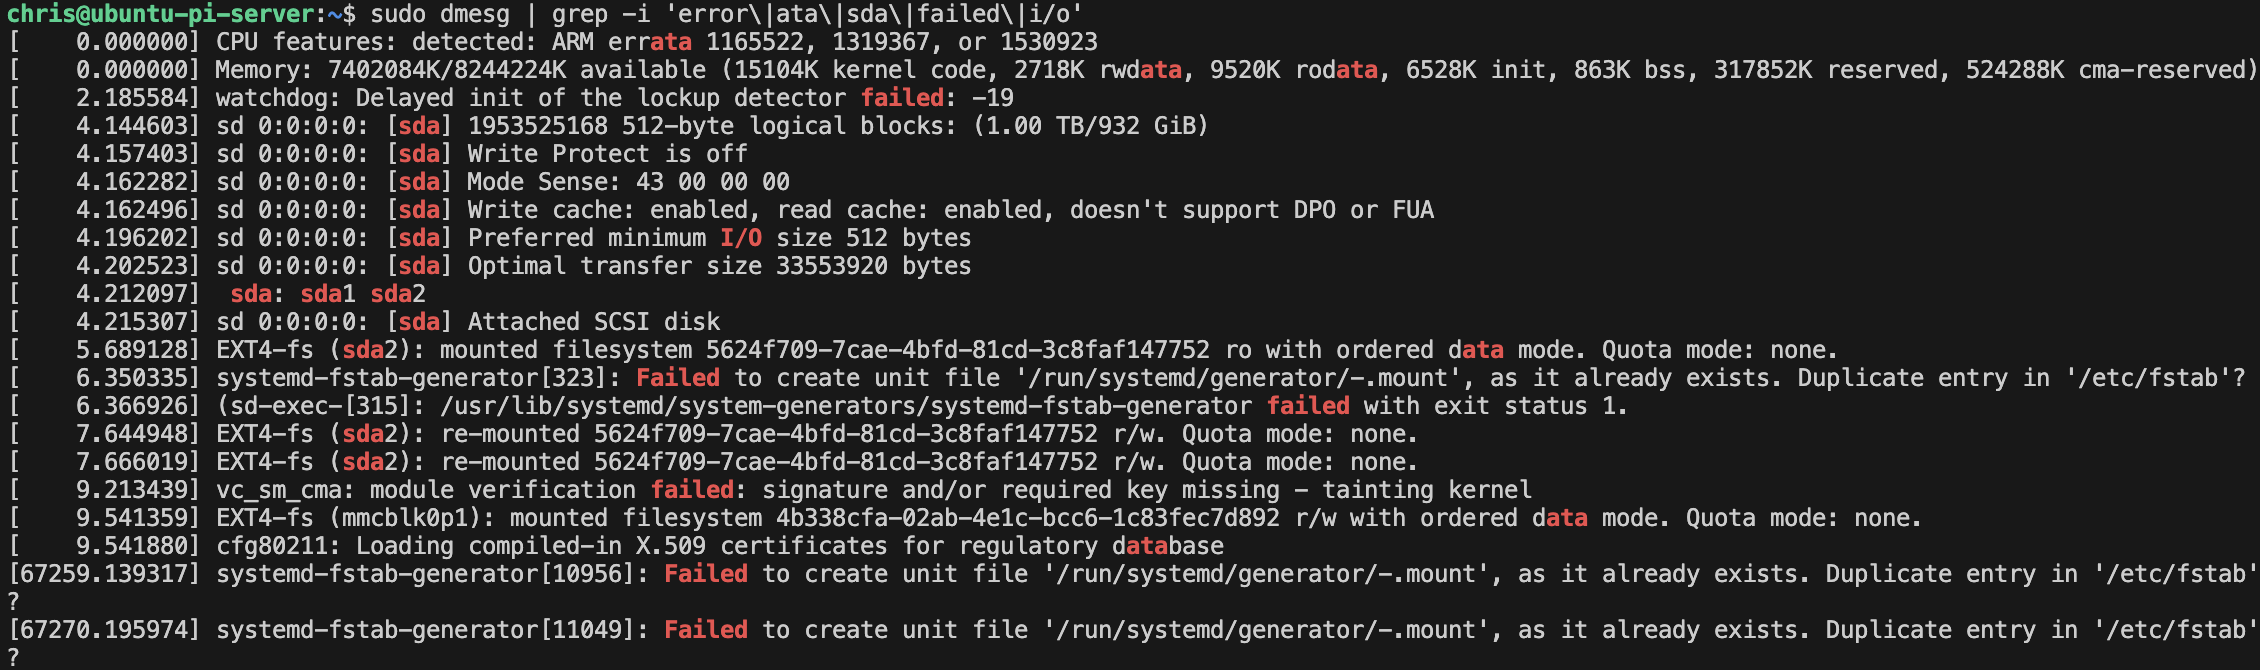
sudo journalctl -p err..emerg -o short-precise | grep -i 'sda\|disk\|i/o\|error'
sudo journalctl -u smartd
The output shows normal disk detection and mounting events, without indicating any current I/O errors. No errors related to the disk were found in the system journal. No entries found, indicating the SMART monitoring service isn’t running. These commands search through different system logs for any reported disk errors. The absence of current errors suggests that despite the history of unsafe shutdowns, the filesystem has remained resilient enough to recover without logging critical errors.
8. Check the Power Supply Status
vcgencmd get_throttled
Output: 0x0
This indicates no power-related issues have been detected since boot. The vcgencmd get_throttled command is specific to Raspberry Pi systems and reports if the system has experienced undervoltage, overheating, or other throttling conditions. A non-zero value would indicate power problems affecting the Raspberry Pi. The result 0x0 is good news, suggesting that your current power supply is adequate for normal operation.
Implementing Preventive Measures
1. Enable SMART Monitoring Service
# Configure the SMART monitoring service
sudo nano /etc/smartd.conf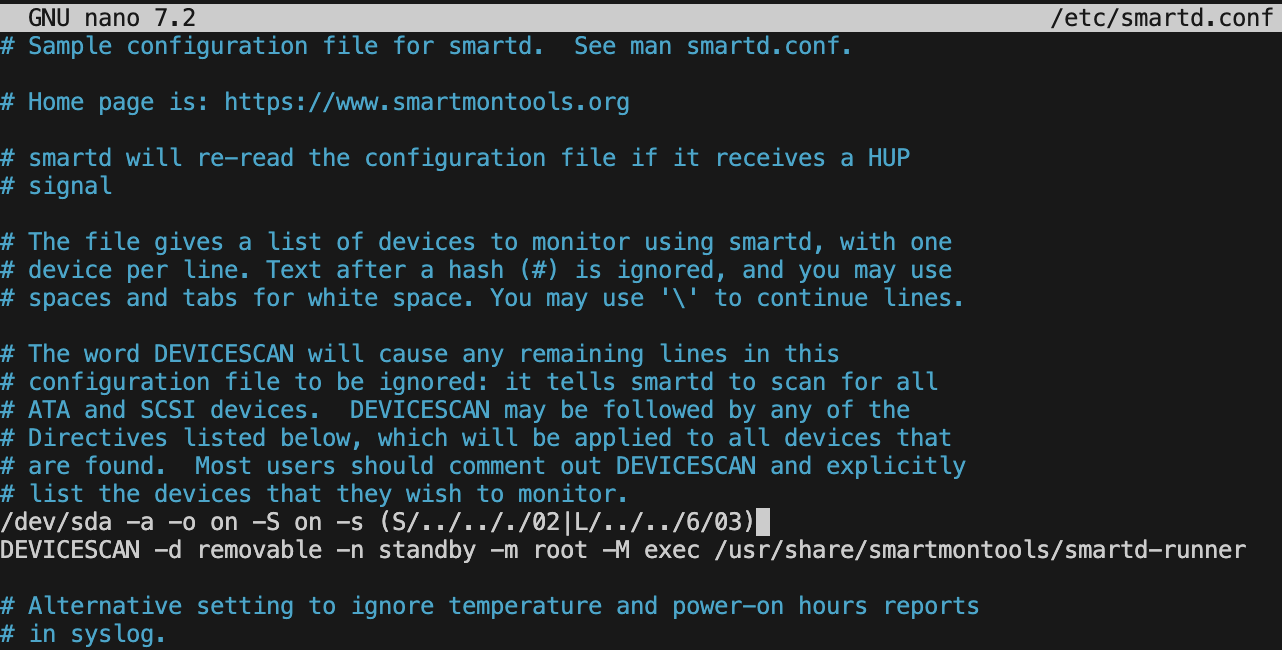
The SMART monitoring daemon (smartd) continuously checks your drive’s health and can alert you to developing issues. Add this line to monitor your SSD (replace sda with your device if different): /dev/sda -a -o on -S on -s (S/../.././02|L/../../6/03) -m root. This should go above the line with DEVICESCAN, because every configuration after it is ignored.
This configuration:
-a: Monitors all SMART attributes-o on: Enables automatic offline testing-S on: Saves error logs-s (S/../.././02|L/../../6/03): Schedules short tests at 2 AM daily and long tests on Saturdays at 3 AM-m root: Sends email alerts to the root user
Then enable and start the service.
sudo systemctl enable smartd
sudo systemctl start smartd
To receive email alerts, you’ll need to configure a mail transfer agent like postfix. Personally, I just didn’t include that functionality now, but it’s something I’ll eventually configure; however, I left it in for those curious. The SMART monitoring service provides proactive protection by continuously monitoring your drive’s health metrics. It can detect deteriorating conditions before they lead to data loss and send you notifications when potential issues are identified.
2. Configure Proper Filesystem Mount Options
# Edit /etc/fstab
sudo nano /etc/fstab

# Add specific options for your root partition
sudo blkid | grep sda2
Then add this line to your /etc/fstab file: UUID=your-uuid-here / ext4 defaults,noatime,commit=60 0 1. While your SSD partitions automatically mount at boot, optimizing the mount options can significantly improve resilience against power failures.
Let’s look at these options in detail:
defaults: This incorporates standard mount options:rw(read-write),suid(allow setuid),dev(interpret device files),exec(permit execution of binaries),auto(mountable with -a),nouser(only root can mount), andasync(asynchronous I/O).noatime: Disables updating access time attributes on files when they’re read. This reduces unnecessary write operations, which is especially beneficial for SSDs that have limited write cycles. Every time you read a file without this option, the system would write an update to the file’s metadata recording when it was last accessed.commit=60: Changes how often filesystem changes are committed to disk (in seconds). The default is 5 seconds, meaning data may stay in RAM for up to 5 seconds before being written to disk. Increasing this to 60 seconds reduces write operations but increases the potential for data loss during a crash. However, it’s a reasonable compromise for most systems.0: This refers to the dump flag. A value of 0 indicates the filesystem should not be backed up by the dump utility (which is rarely used these days).1: This is the fsck order. A value of 1 means this filesystem should be checked first during boot if a check is needed. The root filesystem always gets 1, while other filesystems get 2 or higher, or 0 to skip checks.
# Apply the changes without rebooting
sudo mount -o remount /
These optimized mount options help mitigate the impact of unexpected shutdowns by reducing unnecessary writes and ensuring more efficient I/O operations. The trade-off between performance and data safety is balanced by the commit interval - 60 seconds provides reasonable protection while reducing write pressure.
By implementing the following measures:
- Verifying adequate power supply: The vcgencmd get_throttled output of 0x0 indicates your current power supply is stable.
- Enabling SMART monitoring: Setting up the smartd service provides ongoing monitoring and early warning of potential drive issues.
- Optimizing filesystem mount options: The modified fstab entries with noatime and commit=60 strike a balance between reducing unnecessary writes and maintaining data integrity.
These implementations together create a more resilient system that:
- Continuously monitors drive health
- Reduces unnecessary write operations that contribute to SSD wear
- Balances performance with data integrity requirements
- Provides early warning of developing issues
For a 24/7 self-hosting server, these measures provide essential protection against the most common causes of data loss and system instability. While no solution can completely eliminate the risk from sudden power loss, these configurations significantly reduce the likelihood of filesystem corruption and data loss.
Log Management
Effective log management is crucial for maintaining system health, troubleshooting issues, and detecting security incidents on your Raspberry Pi server. Logs provide insights into system behavior, application performance, and potential security threats. This section will cover fundamental log concepts and practical strategies for managing logs efficiently.
Log Basics
Linux logs record events occurring within the system and applications, providing essential information for monitoring and troubleshooting. Understanding where logs are stored and how to interpret them allows you to efficiently diagnose problems and maintain system health.
Let’s explore the key log locations on your Ubuntu-based Raspberry Pi server:
# View the main system log
sudo tail -n 50 /var/log/syslog

# View authentication attempts
sudo tail -n 50 /var/log/auth.log

# View kernel messages
sudo dmesg | tail -n 50

# View systemd journal logs
sudo journalctl -n 50
Key log files and their purposes:
/var/log/syslog: General system messages and activities/var/log/auth.log: Authentication and authorization events/var/log/kern.log: Kernel messages and warnings/var/log/dpkg.log: Package installation and removal logs/var/log/apt/: APT package management activities/var/log/fail2ban.log: Failed login attempt blocks/var/log/nginx/: Web server logs (if nginx is installed)
Ubuntu Server uses two primary logging systems:
- Traditional syslog: Text files stored in /var/log/
- Systemd journal: Binary logs accessed through journalctl
# View only error and higher severity messages
sudo journalctl -p err..emerg
Log severity levels (from lowest to highest):
debug: Detailed debugging informationinfo: Normal operational messagesnotice: Normal but significant eventswarning: Potential issues that aren’t errorserr: Error conditionscrit: Critical conditions requiring attentionalert: Actions that must be taken immediatelyemerg: System is unusable
Management Tools and Strategy
Proper log management ensures you can efficiently access the information you need while preventing logs from consuming excessive disk space. A balanced strategy involves log rotation, centralized collection, and automated monitoring.
First, let’s configure logrotate to manage log file growth. We can also create a custom logrotate config for application logs. While this doesn’t apply to anything we’ve done yet, it will be useful once you start developing and deplying applications on your server. I’ll include this below for anyone that wants a starting point.
# Examine the main logrotate configuration
cat /etc/logrotate.conf

# View the service-specific configurations
ls -l /etc/logrotate.d/

# Customize application log management
sudo nano /etc/logrotate.d/myapplogs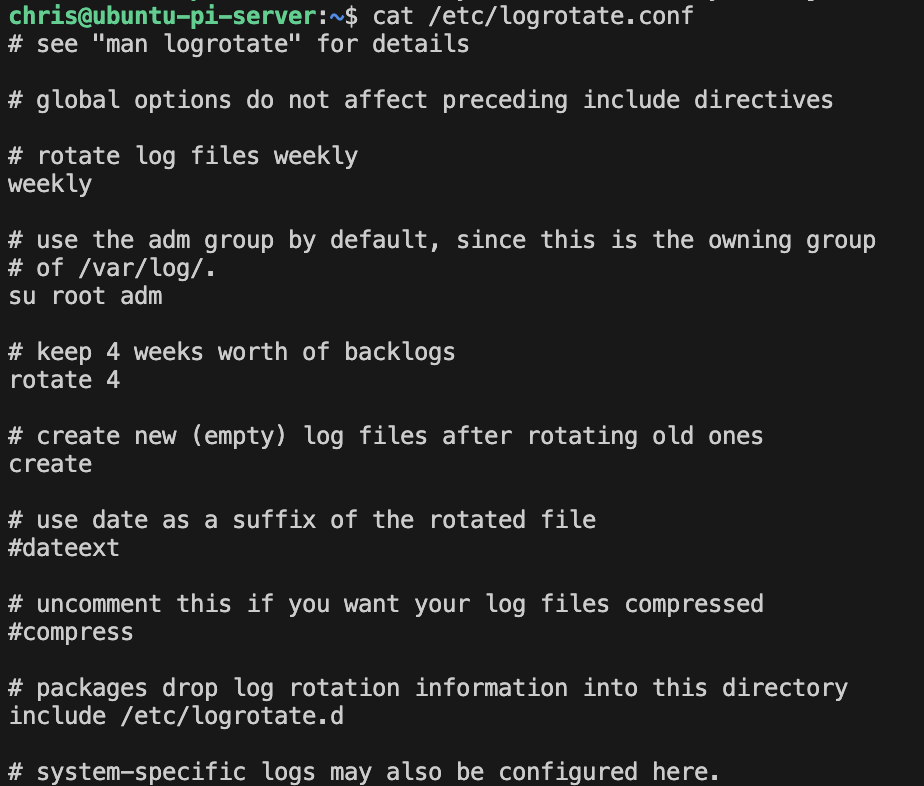
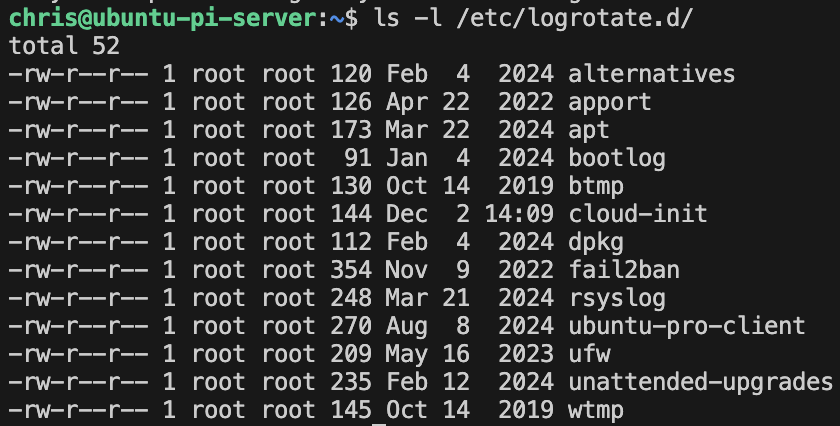
/home/chris/apps/*/logs/*.log {
    weekly
    rotate 4
    compress
    delaycompress
    missingok
    notifempty
    create 0640 chris chris
}
This configuration:
weekly: Rotates logs once per weekrotate 4: Keeps 4 rotated log files before deletioncompress: Compresses rotated logs with gzipdelaycompress: Delays compression until the next rotation cyclemissingok: Doesn’t generate errors if log files are missingnotifempty: Doesn’t rotate empty log filescreate 0640 chris chris: Creates new log files with specified permissions and ownership
Then, let’s setup some persistent storage for our journal logs.
# Configure persistent storage for journal logs
sudo nano /etc/systemd/journald.conf
[Journal]
Storage=persistent
Compress=yes
SystemMaxUse=500M
SystemMaxFileSize=50M
MaxRetentionSec=1month# Apply changes
sudo systemctl restart systemd-journaldThis configuration:
Storage=persistent: Saves logs across rebootsCompress=yes: Compresses older journal filesSystemMaxUse=500M: Limits total journal size to 500MBSystemMaxFileSize=50M: Limits individual journal files to 50MBMaxRetentionSec=1month: Automatically removes logs older than a month
For more detailed systemd journal queries:
# View logs from a specific service
sudo journalctl -u ssh

# View logs from a specific time period
sudo journalctl --since "2024-05-10" --until "2024-05-12"

# View logs from the current boot
sudo journalctl -b
Advanced log management strategies include:
- Centralized logging: Consider setting up a central log server for multiple devices using rsyslog.
- Log analysis tools: For more sophisticated analysis, tools like Logwatch provide automated log summaries.
- Security monitoring: Configure fail2ban to monitor logs for security threats and respond automatically.
- Custom alerting: Set up alerts for specific critical events using simple grep scripts and cron jobs.
These log management practices ensure your Raspberry Pi server maintains manageable, accessible logs while providing the information needed for effective system monitoring and troubleshooting.
Docker
Key Terms
Container Concepts:
- Container: A lightweight, standalone, executable package that includes everything needed to run an application.
- Image: A read-only template containing instructions for creating a container.
- Containerization: The process of packaging an application with its dependencies into a container.
- Isolation: The separation of applications from each other and the underlying system.
- Virtual Machine (VM): A virtualized instance of an operating system running on hypervisor software.
- Container Runtime: Software that executes containers and manages their lifecycle.
- Namespace: A Linux kernel feature that isolates system resources for containers.
- Control Group (
cgroup): A Linux kernel feature that limits, accounts for, and isolates resource usage of process groups. - Layer: A set of read-only files that represent filesystem differences in a Docker image.
- Union Filesystem: A filesystem service that layers multiple directories into a single unified view.
Docker Specific Terminology:
- Docker: A platform for developing, shipping, and running applications in containers.
- Docker Engine: The runtime that builds and runs Docker containers.
- Docker Hub: A cloud-based registry service for Docker images.
- Docker Desktop: An application for managing Docker on Windows and Mac.
- Dockerfile: A text file containing instructions to build a Docker image.
- Docker Compose: A tool for defining and running multi-container Docker applications.
- Docker Swarm: A native clustering and orchestration solution for Docker.
- Docker Network: A communication system that enables containers to communicate with each other and the outside world.
- Docker Volume: A mechanism for persisting data generated by and used by Docker containers.
- Docker Registry: A storage and distribution system for Docker images.
Container Management:
- Tag: A label attached to an image version for identification.
- Repository: A collection of related Docker images with the same name but different tags.
- Pull: The action of downloading an image from a registry.
- Push: The action of uploading an image to a registry.
- Build: The process of creating a Docker image from a Dockerfile.
- Run: The command to start a container from an image.
- Exec: A command to run additional processes in a running container.
- Commit: Creating a new image from changes made to a container.
- Stop/Start: Commands to halt and resume container execution.
- Remove: The action of deleting a container or image.
CI/CD with Containers:
- CI/CD (Continuous Integration/Continuous Deployment): Practices that automate the integration and deployment of code changes.
- Pipeline: A series of automated steps that code changes go through from development to production.
- Build Automation: The process of automating the creation of software builds.
- Integration Testing: Testing the interaction between integrated units/modules.
- Deployment Strategy: A planned approach for releasing changes to production.
- Artifact: A byproduct of software development, such as a compiled application or container image.
- Registry Authentication: The process of securely accessing a container registry.
- Webhook: An HTTP callback triggered by specific events in a development workflow.
- GitHub Actions: GitHub’s built-in CI/CD tool.
- Jenkins: An open-source automation server often used for CI/CD.
Kubernetes
Key Terms
Kubernetes Architecture:
- Kubernetes (K8s): An open-source platform for automating deployment, scaling, and management of containerized applications.
- Cluster: A set of worker machines (nodes) that run containerized applications managed by Kubernetes.
- Control Plane: The container orchestration layer that exposes the API and interfaces to define, deploy, and manage the lifecycle - of containers.
- Node: A worker machine in Kubernetes, which may be a virtual or physical machine.
- Master Node: A node that controls the Kubernetes cluster.
- Worker Node: A node that runs applications and workloads.
kubelet: An agent that runs on each node to ensure containers are running in a Pod.kube-proxy: A network proxy that runs on each node to maintain network rules.etcd: A consistent and highly-available key-value store used as Kubernetes’ backing store for all cluster data.- Container Runtime Interface (CRI): The primary protocol for communication between kubelet and container runtime.
Kubernetes Resources:
- Pod: The smallest deployable unit in Kubernetes that can contain one or more containers.
- Deployment: A resource that provides declarative updates for Pods and ReplicaSets.
- ReplicaSet: A resource that ensures a specified number of pod replicas are running at any given time.
- Service: An abstraction which defines a logical set of Pods and a policy by which to access them.
- Namespace: A mechanism to divide cluster resources between multiple users or projects.
- ConfigMap: A resource that stores non-confidential data in key-value pairs.
- Secret: A resource that stores sensitive information such as passwords and tokens.
- Volume: A directory accessible to all containers in a pod, which may be backed by various storage types.
- Ingress: A resource that manages external access to services in a cluster, typically HTTP.
- StatefulSet: A resource used to manage stateful applications.
Kubernetes Management:
kubectl: The command-line tool for interacting with a Kubernetes cluster.kubeadm: A tool for creating and managing Kubernetes clusters.- Helm: A package manager for Kubernetes that helps install and manage applications.
- Manifest: YAML or JSON files that describe Kubernetes resources.
- Scaling: Increasing or decreasing the number of replicas of an application.
- Self-healing: The ability of Kubernetes to automatically replace failed containers.
- Rolling Update: A deployment strategy that updates pods one at a time without service interruption.
- Blue-Green Deployment: A deployment strategy that maintains two production environments.
- Canary Deployment: A deployment strategy that releases a new version to a small subset of users.
- Affinity/Anti-Affinity: Rules that influence pod scheduling based on the topology of other pods.
Distributed Computing:
- Distributed System: A system whose components are located on different networked computers.
- PySpark: The Python API for Apache Spark, a unified analytics engine for large-scale data processing.
- Data Parallelism: A computation pattern where the same operation is performed on different pieces of data simultaneously.
- Task Parallelism: A computation pattern where different operations are performed simultaneously.
- Worker: A node or process that executes assigned tasks.
- Master: A node or process that coordinates the distribution of tasks to workers.
- Job: A complete computational task, often broken down into smaller tasks.
- Task: A unit of work assigned to a worker.
- DAG (Directed Acyclic Graph): A structure used to represent the sequence of operations in a job.
- Resource Allocation: The process of assigning computational resources to jobs or tasks.